

Creating and editing sections
| Table of contents |
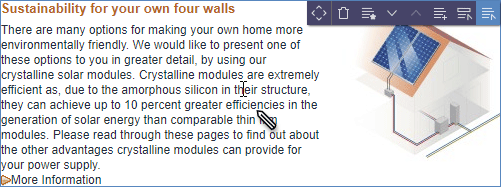
Hovering the mouse pointer over the preview page displays a frame and icons where sections can be edited or created from scratch.
Actions
The following functions can be available:
![]() Rule violations: Depending on the project configuration, this icon is used to display what are known as “rule violations”.
Rule violations: Depending on the project configuration, this icon is used to display what are known as “rule violations”.
See also page Rule violations.
![]() Move: A section can be moved to another position on the current page using this icon.
Move: A section can be moved to another position on the current page using this icon.
When using multi-column layouts, it may not always be possible to move sections to another column.
![]() Show History: Opens the Project history report. You can check there what changes have been made to the element and restore older states.
Show History: Opens the Project history report. You can check there what changes have been made to the element and restore older states.
![]() Show References: Opens the References report. You can check there which elements are referenced with this section.
Show References: Opens the References report. You can check there which elements are referenced with this section.
![]() Execute script: Click this icon to execute a script (project-specific function extension), if available.
Execute script: Click this icon to execute a script (project-specific function extension), if available.
![]() Delete: Click this icon to delete the selected section.
Delete: Click this icon to delete the selected section.
![]() Move up: Click this icon to move the selected section up one position.
Move up: Click this icon to move the selected section up one position.
![]() Move down: Click this icon to move the selected section down one position.
Move down: Click this icon to move the selected section down one position.
![]() New section: Click this icon to add a new section after the selected section on the current page. A list of all available
New section: Click this icon to add a new section after the selected section on the current page. A list of all available
- section master copies
 You can create section references on the basis of section master copies (see below).
 - section templates
will be displayed.
Duplicate section: Use this function to copy the selected section. An edit window opens with all input elements and the saved content of the selected section. After clicking on the “Save” button, the window closes and the section is inserted after the section to be duplicated.
Alternatively, sections can be created via project-dependent options, such as an icon or a button on the page:  . If the settings have been configured accordingly by the template developer, these icons / buttons can also be used to create sections with drag-and-drop.
![]() Use as master copy: Click this icon to create a master copy from the selected section. A section marked as a master copy can be used when creating new sections and section references.
Use as master copy: Click this icon to create a master copy from the selected section. A section marked as a master copy can be used when creating new sections and section references.
![]() No longer use as master copy: Click this icon to deselect a section as a master copy.
No longer use as master copy: Click this icon to deselect a section as a master copy.
![]() Edit metadata: Click this icon to open a dialog for editing metadata.
Edit metadata: Click this icon to open a dialog for editing metadata.
Whether the function is available and which metadata can be edited depends on the project developer's specifications.
Metadata is additional information about an element (page, section, media file, etc.) that can be saved, but which is not necessary for the person viewing the page. This way, for instance, the last changed date for a page or the last editor of a page can be saved.
![]() Edit: Click this icon to open an edit window with all of the input elements of the respective element.
Edit: Click this icon to open an edit window with all of the input elements of the respective element.
![]() Edit section reference: This icon appears in place of the original “Edit” icon if the object involved is a reference for another section.
Edit section reference: This icon appears in place of the original “Edit” icon if the object involved is a reference for another section.
An edit window with all of the input elements from the selected section opens.
 |
Changes made to section references have an effect on other pages or in other sections. |
Section references
Section references can be used in FirstSpirit to reuse content across multiple pages.
Unlike a copy, changes to section references (or to the so-called “source section”) affect all referenced sections simultaneously.
You can create section references using the function “New section”:
 in the preview
  in the navigation bar
To do this, the section must be available as a master copy.
![]() A section reference of the respective paragraph can then be created via this icon.
A section reference of the respective paragraph can then be created via this icon.
If there is not yet a master copy of the section from which you want to create a section reference, proceed as follows (preview / navigation bar):
 /
/  Click this icon of the section from which you want to create a section reference.
- Go to the page where you want to create the section reference.
- / Click this icon of the section behind which you want to create the section reference.
Or. - In the selection list in the “Masters” area, click this icon of the desired master copy.
- The selection list closes and the section reference appears on the page after the previously selected section.
You can check whether the section you want to use as a section reference already exists as a master copy as follows:
- on the section itself: does not exist as a master copy
 already exists as a master copy
 - in the Bookmarks report
- in the navigation bar (Page tab): does not exist as a master copy
 already exists as a master copy
Nested areas within a section
Consolidated icon bars
In the case of multiple overlapping levels, the corresponding icon bars are grouped into a single bar. The actions for the different levels are displayed from inside (on the right in the icon bar) to outside (on the left in the icon bar).
If the mouse pointer is hovered over an icon in the icon bar, highlighting is used to visualize which level the relevant action relates to.
As soon as an action appears multiple times in a consolidated icon bar, the instances of the same action are grouped together and displayed as an icon with an arrow symbol.
The user can click on the icon and use a popup menu to select the actual action or the level for which the action is to be performed.
Other project-specific icons
In addition to the standard icons mentioned above, the project-specific expandability of ContentCreator also allows the incorporation of project-specific icons with project-specific functions. The appearance of the icons listed here may therefore differ from the icons actually used in the project.
![]() Translation help: This icon opens the Content for translation dialog which can be used to transfer the content from language A into corresponding input elements of language B. The language into which the content is to be translated can then be selected by clicking the mouse. See also the Use of multiple languages page.
Translation help: This icon opens the Content for translation dialog which can be used to transfer the content from language A into corresponding input elements of language B. The language into which the content is to be translated can then be selected by clicking the mouse. See also the Use of multiple languages page.
Editing an individual input element
Depending on the input element type and configuration, an individual input element can be edited instead of the entire section, and this can even be done in a simple window with reduced functionality if necessary. Hovering the mouse pointer over an input field for a moment changes the mouse pointer into a pencil.
The input field has to have been configured by the template developer accordingly to do this. This is only possible for the following input elements:
- Single-line text entry (CMS_INPUT_TEXT)
- Multi-line text entry (CMS_INPUT_TEXTAREA)
- Rich text editor (CMS_INPUT_DOM)
- Rich text editor for tables (CMS_INPUT_DOMTABLE)
- Date and time (CMS_INPUT_DATE)
- Numbers (CMS_INPUT_NUMBER)
- Reference selection (FS_REFERENCE)
![]() Edit input element: Press and hold down the Ctrl key and click with the mouse to open the content of the selected input element for editing in a simple window. If text has been highlighted on the page and the
Edit input element: Press and hold down the Ctrl key and click with the mouse to open the content of the selected input element for editing in a simple window. If text has been highlighted on the page and the ![]() icon has been clicked for this text, the highlighting is applied (to the extent it can be) in the window that opens.
icon has been clicked for this text, the highlighting is applied (to the extent it can be) in the window that opens.
Depending on the input element type, only the following are possible in this mode:
- Text entries
- Text deletions
- Line breaks
- Reference selections
In addition, using a context menu:
- Existing formatting can be removed
- Existing links can be edited or removed
No new formatting or links can be added. In order to add links and formatting, the view has to be changed to the edit window (![]() icon).
icon).
![]() Content has been entered or modified. The changes have to be saved by clicking this icon, then the window closes.
Content has been entered or modified. The changes have to be saved by clicking this icon, then the window closes.
![]() No changes have been made.
No changes have been made.
![]() Closes the window. Changes made to content are lost.
Closes the window. Changes made to content are lost.
![]() Opens the edit window with the form where the current content is located. Changes already made in this window are applied.
Opens the edit window with the form where the current content is located. Changes already made in this window are applied.
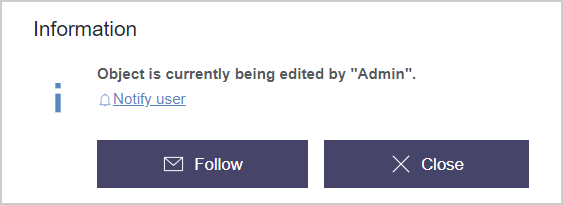
When the content to be edited is currently being edited by another editor, the dialog opposite is displayed if individual input elements need to be edited (Ctrl + click).
Click Notify user to tell editor B, who is currently editing the object, that editor A would like to edit the object (on the top left in ContentCreator). The text changes to “Notified at 14:03” if the window remains open.
Click the button Follow to close the edit window. As soon as editor B has finished editing the object, editor A is notified:
- Underneath the menu bar
- In the report area (see Notifications)