

Working with datasets
| Table of contents |
For content that was captured and can be displayed well, FirstSpirit offers an additional, important option for maintenance: the “datasets” (see also: Content that can be re-used).
Datasets enable another editing and use of content on the website as sections and pages.
In this way, for example, datasets of a type (the data all come from the same content source) which are created by the editor are automatically distributed on the desired page. And, according to the criteria defined by the project developer, such as products according to category, press releases according to a date and timeframe, contact addresses according to countries or cities, etc.
Generally, there are two ways to create and edit datasets in ContentCreator:
- in the data source view
- in the preview itself
Editing in the data sources view
The data sources view displays datasets in data sources. That is, without the context of a page on which the record may be output.
The data source view allows a clear representation of datasets in table form.
See also page Data sources.
Editing in the preview
If datasets are output on a page in ContentCreator, they can usually also be edited directly there. Unlike in the data source view, the editor has a content context available in this case.
Entry of content in datasets in the preview is almost identical to maintenance sections or pages. Certainly, the use or output is different from the use of “normal” sections and pages:
- Content entered in Sections can be freely positioned by the editor, within certain specifications. In other words, the order and appearance of the sections of a page are variable.
- The use of datasets is different: Already during project development, it is established where and how the datasets are displayed on the website. The content administration for this purpose is frequently done elsewhere in the project.
In this way, it is, for example, possible for the project developer to limit the number of datasets shown on a page. With that, overview and detail pages of datasets can be created.
This is to be explained more closely based on the example below:
Overview view
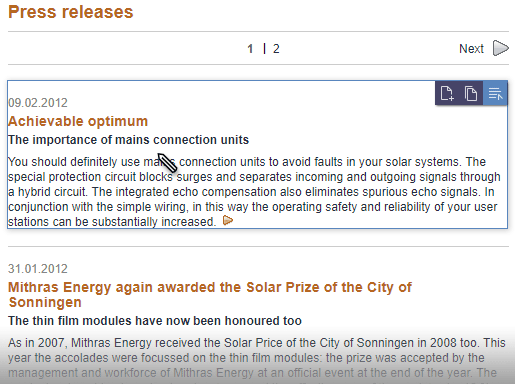
Using the “Press - Press releases” menu item, the press releases are shown in an overview.
- The view was limited to three entries per page by the project developer. Through this, the overview is distributed across multiple pages.
- With the buttons Forward and Back, you can page through the individual overview pages.
- Via the page numbers in the center, a page can also be queried directly.
- Only a text excerpt, called a “teaser”, is shown.
- The latest entry is always shown first.
Detail view

By simply clicking on a press release in the overview, you are switched to the detail view; in other words, now all information on the selected press release is shown on the page.
- The was limited to one entry per page by the project developer.
- With the buttons Forward and Back, you can page through the entries in the detail view.
- Using the page number in the center, the detail view of another dataset can also be queried directly.
- Using the Back to the press releases button, we again leave the detail view.
- The entire text is shown.
Edit datasets
If on the overview and on the detail page, different editing options for a selected dataset are available to the editor via different icons:
![]() Show History: Opens the Project history report. You can check there what changes have been made to the element and restore older states.
Show History: Opens the Project history report. You can check there what changes have been made to the element and restore older states.
![]() Show References: Opens the References report. You can check there which elements are referenced with this dataset.
Show References: Opens the References report. You can check there which elements are referenced with this dataset.
![]() Show dataset: This icon opens the dataset in the data sources view and highlights it in the relevant data source.
Show dataset: This icon opens the dataset in the data sources view and highlights it in the relevant data source.
![]() Create: With this icon, a new dataset is created.
Create: With this icon, a new dataset is created.
A dialog will open, containing the input elements which are available for this dataset.
Depending on the individual project configuration, new datasets can be created also by using the menu item New – Create dataset or drag and drop.
![]() Copy: With this icon, a copy of the selected dataset is created.
Copy: With this icon, a copy of the selected dataset is created.
A dialog will open, containing the input elements which are available for this dataset, and the data of the selected dataset.
![]() Translation help: This icon opens the Content for translation dialog which can be used to transfer the content from language A into corresponding input elements of language B. The language into which the content is to be translated can then be selected by clicking the mouse. See also the Use of multiple languages page.
Translation help: This icon opens the Content for translation dialog which can be used to transfer the content from language A into corresponding input elements of language B. The language into which the content is to be translated can then be selected by clicking the mouse. See also the Use of multiple languages page.
![]() Edit: With this icon, an edit window with all input components of the selected dataset opens.
Edit: With this icon, an edit window with all input components of the selected dataset opens.
Creating datasets using drag-and-drop
If configured by the project developer, new datasets can also be created by using drag-and-drop.
For this purpose, media, pages or datasets can be dragged from the report area or text from text editing programs like Word, from internet pages etc. onto project specific buttons or icons (e.g. ![]() ) on the preview page. Color highlighting is applied to indicate where the element can be dropped.
) on the preview page. Color highlighting is applied to indicate where the element can be dropped.
There are three possibilities, depending on how the project has been configured by the project developer:
- A new dataset is created as soon as the mouse button is released. If a medium, a page, a dataset, or a text has been selected, they will automatically be included in a suitable input element (assuming that the project developer has configured the project accordingly). Further data for the dataset (texts, images, etc.) can be entered subsequently (
 icon) and any placeholder information stipulated by the project developer can be adapted as necessary.
 - The edit window containing the input elements that are available for the dataset concerned opens as soon as the mouse button is released (see above). If a medium, a page, a dataset, or a text has been selected, they will – once again – already be preselected within a suitable input element (assuming that the project developer has configured the project accordingly). In the case of a dataset, the input elements may alternatively contain the content of the dropped dataset (“copy”). The content of the edit window can be edited as required and then saved in the usual manner.
- The current project configuration does not allow the creation of a new dataset using drag-and-drop (message: “No matching templates have been found.”)
Exclusive working
When editing and saving datasets two different methods are possible:
1. Parallel working
By default datasets are not blocked against data entry by other users. Thus various modifications can be simultaneously made by several users. This can lead to conflicts. In this case, a so called “optimistic lock method” is applied. Only the modifications of the editor who was the first to save are accepted initially. If a second user tries to save his modifications a dialog informs that the elements has been changed: “Failed to save this form. Reason: The element has been changed since the last refresh. Changes cannot be saved.”
The modifications of the first user will be overwritten if the second user saves despite this.
2. Exclusive working
If exclusive editing of datasets is enabled, modifications can be made and saved just by exactly one user. Other users will be informed by a dialog that the element is locked, if they try to edit it: “Object is currently being edited by 'User B'.”
 |
The option “Exclusive working” for datasets can only be enabled by the project administrator. By default this option is disabled and a dataset can be edited by several users at the same time. Whether this option is enabled or not a user can only recognize by the dialogs. |