

Use of Content Highlighting, EasyEdit, and LiveEdit in projects
In order to enable these functions in the project, the templates (the required template set) must be adjusted. The principle is identical for all three functions. It must be possible to clearly reference HTML elements that are to be highlighted or marked with an edit icon within an HTML page. On the technical side, “editor identifiers” are used; the template developer can store these in the HTML templates for the project. An editorId() call is used for this purpose. The name of an input component, for example, can be passed as a parameter.
For example, the call
$CMS_VALUE(editorId(editorName:"pt_headline"))$
ensures that the value of the input component “pt_headline” in the HTML template set is highlighted – regardless of whether or not the editor wishes to edit this content in SiteArchitect or ContentCreator or LiveEdit.
Each “editor identifier” has to be assigned to a suitable HTML element. This includes HTML tags for displaying content in blocks, such as <h> tags for displaying headers (<h1>, <h2>, <h3>, etc.) and the <p> or <div> tag for displaying large content areas. Thus, in order to highlight a header, editorId() has to be called within the <h> element in the HTML template set:
<h3$CMS_VALUE(editorId(editorName:"pt_headline"))$>
In addition to highlighting HTML content by block, element-specific highlighting, such as an image in an <img> tag, can be implemented this way as well:
<img src="$CMS_REF(st_picture)$" alt="" $CMS_VALUE(editorId(editorName:"st_picture"))$ />
If this syntax is used to output image maps (CMS_INPUT_IMAGEMAP) the corresponding image is identified in ContentCreator by positioning the mouse with the  icon over it.
In addition to the name of an input component, it is possible to pass other parameters as well:
Parameters for editorId() calls
Parameter name | Description | Scope |
|---|---|---|
editorName | Passes the UID for an input component. | |
language | By default, forms are initially opened in the current language (#global.language). This parameter can be used to specify a language in which a form should be opened. | ContentCreator only |
entity | Passes an entity object | |
template | Passes a table template (TableTemplate object) or the UID for a table template (as a string, e.g., schema.gallery). | |
view | Passes a data source (Content2 object) or the UID for a data source (as a string). | |
element | Passes a FirstSpirit object (from the IDProvider type) e.g., a GCA (#global.gca(„...“)) or a content area (#global.page.body(„...“)). | |
target | Passes a FirstSpirit object (similar to the element parameter). In the process, not just objects of the IDProvider type, but also FirstSpirit objects can be passed using target. | |
previewRulesEvaluation | This parameter is only relevant for display in ContentCreator.
Example: <div$CMS_VALUE(editorId(previewRulesEvaluation:false))$>...</div> | ContentCreator only |
resolution | The image cropping function can be activated in ContentCreator in the preview using this parameter. For more information, refer to Image cropping in ContentCreator. | ContentCreator only |
reloadPreview | If changes are made in a subsection of the HTML page using the EasyEdit or InEdit function, such as changing a heading, then only this modified HTML area is refreshed and replaced on the HTML page. This allows for quick refreshing of the page preview. This targeted refresh does not catch some changes, since the changes are outside the current HTML area. In this case, the entire page can be loaded using the reloadPreview parameter (reloadPreview:true). Loading the entire page for changes made using the EasyEdit or InEdit function in ContentCreator is switched off by default. | ContentCreator only |
reloadElement | By default, the element with the indicated editorId is reloaded after having edited a page. You can use reloadElement to pass the ID of an HTML element that is to be loaded after having edited the page. | ContentCreator only |
json | The parameter is required only when new list entries are to be added via the FS_BUTTON handler class NewListEntryExecutable in ContentCreator within the input components: If, within the editorId parameter, the json parameter is specified as json:true, then a JSON object is returned instead of an HTML fragment (see Example). The parameter may only be used within JavaScript (not in the HTML output, as in such cases invalid HTML will be generated. | ContentCreator only |
meta | When using the InEdit function, if the metadata for a FirstSpirit object (such as pages, sections, media, etc.) is to be edited instead of the editorial form content, the meta:true parameter can be set in the editorId() call. In this case, the form for editing metadata is opened instead of the form for editing editorial content when the InEdit function is activated. Editing metadata using the InEdit function in ContentCreator is switched off by default (refer to Edit metadata for examples). | ContentCreator only |
externalReference | This parameter is only relevant for use in ContentCreator in conjunction with FS_INDEX, which does not use DatasetDataAccessPlugin, for example FirstSpiritFragmentAccess. | ContentCreator only |
If no parameter is passed, the current context is used automatically (e.g., the section or the page).
For more information, see also the editorID(...) function.
 |
The editor identifiers are evaluated for both editing in ContentCreator (via EasyEdit, InEdit, or LiveEdit) and Content Highlighting in FirstSpirit SiteArchitect. In ContentCreator, the identifiable form elements can be edited with EasyEdit editing and possibly also with InEdit and LiveEdit (see Supported input components (InEdit) and the LiveEdit page for more information). At the same time, this process enables Content Highlighting for these elements in SiteArchitect – both using the same template adjustment. If this is not desired, different handling for SiteArchitect and ContentCreator must be implemented in the HTML template set (see SiteArchitect/ContentCreator case-by-case analysis). |
The following highlights can be implemented:
Page Store: Input components
Highlighting input components in SiteArchitect
If the user clicks on an input component in the SiteArchitect workspace, the associated content in the integrated preview can be highlighted in color.
If a text passage or an image is clicked on in the integrated preview, the associated input component can be marked in the workspace.
In the SiteArchitect navigation area, the tree structure opens up to the section containing the input component.
Editing an input component in ContentCreator
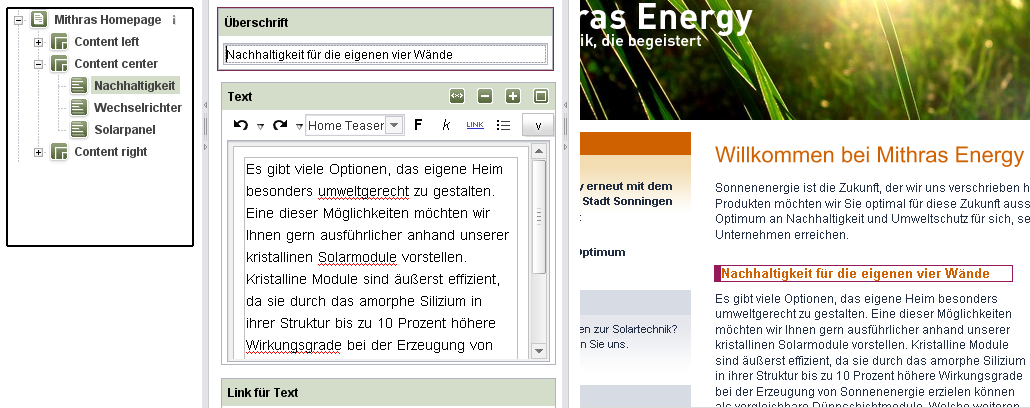
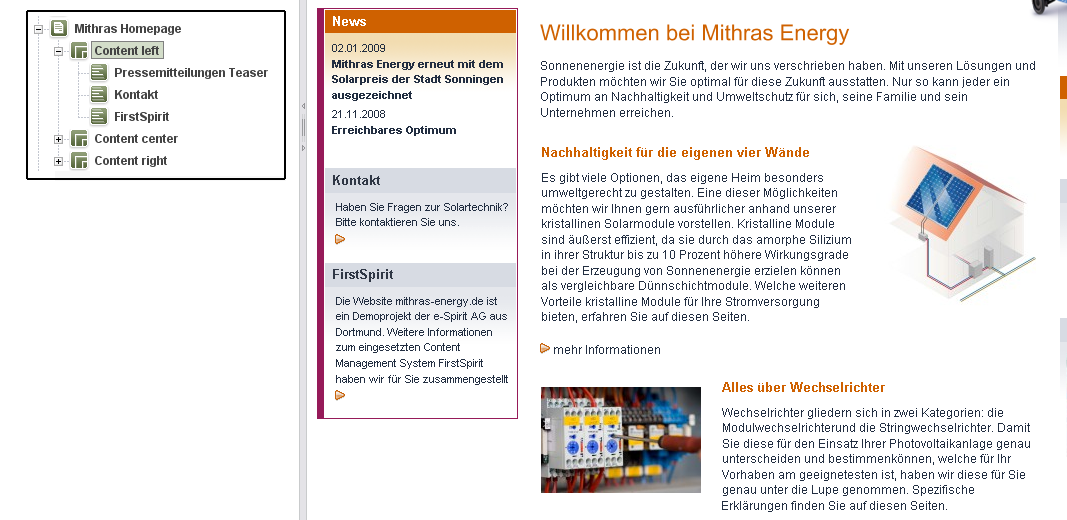
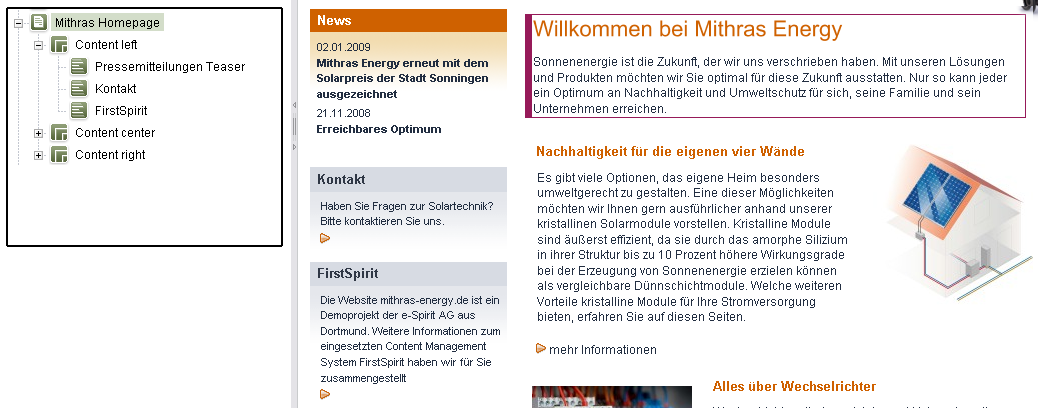
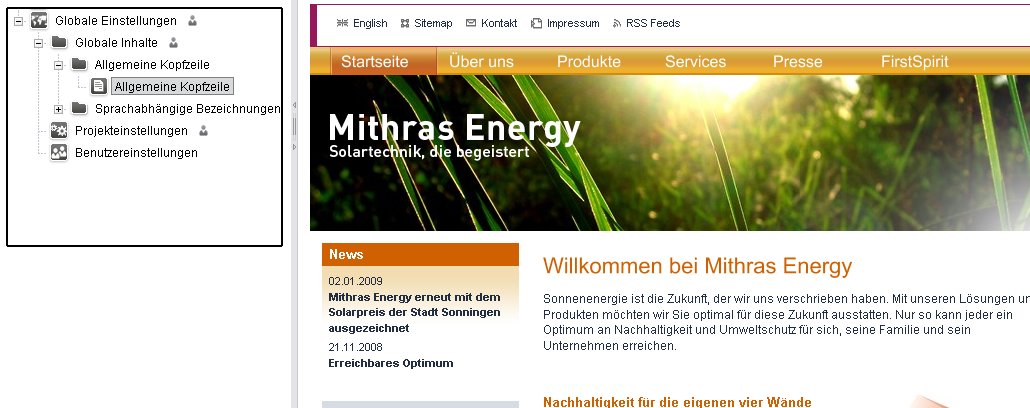
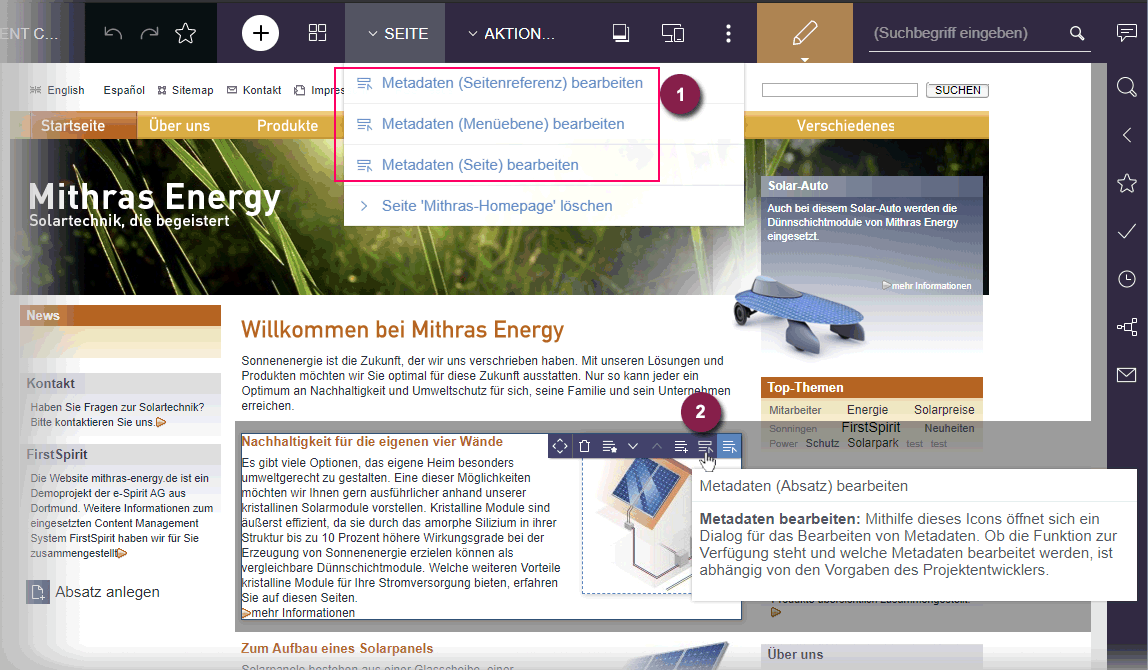
In the first figure, for example, a border is placed around the input component containing “Sustainability for your own four walls” from the “Sustainability” section in the “Content center” content area of the “Mithras Homepage” page in the workspace as well as in the integrated preview.
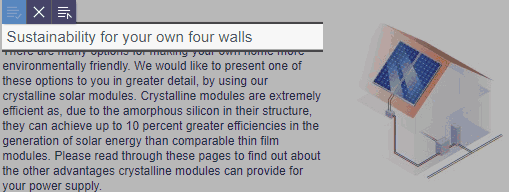
In ContentCreator, the content of the input component can be edited using the EasyEdit or InEdit functions (see second figure).
Note: Not all FirstSpirit input components support the “InEdit” function (see Supported input components (InEdit)).
Adjusting the template:The following expression is simply added to the HTML template set of the section template:
<h3$CMS_VALUE(editorId(editorName:"st_headline"))$>
The name of the input component is passed using the “editorName” parameter.
The call takes place within an <h3> HTML element, since the content is a heading.
|
Not all FirstSpirit components fully support “Content Highlighting” functionality. |
Page Store: Multi-value input components
Passing additional parameters within the editorId() call is necessary to enable the Content Highlighting or EasyEdit functions for complex multi-value input components (e.g., FS_CATALOG).
Adjusting the template: The iteration across individual editors of an FS_CATALOG component is done using a $CMS_FOR(...)$ loop. The returned FormDataList type object can be passed in the editorId() call using the “target” parameter:
$CMS_FOR(_card, st_list)$
            <li$CMS_VALUE(editorId(target:_card))$>
                 $CMS_VALUE(_card)$
            </li>
$CMS_END_FOR$
If the object in question is an FS_INDEX with DatasetDataAccessPlugin, it may be necessary to pass additional parameters, such as passing a jump target using the “View” parameter:
$CMS_FOR(_formData, st_List)$
          <li$CMS_VALUE(editorId(element:_formData,view:"mycontent2"))$>
                [ID: $CMS_VALUE(_formData.id)$] $CMS_VALUE(_formData)$
            </li>
$CMS_END_FOR$
Page Store: Sections
Highlighting sections in SiteArchitect
When the user clicks on a section in the tree structure in the SiteArchitect navigation area, the content of this section (along with all of the its input components) can be highlighted in color in the integrated preview.
The section, along with the input components contained inside it, is opened in the SiteArchitect workspace.
Likewise, the section is highlighted in ContentCreator and can be edited there using the EasyEdit or InEdit functions.
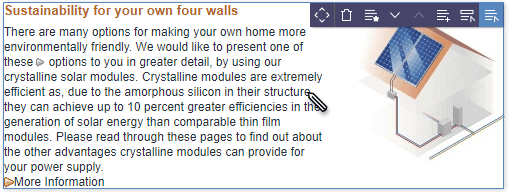
Highlighting sections in ContentCreator
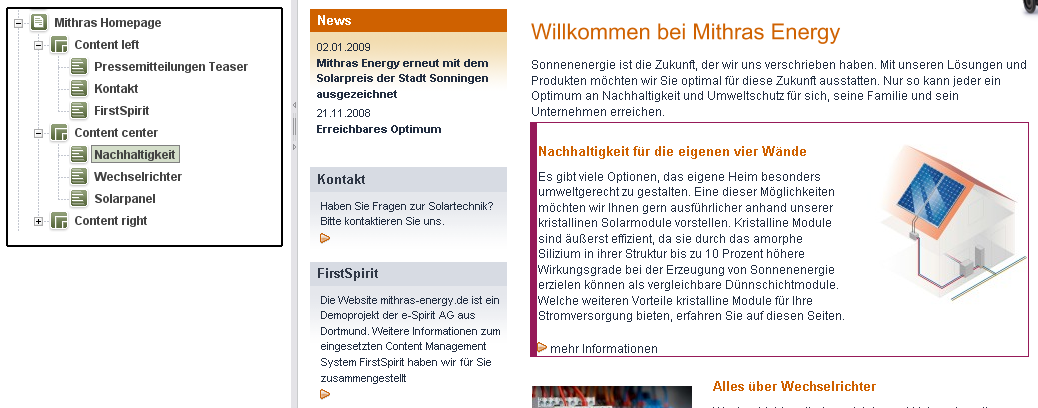
As examples, the content of the “Sustainability” section in the “Content center” area of the “Mithras Homepage” page is outlined in both figures. In this case, this includes:
- The heading “Sustainability for your own four walls”
- The text “There are many options,...”,
- The link “More information” and
- The image.
Adjusting the template: If no specific element (such as the value of an input component) is to be highlighted, the following expression can be used in the HTML template set of the section template:
<div $CMS_VALUE(editorId())$>
An editorId() call without parameters is passed here. The current context is always used with it automatically. Thus, clicking on a section inside the navigation area causes the entire section to be highlighted (or the entire page when selecting a page).
It is called in a higher-level HTML <div> area for the entire section.
Page Store: Content areas
Highlighting content areas
When the user clicks on a content area in the tree structure in the SiteArchitect navigation area, the content of that content area is highlighted in color in the integrated preview. This includes all sections and input components present in the content area.
For instance, the content of the “Content left” content area (i.e., the left content column including the “Press release teaser”, “Contact” and “FirstSpirit” sections) for the “Mithras Homepage” page is highlighted in the figure.
This template adjustment is not relevant in ContentCreator and thus does not have an effect on anything. However, individual sections of a content area can of course be highlighted and edited (see above).
Adjusting the template:The following expression is simply added to the HTML template set of the page template:
<div $CMS_VALUE(editorId(element:#global.page.body("Content left")))$>The content area (#global.page.body(“...”)) is passed using the “element” parameter.
It is called in a higher-level HTML <div> area for the entire content area.
Page Store: Pages
Highlighting page content in SiteArchitect
When the user clicks on a page in the tree structure in the SiteArchitect navigation area, the content maintained on this page is highlighted in color in the integrated preview.
In the process, we recommend not outlining the entire page, but rather just an area containing input components or a central subsection.
Likewise, this content is highlighted in ContentCreator and can be edited there using the EasyEdit or InEdit functions.
Highlighting page content in ContentCreator
The content of the page (including the input components for the heading and the text) is outlined in both figures as an example.
Adjusting the template: The method used to adapt templates is similar to that used to highlight sections. However, in this case, the corresponding call is added in page templates and not in section templates:
<div $CMS_VALUE(editorId())$>
Again, an editorId() call without parameters is passed here. The current context is used automatically along with it.
It is called in a higher-level HTML <div> area that contains both the HTML elements for the page header and the text.
Data Store: Input components
Usually, datasets are maintained centrally in the Data Store. However, they can be output at multiple places on a website using different table templates, including different layouts. In these cases, the link between the workspace where datasets can be edited using input components and where the integrated preview content from those input components can be highlighted may not be provided automatically.
Example: On a corporate website, press releases or information about products are maintained as individual datasets in data sources. In one instance, these may be output on individual pages (one page per press release or product description) and then, in another instance, on an overview page where, for example, only specific content from the datasets is output (“teasers”). The individual and overview page are based on different table templates; however, only the table template for the individual pages contains the definition of input components for maintaining datasets. The “Form” tab of the table template for the overview page is empty. When output, it receives its content from the data source with the individual datasets.
For the table template where no input components are defined (overview page), some missing information has to be passed manually for a correct link between the view in the workspace and the integrated preview, and this is done using the “entity”, “view” and “editorName” parameters.
When the user clicks on input component of a dataset from a data source in the SiteArchitect workspace, the content of this input component is highlighted in color in the integrated preview.
If content originating from a dataset is clicked on in the integrated preview, the associated dataset is opened in the workspace and the affected input component is highlighted in color.
In the SiteArchitect navigation area, the tree structure opens up to the data source (Content2 node) containing the respective dataset.
Editing input components with database content in ContentCreator
In ContentCreator, the content of this input component can be edited using the EasyEdit or InEdit functions.
Note: Not all FirstSpirit input components support the “InEdit” function (see Supported input components (InEdit)).
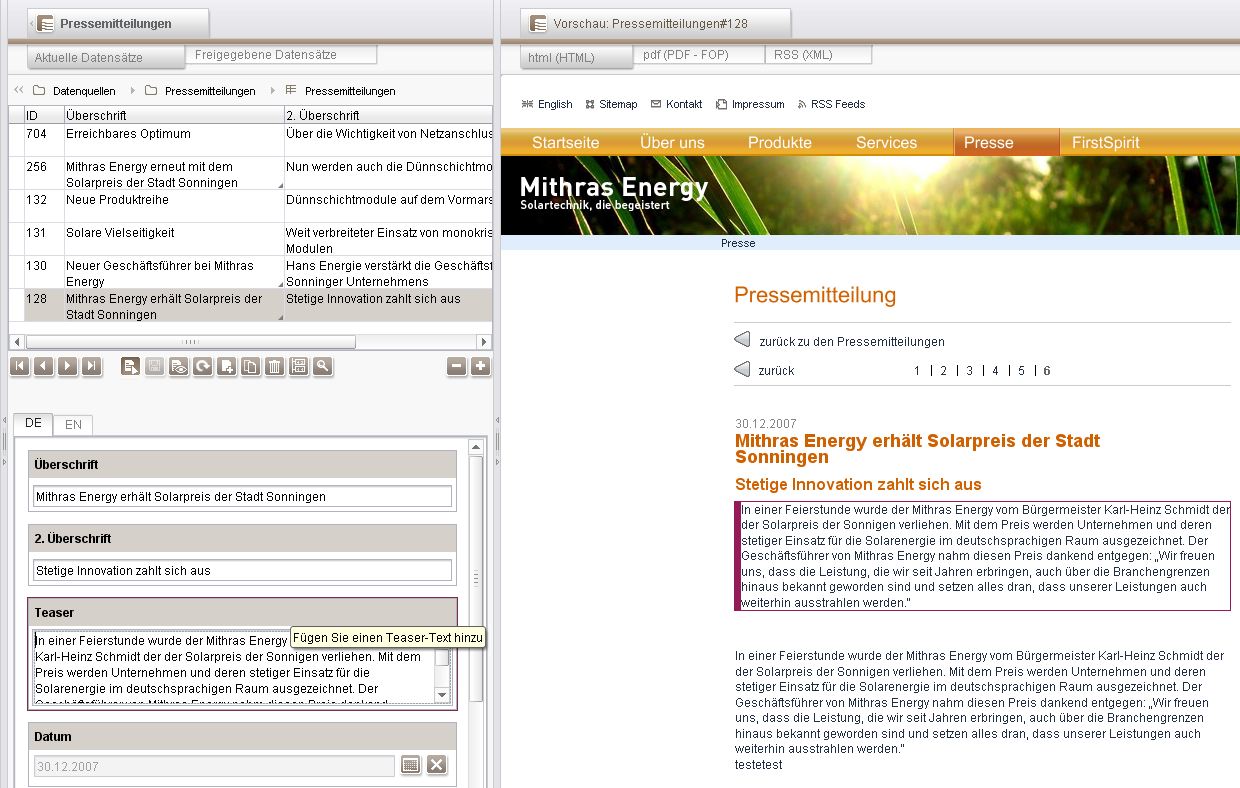
The content of the press release teaser with ID 128 (“During a ceremony...”) is outlined in both figures as an example.
Adjusting the template (dataset in a content projection):
To do this, the following expression is simply added to the HTML template set of the table template:
<div$CMS_VALUE(editorId(view:"pressreleases", editorName:"cs_teaser"))$>
In a content projection, the dataset can be detected from the generation context and does not have to be passed in the editorId() call.
The name of the data source is passed using the “view” parameter.
In addition, the name of the input component is passed using the “editorName” parameter.
This expression is added in a <div> area again.
Adjusting the template (dataset in a contentSelect function):
Specifying the “entity” parameter is necessary for database content queried using a contentSelect function, for example:
$CMS_FOR(_medium, st_gallery.dataset.entity.gallery_MediaList.sort(x -> x.Order_Index))$
 ...
 <img src="$CMS_REF(_medium.Media_Ref)$"$CMS_VALUE(editorId(entity:_medium, view:"gallerymedia", editorName:"cs_picture"))$ />
 ...
$CMS_END_FOR$
|
Not all FirstSpirit components fully support “Content Highlighting” functionality. This is particularly true of multi-value components. |
|
Datasets can be output to different pages depending on the project. As a result, the link between the integrated preview and the respective dataset or contained input components is not unique. In the event that a dataset is used multiple times, the template developer has to create this link “manually” by specifying special parameters. |
|
In order to edit datasets in the preview of ContentCreator, the box labeled “Use in ContentCreator” on the Properties tab for the corresponding table templates must first be checked (individually for each table template). |
Selecting the preview page
The page reference that a preview is to be based on can be selected for each template on the Properties tab using the “Preview page” field.
Selecting a corresponding preview page in the respective table template is necessary in order to highlight datasets from the Data Store. This is done to determine which page reference is to be used as the basis for a dataset preview from the Data Store. Even though a dataset can be output to multiple pages of a project, only one page reference can be defined here that has context that can be used to output a dataset from the Data Store.
The selection of the preview page has to be taken into account for all templates that use the same data source.
Global content area
Highlighting global pages in SiteArchitect
When the user clicks on a global page in the tree structure in the SiteArchitect navigation area, the output of the content in the integrated preview can be highlighted in color. To do this, a preview made from the Page Store or the Site Store must already be open in the integrated preview in SiteArchitect. The input components that have been defined for the global page are shown in the SiteArchitect workspace.
If the content of a global page is clicked on in the integrated preview, the tree structure opens below the “Global settings” root node up to the page containing the marked content.
Highlighting global pages in ContentCreator
Likewise, global page content is highlighted in ContentCreator and can be edited there using the EasyEdit or InEdit function.
The content of the “General headline” global page is highlighted in both figures as an example.
Adjusting the template: The following expression is simply added to the HTML template set of the page template:
<div$CMS_VALUE(editorId(element:#global.gca("gca_common_header")))$>The name of the global content is passed using the “element” parameter. It is called in a higher-level HTML <div> area.
ContentCreator: Editing metadata
Options for editing metadata in ContentCreator
Prerequisite
The ability to maintain metadata in ContentCreator must first be activated via the FirstSpirit ServerManager (under Project properties - ContentCreator settings, see ContentCreator settings (→Documentation for Administrators)). The different object types for which metadata can be defined in FirstSpirit (e.g., pages, page references, media) can be activated individually here and assigned language-dependent identifiers. These language-dependent display names are then displayed in ContentCreator in the corresponding menu entries.
Using the “Element type” menu (for example “PAGE”) for editing
Once metadata has been activated in the ContentCreator settings, metadata for the current page, the page reference, and the associated Site Store folder can be edited in the Element type menu (for example: “PAGE”, “FOLDER”; see Figure: “Options for editing metadata in ContentCreator” (1)).
Using EasyEdit for editing
After activating the EasyEdit functions for sections, an “Edit metadata” icon is also available in the EasyEdit tool bar (see Figure: “Options for editing metadata in ContentCreator” (2)). No additional parameters must be passed in the editorId() function for this button to appear. In this case, the object that is to receive metadata is automatically determined based on the current context. For instance, if a section is highlighted via EasyEdit in ContentCreator, clicking on the “Edit metadata” button opens the metadata form where the editor can add metadata for this section.
Additional template adjustments only need to be made if more project-specific editing processes need to be taken into account. This makes it possible to limit the input of metadata for a FirstSpirit object to individual input components of the metadata template. This limited metadata information can then be edited using InEdit. The context can also be changed. Instead of editing the metadata of a section, the metadata of a page can also be edited. The following are a few examples of this:
Using EasyEdit to edit the metadata of a medium
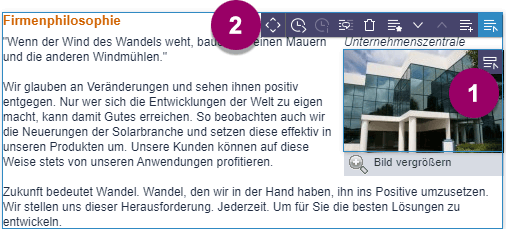
Via EasyEdit: Metadata of media can also be easily edited directly on the medium using EasyEdit.
This is done by passing the editorId() function in the <img> tag in the HTML output with the element parameter. The medium referenced in the input component is passed to the parameter. An additional icon is then displayed on the medium in ContentCreator, which is used to edit media metadata (see Figure: “Using EasyEdit” to edit the metadata of a medium (1)), while the EasyEdit icon of the section can continue to be used to edit the section's metadata (see Figure (2)).
$CMS_SET(el, st_picture.getMedia)$
 <img src="$CMS_REF(st_picture, resolution:"TextBildTeaser")$"
 		     class="Img$CMS_VALUE(if(st_picture_position, "Left", "Right"))$"
 		     width="$CMS_VALUE(ref(st_picture, resolution:"TextBildTeaser").width)$"
 		     alt=""
 		 		    $CMS_VALUE(editorId(element:el))$
 		/>
Using InEdit to edit metadata
Via InEdit: InEdit can also be used to edit metadata, but only for an input component of the metadata form. This is done by passing the following parameters in the editorId() function:
- meta:true (to activate the metadata template) and
- editorName (to pass the UID of an input component from the metadata template - only when used with the meta:true parameter)
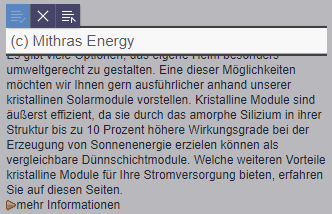
To define metadata using a section heading, such as the following:
<h3$CMS_VALUE(editorId(editorName:"md_copyright", meta:true))$>
Clicking on the desired element in InEdit opens the specified input window from the metadata form (in this case: “md_copyright”) (see Figure: “Using InEdit to edit metadata”).
The context is determined automatically. If metadata is defined on a section heading as in this example, the metadata is defined automatically on the section. If a context other than the current one is desire, this has to be passed using the additional element parameter. This makes it possible, for instance, to configure the InEdit function on the section heading so that the metadata is always set for the current page (and not for the section):
<h3$CMS_VALUE(editorId(element:#global.page, editorName:"md_copyright", meta:true))$>
Or the InEdit function can be configured for an image on the preview page image so that the metadata is not defined on the section (current context), but is instead defined directly on the medium (or even a medium folder):
$CMS_SET(el, st_picture.getMedia)$
 <img src="$CMS_REF(st_picture, resolution:"TextBildTeaser")$"
 		     class="Img$CMS_VALUE(if(st_picture_position, "Left", "Right"))$"
 		     width="$CMS_VALUE(ref(st_picture, resolution:"TextBildTeaser").width)$"
 		     alt=""
 		     $CMS_VALUE(editorId(element:el, meta:true, editorName:"md_copyright"))$
 		/>
ContentCreator: Supported input components (InEdit)
Editing content using the “InEdit” function is supported for the following input components:
- CMS_INPUT_CHECKBOX
- CMS_INPUT_COMBOBOX
- CMS_INPUT_DATE
- CMS_INPUT_DOMTABLE
- CMS_INPUT_DOM
- CMS_INPUT_LIST
- CMS_INPUT_NUMBER
- CMS_INPUT_RADIOBUTTON
- CMS_INPUT_TEXT
- CMS_INPUT_TEXTAREA
- CMS_INPUT_TOGGLE
- FS_DATASET
- FS_REFERENCE
ContentCreator: Moving menu items
In ContentCreator, pages and/or menu items can be moved directly in the preview with drag-and-drop.
Representation for editors: see ContentCreator User documentation.
To do this, the surrounding HTML element of the relevant navigation element must include an editorId() call in the navigation function.
Example of use with li elements (lists):
<CMS_ARRAY_ELEMENT><![CDATA[<li$CMS_VALUE(editorId(element:#nav.ref))$>]]></CMS_ARRAY_ELEMENT>
Example of use with a elements (hyperlinks):
<CMS_ARRAY_ELEMENT>
       <![CDATA[<a$CMS_VALUE(editorId(element:#nav.ref))$
                href="$CMS_REF(#nav.ref)$">
                      $CMS_VALUE(#nav.label.convert2)$</a>]]>
</CMS_ARRAY_ELEMENT>
ContentCreator: Creating a new page using drag-and-drop
In the previously mentioned configuration, the navigation elements can also be used as drop targets for pages and page references: If the editor drags a page or page reference from the report section to a navigation element, icons are displayed on the navigation elements; these icons are the same as those that appear when moving menu items in the preview, when a page is hovered above the icon with the mouse button pressed. When the mouse button is released, the dialog for inserting a new page into the website navigation system opens. When you click “Finish”, the default setting leads to the creation of a new page at the required position within the navigation system, with the same name and content as the dropped page. If necessary, you can change the settings for the new page in this dialog or after the page has been created.
Representation for editors: see ContentCreator User documentation.
ContentCreator: Visualizing report entries in the preview ("Hit marker")
In the previously mentioned configuration, report entries can also be visualized in the preview. Using the class de.espirit.firstspirit.webedit.DataAssociationHandler (FirstSpirit Access API), an association can be established between objects in a report and objects in the preview. Icons can be displayed in the preview to indicate the number of associated report entries. To display the number of entries in a search report (i.e., search results/page references) on menu items (SiteStoreFolder), for example, the DataAssociationHandler “SiteStoreAssociation” is used. In this case, the objects are identified in the preview via the editorId() function.
See also FirstSpirit Access API, Interfaces
- de.espirit.firstspirit.webedit.DataAssociationHandler
- de.espirit.firstspirit.webedit.DataAssociationAgent
- de.espirit.firstspirit.client.plugin.dataaccess.aspects.DataAssociating
Representation for editors: see ContentCreator User documentation.
|
In some cases, the icons cannot be displayed correctly, e.g., if CSS or JavaScript is being used for navigation. |
ContentCreator: Image cropping
The image cropping function in ContentCreator in the preview is activated using the resolution parameter information. The reference name of a resolution is expected as the value (see ServerManager / Project / Properties / Resolutions / “Reference name” column for more information).
This is possible only for the FS_REFERENCE input component.
<img src="$CMS_REF(st_picture, resolution:"TextBildTeaser")$"
 $CMS_VALUE(editorId(editorName:"st_picture", resolution:"TextBildTeaser"))$/>
In this case, st_picture is the identifier of the input component. In this example, the cropping function in ContentCreator would relate to the TextBildTeaser resolution of images that are selected using an input component with the specified identifier.
Multiple resolutions can be passed in square brackets, separated by a comma:
editorId(..., resolution: ["REFERENCENAME1", "REFERENCENAME2"])
The order in which the resolutions are specified is reflected in the image cropping dialog in ContentCreator.
Different variants of image information may exist for each resolution in the image elements of the Media Store (see Image level (→Documentation FirstSpirit SiteArchitect) ff.):
- None
A scaled version of the “Original” resolution is generated as the file when the image is output - Cropped
A cropped or otherwise modified (e.g., rotated or mirrored) version of the “Original” resolution exists; this modified version is generated as the file when the image is output - Uploaded
A file has been explicitly saved in this resolution and is distinct from the file saved in the “Original” resolution; the existing graphical material is generated as a file without scaling when the image is output
|
Using the image cropping function in ContentCreator, all variants mentioned can be edited; however, resolution-specific uploading or deletion of an image that differs from the original file is not supported. The image cropping function also enables variants of images to be edited that are not stored in the same project but which are integrated via a remote project instead. All changes that are made are saved in the target resolution of the remote project (for more information, also see the page on remote access). |
The ContentCreator image cropping function proceeds with the image variants mentioned as follows:
Content of the target resolution | For cropping an available image area | Effect when saving an image cropping | Effect when saving without a cropping box |
|---|---|---|---|
None | Image area in “Original” resolution | Cropped image area in “Original” resolution is created and saved in the target resolution | - |
Cropped | Image area in “Original” resolution | Cropped image area in “Original” resolution is created and saved in the target resolution | Cropping in target resolution is removed; the content of the target resolution is now the equivalent of the “none” variant |
Uploaded | Image area of the graphical material saved in the target resolution | The cropped area replaces the graphical material saved in the target resolution | - |
|
When cropping None and Cropped type content, it is possible to access the image area in the “Original” resolution at any time by using the function again. If image cropping is carried out on an image element containing Uploaded type content in the target resolution (this is includes the “Original” target resolution), the content of this resolution is replaced when a cropped area is saved. When using the cropping function again for this content, you can only work with the image area of the cropped area previously selected. |
ContentCreator: Opening the "Edit image section" dialog via API
The image section dialog can be opened via the FirstSpirit Access API: CropDialogOperation
The parameter media passed to the method setMedia(Media media) specifies the media element which should be edited.
The parameter resolutions passed to the method setResolutions(List<Resolution> resolutions) contains resolutions of the image which should be available for editing in the dialog. If this list contains no resolutions or resolutions which are unknown within the current project, all resolutions specified in the project will be made editable.
The following example script (“cc_crop”) opens the image section dialog if an image is dropped onto an accordingly configured FS_BUTTON input component in the preview:
import de.espirit.firstspirit.agency.LanguageAgent;
import de.espirit.firstspirit.agency.OperationAgent;
import de.espirit.firstspirit.agency.ResolutionAgent;
import de.espirit.firstspirit.agency.TransferAgent;
import de.espirit.firstspirit.access.store.IDProvider;
import de.espirit.firstspirit.access.store.mediastore.Media;
import de.espirit.firstspirit.webedit.server.CropDialogOperation;

if (dropdata == null) {
	return false;
}

transferAgent = context.requireSpecialist(TransferAgent.TYPE);
elements = dropdata.get(transferAgent.getType(IDProvider.class));
if (elements == null || elements.isEmpty()) {
	return false;
}

media = elements.get(0);
if (media == null || !(media instanceof Media) ) {
	return false;
}

languageAgent = context.requireSpecialist(LanguageAgent.TYPE);
lang = null;
for (language : languageAgent.getLanguages().iterator()) {
	if ("EN".equals(language.getAbbreviation())) {
		lang = language;
	}
}

resolutionAgent = context.requireSpecialist(ResolutionAgent.TYPE);
resolutions = new ArrayList();
resolutions.add(resolutionAgent.getResolutionByName("Teaser"));
resolutions.add(resolutionAgent.getResolutionByName("HeaderPicture"));

operations = context.requireSpecialist(OperationAgent.TYPE);
operation = operations.getOperation(CropDialogOperation.TYPE);
operation.setMedia(media);
if (lang != null && media.isLanguageDependent()) {
	operation.setLanguage(lang);
}
operation.setResolutions(resolutions);
operation.perform();
Example configuration of the FS_BUTTON input component:
<FS_BUTTON
     name="pt_cropButton"
     hidden="yes"
     onDrop="script:cc_crop"
     style="firstspirit"
     useLanguages="no">
      <DROPTYPES>
        <TYPE value="picture"/>
      </DROPTYPES>
      <LANGINFOS>
        <LANGINFO lang="*" label="Crop a Picture"/>
      </LANGINFOS>
 </FS_BUTTON>
Example for HTML output:
<span$CMS_VALUE(fsbutton(editorName:"pt_cropButton"))$></span>
If a media element that is of type File or is an object of type Picture which does not contain image data is passed to the method setMedia(Media media), according exceptions will be logged to the file fs-server.log, and the image section dialog will not be opened.
ContentCreator: Editing external references (FS_INDEX)
This parameter is only relevant for use in ContentCreator in conjunction with FS_INDEX, which does not use the DatasetDataAccessPlugin, e.g FirstSpiritFragmentAccess.
With the new externalReference parameter, external references originating from this DataAccess-Plug-in can now be marked for use in ContentCreator. The parameter expects the identifier of references that are saved in the FS_INDEX component.
Example:
<div$CMS_VALUE(editorId(editorName:"fs_index"))$>
   $CMS_FOR(i, [0..fs_index.identifiers.size-1])$
     $CMS_SET(objectId, fs_index.identifiers[i])$
       <div$CMS_VALUE(editorId(editorName:"fs_index", externalReference: objectId))$>
       </div>
   $CMS_END_FOR$
</div>
Implementing different behavior for SiteArchitect and ContentCreator
The editor identifiers are evaluated automatically both during editing in ContentCreator and for Content Highlighting in FirstSpirit SiteArchitect – both using the same template adjustment.
If this is not desired, it is necessary to differentiate between SiteArchitect and ContentCreator in the HTML template set.
To do this, the #global system object is first used to detect whether an HTML page was opened in SiteArchitect or ContentCreator. If the page was opened in ContentCreator, the expression:
#global.is("WEBEDIT")returns TRUE in the HTML template. In this case, for instance, template adjustment can then be carried out for just the EasyEdit (or InEdit) function in ContentCreator while being suppressed for “Content Highlighting” functionality in SiteArchitect:
$CMS_SET(isWebEdit, #global.is("WEBEDIT"))$
$CMS_IF(!isWebEdit)$
    <div$CMS_VALUE(editorId())$>
$CMS_END_IF$
General information for template development
Input components without content
Highlighting cannot take place if there is still no content in the input components on pages, in sections or in datasets in the workspace. It is therefore advisable to check whether the output is empty.
For instance, this can be checked using the .isEmpty method in conjunction with $CMS_IF(...)$:
$CMS_IF(!IDENTIFIER.isEmpty)$
  $CMS_VALUE(IDENTIFIER)$
$CMS_END_IF$
ContentCreator displays and use of the CSS property z-index in templates
Frames and tool bars, which are displayed using the HTML element with the same dimensions, are used to access the EasyEdit and InEdit functions in ContentCreator preview.
HTML blocks inserted in the preview HTML code for an HTML element defined using an Editor identifier are positioned using cascading style sheets (CSS) in such a way that their display areas match the dimensions of the HTML element, but are only displayed while the mouse pointer is within the particular display area.
For this purpose, the z-index CSS property of the EasyEdit and InEdit displays receives a value of 1000 or higher. If the HTML elements in project templates are also to be positioned along the z-axis, the ContentCreator-specific displays are only guaranteed to work when the project z-index definitions are less than 1000.