

ContentCreator settings
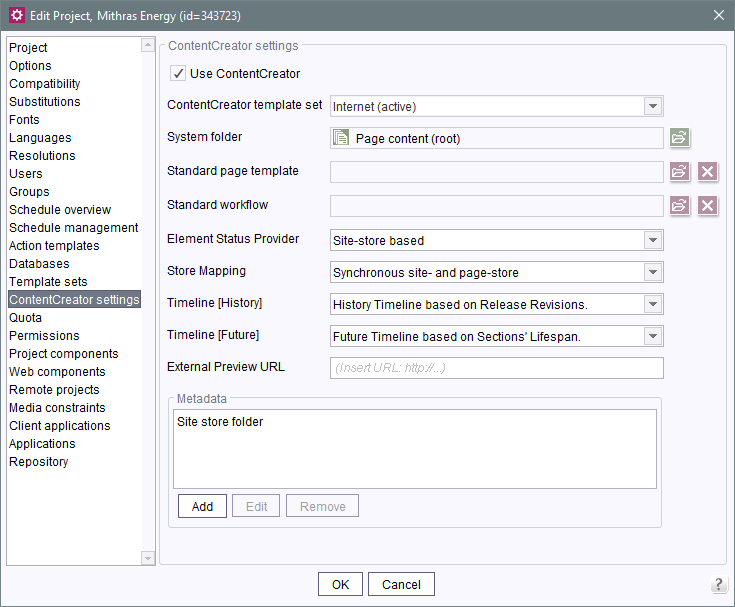
Use ContentCreator: if this option is selected, this project can be edited in ContentCreator (editing environment). If the option is not checked, the project can no longer be edited in ContentCreator.
ContentCreator template set: this option is used to select a template set for the ContentCreator from the template sets assigned to the project (see Template sets).
System folder: by selecting “System folder”, you can specify the page store folder where new pages are to be stored. Any existing folder can be selected as the destination for the pages added to ContentCreator. Alternatively, the root node of the page store can also be selected (“Content”). This is predefined initially. Using this setting, all new pages are placed under the root node.
Since by default pages are added using the ContentCreator menu to a folder and page reference in the site store, for instance, the pages are also added to a folder in the page store. This folder is placed under the selected system folder.
A “Company” page with a menu item within the default setting with Page content as a system folder appears in ContentCreator and SiteArchitect as follows:
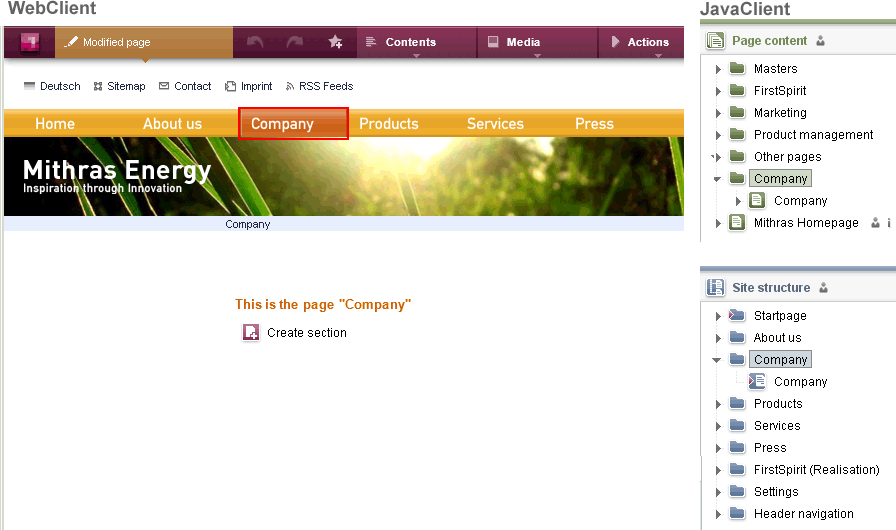
Page with menu item in ContentCreator and SiteArchitect
If the menu item in ContentCreator is removed (“PAGE / Convert menu item to page”), the “Company” menu item will disappear from the navigation area and the related folder will be removed from the SiteArchitect Site Store and Page Store; the page under the selected “System folder” is retained.

Page with menu item in ContentCreator and SiteArchitect removed
Standard page template: in this field a page template can be selected that is then preselected when creating pages in ContentCreator (“New” menu / “Create new page”). The editor then no longer has to select a template in the “Layout” area of the corresponding wizard (also refer to the Documentation for the FirstSpirit ContentCreator). The editor can, however, select a different template, if necessary. A standard page template cannot be selected initially. A selection affected by this can be reset to the initial state using the X icon.
Standard workflow: Selection of the workflow which is to be used for LiveEdit mode. You can reset the selection by using the X icon to the initial state. For more information see LiveEdit (→FirstSpirit Online Documentation).
Element Status Provider: The FirstSpirit object(s) to which workflows is to refer in FirstSpirit ContentCreator, e.g. to pages of the site store or of the page store, can be set via the Element Status Provider. The following providers are included with FirstSpirit by default and can be selected from the drop-down menu:
- SiteStore: if this provider is selected, the workflows started in ContentCreator only affect pages in the site store. This means, for instance, that if a release workflow is carried out on the ContentCreator page on which the editor is currently working, after the workflow is completed, only the corresponding page in the site store will be released and not the associated menu level or the associated page in the page store.
This provider is selected by default. - PageStore: if this provider is selected, the workflows started in ContentCreator only affect pages in the page store. This means, for instance, that if a release workflow is carried out on the ContentCreator page on which the editor is currently working, after the workflow is completed, only the corresponding page in the page store will be released and not the associated page reference or the associated menu level in the site store. A page released with this provider might be ignored during the next generation action.
It is recommended to create a provider for each project which is customized to the respective requirements, which for example can release media or more than one object at once. See also Functional Overview (→FirstSpirit Online Documentation). There you can find amongst others an example workflow for releasing pages including modified media.
Store Mapping: in order to add new content to FirstSpirit, a page is always needed in the page store to be used as the basis for the page. When adding new pages in the ContentCreator (via “New” menu / “Create new page”), the editor can specify only the position in the site store and not the position in the page store. The “Store Mapping” drop-down menu is used to specify how and where new pages are to be stored in the page store and how renaming or moving of pages/menu levels in ContentCreator is to take place in the page store.
Depending on the project requirements and architecture, a plug-in selected from this drop-down menu identifies, for example (based on the folder and page in the site store), the appropriate folder in the page store in which the page in ContentCreator will be created, or, if necessary, creates an appropriate folder or folder hierarchy.
“SynchronousStoreMapping” is included with FirstSpirit by default. The page structure in ContentCreator matches the structure in the folder selected under System folder (see above). If a new page is created in ContentCreator, this plug-in depicts the structure/hierarchy of the site store in the System folder of the page store from the root (the site store) to the newly created page reference.
For information on developing custom plug-ins, see ContentCreator Extensions (→FirstSpirit Online Documentation).
Timeline [History]/[Future]: In ContentCreator, the content of the current page can be displayed at different points in time. A timeline is provided so that the editor can select a particular point in time. FirstSpirit contains default timelines for the past (“History Timeline based on Release Revisions”) and for the future (“Future Timeline based on Sections' Lifespan”), but customer-specific timelines can be implemented in addition to these. Use the “Timeline” drop-down menu to define which timeline implementation is to be used for the past and which one is to be used for the future. If you want to create your own implementations, you can use the de.espirit.firstspirit.client.plugin.timeline package in the FirstSpirit Access API as a starting point. Refer also to the following section in Functional Overview (→FirstSpirit Online Documentation).
The default timeline implementation called History Timeline based on Release Revisions stretches back eight weeks and displays release times. The default timeline implementation called Future Timeline based on Sections' Lifespan displays validity periods for sections. The exact future period that is displayed by the timeline is dependent on what validity periods have been set.
You could, for example, set up your own implementations so that the history timeline displays (fixed) deployment times or tagged revisions (see FirstSpirit Access API, Interface in the de.espirit.firstspirit.access.project package, createTag method, etc.) and so that the validity of datasets is read out for the future timeline.
External Preview URL: If an external web application is to be used for the preview in FirstSpirit (a Single Page Application, “SPA”, for example), the respective URL can be entered into this text field. The preview application can then be used in the ContentCreator. If the linked application has been suitably prepared, the editor can still edit, create, and delete the contents displayed in the preview area with the functions of the ContentCreator. See also Documentation about FirstSpirit Third Party Preview (TPP).
Please make sure that the URL specified here contains the protocol of the external web application.
If the text field is empty (“Insert URL: http://...”), the internal ContentCreator preview function is used as before.
The URL can be read and also set by API (getWebeditPreviewUrl or setWebeditPreviewUrl method, Project interface, de.espirit.firstspirit.access.project package, FirstSpirit Access API).
Metadata
Extra information about FirstSpirit objects can be added using metadata. A special page template used to query and enter the desired information can also be provided to editors. The form based on the template defined for metadata is directly available in SiteArchitect (see Metadata template). In order to collect metadata via the ContentCreator as well, an entry must be created in this list for each FirstSpirit object type on which the metadata are to be collected in ContentCreator. The following FirstSpirit object types are available:
- Page
- Section
- Page reference
- Structure folder (menu level)
- Medium
- Media folder
Add: the Add button is used to add the desired FirstSpirit object type to the list. The desired type can be selected from the drop-down menu when it opens. Each type can be selected only once.
For the type, an informative display name must be specified for each project language in the following dialog. This display name will appear to the editor in ContentCreator as part of the description for the metadata entry and edit menu.
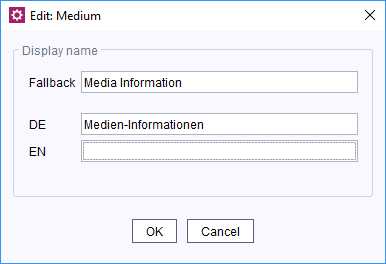
A display name must be specified for all languages. If a display name is not entered, the fallback value from the Fallback field is used as a substitute value.
If the Fallback field is blank and there is no fallback value, it will not be possible to save the object type an a corresponding message will be displayed in the edit window “At least a fallback must be configured”.
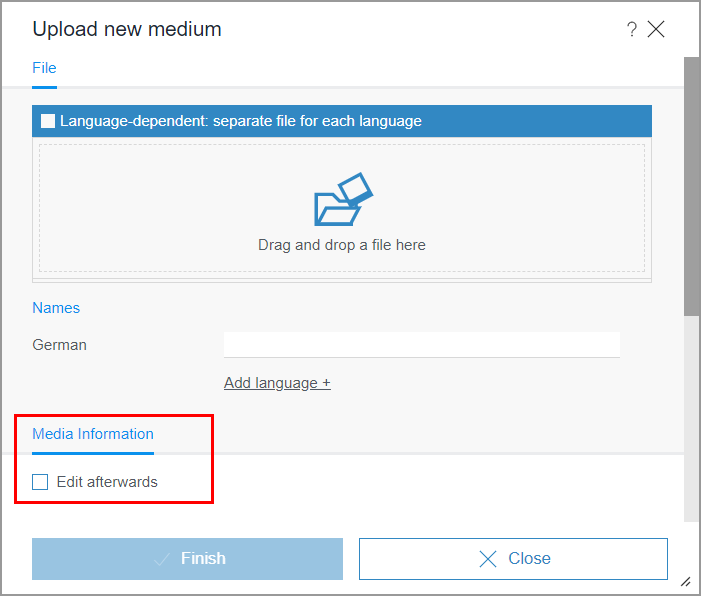
The display name “Media Information” selected for media in the example is displayed to the editor in ContentCreator, e.g., when uploading media to the project:
Edit: if display names already selected in one or all languages are to be changed, this can be done using the Edit button. This opens the same dialog as for adding. Only the menu name needs to be changed in ContentCreator; this change will have no effect on previously entered metadata.
Remove: this button is used to prevent the entry of metadata in ContentCreator. If no more metadata is to be entered or if metadata is only to be entered for certain FirstSpirit object types, the types that are no longer required can be removed from the list using the Remove button. The corresponding menu function is then removed; this change does not affect previously entered metadata.
 |
If Workflow Group Provider, Store Mapping or Report-Plug-ins are to be used in a project configuration and they were installed using FirstSpirit modules (FSM) in the FirstSpirit Server, a project-specific ContentCreator web application must be installed and activated (see Web components). Web components that contain Java classes used and resources required by these plug-ins must be added to this web application. A description of how to configure these types of web components in an FSM as well as how to provide ContentCreator plug-ins specific to projects via web components can be found in Implementation and Deployment (→FirstSpirit Online Documentation). |