

Introduction / FirstSpirit ServerManager / Schedule entry planning / Project-based actions / Execute deployment / Via Deployment Servlet
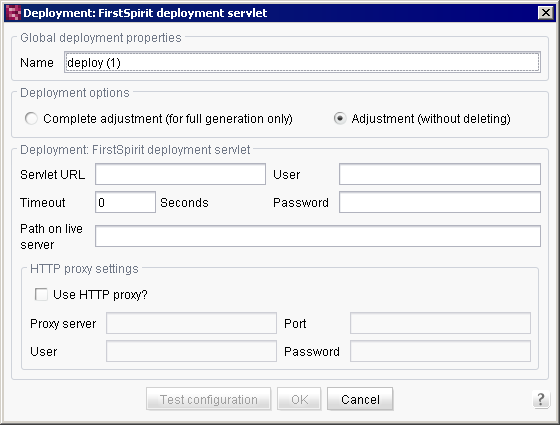
Deployment via the FirstSpirit Deployment Servlet
This action is used to deploy the project via a FirstSpirit Deployment Servlet. The task of the servlet is to compare the project files on the FirstSpirit server to those on the live system. Using the CRC checksum calculation, new, modified or deleted files can be found, and only these files are updated. This differential upload accelerates the update process on the live system. (The information required for this can be read out from, among other things, an Access Control Database, which the CRC checksum manages for all objects. Use of the Access Control Database, however, is not required in order to use the CRC servlet.)
General deployment properties
Name: the name of the action displayed in the schedule overview, schedule management and action templates.
Deployment options
Complete adjustment (for full generation only)
This method is used to create a data inventory identical to the generation data inventory on the web server. This means that files that are no longer present on the development server are also deleted on the web server, new files are copied, and old files already present on the server are overwritten by the new ones.
Adjustment (without deleting)
This deployment option is similar to the complete adjustment, but differs in the fact that no files are deleted from the web server, even if they are no longer present on the development server.
Servlet settings
Servlet URL: the complete address to the FirstSpirit Deployment Servlet is entered here. This information is mandatory. After configuration of the crcTransfer.ini file (using FirstSpirit Security WebApp (FirstSpirit security module), the servlet mapping is copied to the application's web.xml file. The servlet is mapped to *.CRCTransfer by default.
To test the accessibility of the servlet, the servlet can be called in the web browser, e.g. via
http://www.mydomain.de/ fs5staging_1921116/do.CRCTransferThe servlet will display an error message, since no login credentials have been passed in the browser.
User: the user used by the server is entered here for the login if the servlet is used. This information is mandatory.
Password: the password is used along with the user name to log on if the servlet is used. This information is mandatory.
Timeout: if the Deployment Servlet cannot be accessed, this value specifies after how many seconds the communication attempt should be canceled.
Path on live server: here the user specifies the path to the directory on the remote server where the generated data are to be transferred. The directory specified here can potentially be deleted (under Options – Clear generation directory beforehand). The web application directory should therefore never be entered here, but rather any subdirectory can be entered here instead.
To ensure secure access via the FirstSpirit security module (see Checking access rights), the prefix for the Access Control Database should also be entered.
HTTP proxy settings
Use HTTP proxy?: if this option is selected, the connection to the Deployment Servlet is established via the proxy server configured in this area.
Proxy server: the address of the proxy server used to establish the connection. This information is mandatory.
Port: the port to the proxy server entered above. This information is mandatory.
User: the user name used to establish the connection to the HTTP proxy.
Password: the password is used along with the user name to log on if an HTTP proxy is used. This information is mandatory if a user name will be used.
The specified configuration can be tested by clicking on the Test configuration button. The server will first verify that all the necessary parameters have been entered. The server will then attempt to connect to the Deployment Servlet and to create a folder and write a file to it in the specified “Path on live server”. It will then also attempt to rename the file and then delete all of the data created.
If the test is successful, this message appears: “Test successfully completed”
This message appears if it fails: “The test has failed”
Clicking on the Details button opens a dialog with the corresponding log file showing the errors.