

Web server
| Table of contents |
• Overview |

Web server control can be added here for installation and removal procedures within the project areas (see Project components).
Overview
Name: a unique name under which the web server instance was added.
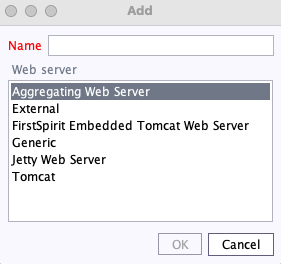
Web server: The following types of web servers are available by default:
- Aggregating Web Server: This type supports the control of several web servers simultaneously, including those of different types.
- External (external web server): This type can be supported by FirstSpirit if configured appropriately. The web applications can be installed and updated automatically on the web server using the FirstSpirit interface.
- FirstSpirit Embedded Tomcat Web Server (2023.9): This type provides a FirstSpirit Embedded Tomcat web server as a system module for reasons relating to maintainability. No more than one instance of this type should be created per server.
- Generic (local web server): FirstSpirit allows for the easy connection of web servers as long as it is possible to implement control (installation or removal of web applications) for these web servers using the BeanShell script.
- Jetty Web Server: This type provides a Jetty web server as a system module for reasons relating to maintainability. See also paragraph Integrated web server. No more than one instance of this type should be created per server.
- Tomcat: this is an external web server that is supported by FirstSpirit. The web applications can be installed and updated automatically on the web server using the FirstSpirit interface.
 |
Using the web server type “Jetty Web Server” and “FirstSpirit Embedded Tomcat Web Server” in production environments is not recommended. |
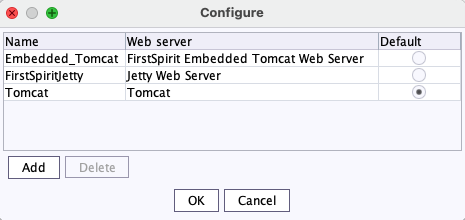
Add: Clicking the Add button adds new web server instances to FirstSpirit Server. See also paragraph “Creating a web server” below.
Delete: Clicking the Delete button deletes an added web server instance.
Configure: Clicking the Configure button opens the web server configuration dialog.
- Aggregating Web Server
- External web server
- FirstSpirit Embedded Tomcat Web Server (2023.9)
- Generic web server
- Jetty Web Server
- Tomcat
Migration: A click on the Migrate button opens the wizard for migrating a web server.
Background: If it is necessary to use the existing web applications on another web server, they must be transferred accordingly. You can use the “Migrate” function to transfer all web applications from one web server to another.
See the Migrating a Web Server section.
Creating and configuring a web server
Name: a unique name for the particular web server instance must be specified here.
Web server: adding a new web server instance is possible by selecting the desired type from the list.
|
Use of “Jetty Web Server” and “FirstSpirit Embedded Tomcat Web Server”is not recommended for production operation and should only be used for as a fallback (in an Aggregating Web Server) or for tests. For more complex configuration requirements (e.g. adjustment of memory size, timeouts, number of threads per deployed application, …), use of an external web server (e.g. Tomcat) is recommended. Complex deployment scenarios, such as use in a reverse proxy scenario, are also not supported. |
Aggregating Web Server
This type supports the control of several web servers simultaneously, including those of different types. Actions such as installing and updating of web applications are performed on all configured application servers in parallel. This enables a fallback scenario to be put in place where, for example, a web server A and a web server B with the same settings / data are operated in parallel. If one of the web servers fails, the other can be used instead with no problem whatsoever (e.g., to configure / administer FirstSpirit).
This function can be used to reproduce a configuration scenario, for instance, in which the “InternalJetty” and a Tomcat were previously operated in parallel.
Add: This button can be used to add existing web servers to the Aggregating Web Server. Web servers of the “Aggregating Web Server” type can not be selected.
All actions taken for the Aggregating Web Server (e.g., installing and refreshing web applications) are executed for all the web servers selected here.
Default: This radio button is used to define a web server that will serve as the default web server. The URL configured for this web server is used universally to generate URLs for all web servers of the Aggregating Web Server.
Optimally, a web server of type Tomcat is configured as “Default”.
External web server
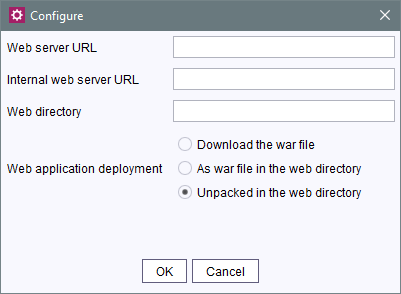
Web server URL: the URL of the desired web server can be entered in this field. The URL is required, for instance, to adapt links for FirstSpirit applications on the start page.
Internal web server URL: An internal (not public) web server URL of the web server may be entered into this field.
Web directory: the path to the directory of the web server can be entered in this field. This is required, for instance, for deleting staging and preview directories when the related project is deleted. The path is also read out and used when updating web applications.
Web application deployment: Web applications configured in FirstSpirit are combined in a WAR file for deployment. Use this option to choose if the WAR file shall
- be available for download (for example in the Web applications (Server) or Web components (project) area). This file must be installed manually afterwards (Download the war file option).
- be saved directly to the specified web directory (As war file in web directory option ), i.e., web/fs5root.war or web/ROOT.war. (Root web applications with / context names are saved in the file system with the name “ROOT”.)
- be unpacked in the specified web directory (Unpacked in web directory option), i.e., web/fs5root/ or web/ROOT/. (Root web applications with / context names are saved in the file system with the name “ROOT”.) In a development scenario, the unpacked WAR file can also serve debugging purposes.
Generic web server
To bind a new web server to FirstSpirit Server, the following functionality is required:
- Installation
- Installation status verification
- Deinstallation
The Configure button opens the web server configuration dialog.
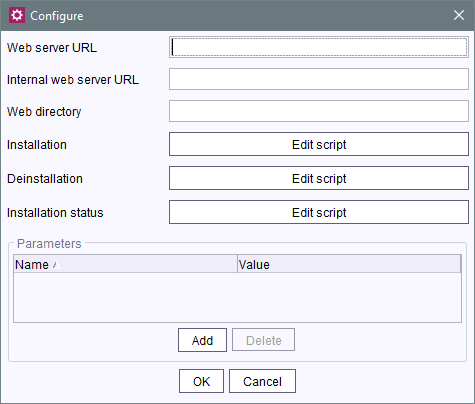
Web server URL: the URL of the desired web server can be entered in this field. The URL is required, for instance, to adapt links for FirstSpirit applications on the start page.
Internal web server URL: An internal (not public) web server URL of the web server may be entered into this field. This can be necessary, if the web server URL cannot be accessed for checking if web applications on the web server are up-to-date. In this case, the web applications would be updated during each start-up phase of the FirstSpirit server. The URL entered here will only be used if the web directory (field “Web directory”, see below) is not set.
Web directory: the path to the web directory of the generic web server for the use of FirstSpirit applications (e.g. fs5staging). If the generic web server is used for the fs5staging web application, for instance, the project files are generated in the specified directory of the generic web server. The path is also required in order to run the configured scripts (e.g. installation or removal).
Edit script: all functions can be enabled using a BeanShell script. The Edit script button (next to the particular function) opens the script dialog.
The desired functions can be carried out under the control of scripts for each web server supported by FirstSpirit. The required parameters for the scripts can be added in the “Parameters” area. The functionality should be checked using the Test button before saving. After saving the script, the functionality will be available in the “Web applications” or “Web components” area:
- Server properties / Web applications
- Project properties / Web components
The web directory containing the generic web server can be specified for running the scripts.
Add parameter: in the “Parameters” area, parameters can be added, which are then available in all script contexts (from installation to removal; example: path information).
Delete parameter: clicking on this button removes a highlighted parameter from the list.
|
Deleting parameters can result in the inability to work with or adapt the scripts. |
Jetty Web Server

The “Jetty Web Server” can be configured within the area Modules, and specifically with the “FirstSpirit Jetty Server” module, “JettyService” service (or in FirstSpirit ServerMonitoring, area “Configuration / Services” or “Control / Services”). Double-click or select “Configure” to open the dialog opposite:
|
 From FirstSpirit 2026.2, the “Jetty Web Server” is no longer available. From FirstSpirit 2026.2, the “Jetty Web Server” is no longer available. |
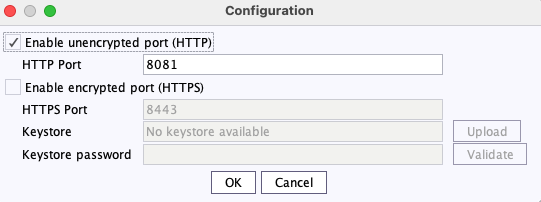
To be able to access the “Jetty Web Server” via an HTTP port, check the “Enable unencrypted port (HTTP)”, checkbox; to be able to access the “Jetty Web Server” via an HTTPS port, check the “Enable encrypted port (HTTPS)” checkbox.
HTTP port: Enter the port number via which the “Jetty Web Server” can be accessed under HTTP here (default: port 8001).
HTTPS port: Enter the port number via which the “Jetty Web Server” can be accessed under HTTPS here (default: port 8443).
Creating encrypted connections requires a keystore in JKS format. This can be uploaded using the button “Upload”.
After uploading the keystore and entering the corresponding password (field Keystore password), a click on the button “Validate” checks the entered configuration. When successful, the number of detected aliases is displayed in the field Keystore.
Configuration is completed with “OK”.
|
Modifications of this configuration require a re-start of the service “JettyService”. |
|
The implementation “Jetty Web Server” does not support authentication with a reverse proxy. |
FirstSpirit Embedded Tomcat Web Server
The “FirstSpirit EMbedded Tomcat Web Server” can be configured within the area Modules, and specifically with the “FirstSpirit Embedded Tomcat Server” module, “TomcatService” service (or in FirstSpirit ServerMonitoring, area “Configuration / Services” or “Control / Services”). Double-click or select “Configure” to open the dialog opposite:
To be able to access the “FirstSpirit Embedded Tomcat Web Server” via an HTTP port, check the “Enable unencrypted port (HTTP)”, checkbox; to be able to access the “FirstSpirit Embdded Tomcat Web Server” via an HTTPS port, check the “Enable encrypted port (HTTPS)” checkbox.
HTTP port: Enter the port number via which the “Jetty Web Server” can be accessed under HTTP here (default: port 8000).
HTTPS port: Enter the port number via which the “Jetty Web Server” can be accessed under HTTPS here (default: port 8443).
Creating encrypted connections requires a keystore in JKS format. This can be uploaded using the button “Upload”.
After uploading the keystore and entering the corresponding password (field Keystore password), a click on the button “Validate” checks the entered configuration. When successful, the number of detected aliases is displayed in the field Keystore.
Configuration is completed with “OK”.
|
Modifications of this configuration require a re-start of the service “TomcatService”. |
|
The implementation “FirstSPirit Embedded Tomcat Web Server” does not support authentication with a reverse proxy. |
|
Use of “Jetty Web Server” and “FirstSpirit Embedded Tomcat Web Server”is not recommended for production operation and should only be used for as a fallback (in an Aggregating Web Server) or for tests. For more complex configuration requirements (e.g. adjustment of memory size, timeouts, number of threads per deployed application, …), use of an external web server (e.g. Tomcat) is recommended. Complex deployment scenarios, such as use in a reverse proxy scenario, are also not supported. |
Tomcat web server
The Configure button opens the web server configuration dialog.

Web server URL: Enter the basis URL of the Tomcat, for example http://tomcat:8080. This URL is required, for instance, to adapt links for FirstSpirit applications on the start page.
Internal web server URL: An internal (not public) web server URL of the web server may be entered into this field, for example http://internaltomcat.company.tld:8080. This can be necessary, if the web server URL cannot be accessed for checking if web applications on the web server are up-to-date. In this case, the web applications would be updated during each start-up phase of the FirstSpirit server. The URL entered here will only be used if the web directory (field “Web directory”, see below) is not set).
Web directory: If FirstSpirit has write access to the Tomcat ~/webapps directory, you should enter the path to the Tomcat ~/webapps directory in this field, e.g.
/var/lib/tomcat/webapps
If the Tomcat web server is used for the global or a project-local fs5staging-web application, FirstSpirit uses the configured directory as the basis for calculating the respective path information of the files to be generated.
If an fs5staging web application is configured to a Tomcat that does not have this field filled in, the webapps directory of the “Jetty Web Server” is used as a fallback as the basis of the path calculation. e.g.
~/data/modules/FirstSpirit Jetty Server.JettyService/webapps/fs5staging/webapp
Note: The service of the “Jetty Web Server” (JettyService) must be running to allow access to the generation directory.
Tomcat user: the user name that can be used to access to the Tomcat Manager URL (see below) must be entered in this field. The user name and password are specified during installation of the Tomcat server and can be found in the tomcat-users.xml file in the conf Tomcat web server directory.
Tomcat password: the password for the user name previously specified must be entered in this field. The password provides access to the Tomcat Manager URL (see below). The user name and password are specified during installation of the Tomcat server and can be found in the tomcat-users.xml file in the conf Tomcat web server directory.
Tomcat manager URLs: Tomcat Manager can be used to view and manage web applications. In addition to an HTML interface, it also provides a text interface. The URL for the Tomcat Manager text interface must be entered in this field; for instance,
http://localhost:8080/manager/text
Multiple URLs can be entered and separated by commas.
Migrating a web server
Migration steps
When migrating a web server (source web server) to a new web server (target web server), the existing web applications must be transferred to the new target web server. Using the “Migrate” function, all affected web applications can be transferred to the target web server.
Recommended proceeding:
- Configuration of the new web server (see section Creating and configuring).
- Migrating the web server (see section Step 1: Selecting the web server).
- Migrating the web applications (see section Step 2: Migrating web applications).
Migration step 1: Select web server
A click on the Migrate button opens the wizard for the migration of a web server.
In the first dialog (Migration Wizard - Step 1), the previous web server is selected as the source web server and the new web server is selected as the target web server. The new web server to which the web applications are to be migrated must be created before (see Creating and configuring).
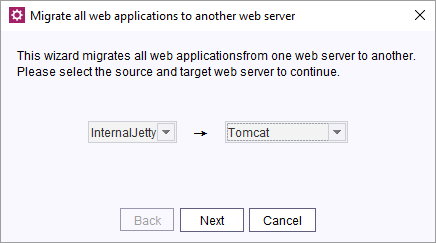
Note: Only web servers on which web applications are installed are displayed as source web servers.
Only web servers on which web applications can be installed by FirstSpirit are displayed as target web servers (these are all web servers except external web servers where the “Download war file” option is activated).
A click on the Next button confirms the selection and opens the next dialog (Migration Assistant - Step 2).
Migration step 2: migrating web applications
The second dialog (Migration Wizard - Step 2) displays a list of all installed web applications of the source web server.
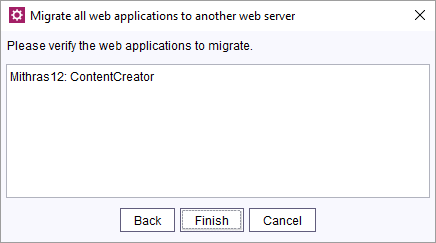
A click on the Finish button starts the transfer of the web applications to the target web server. The web applications are uninstalled on the source web server and then installed on the target web server.
The progress of the entire transfer and the status of the individual transfer steps are displayed in a log window. If problems occur, the fs-server.log or the log file of the corresponding web server should be checked to identify the cause of the problem.
If the FirstSpirit start page is affected by the relocation of the web server, the following applies:
Under certain conditions (when starting the FirstSpirit ServerManager via HTTP or HTTPS) the start page is migrated but not uninstalled. In this case, the start page can be uninstalled on the previous web server (source web server). To do this, start the ServerManager on the target web server and select the Start page tab under Server Properties - Web Applications. There select the source web server and remove the web application by clicking the Delete button.
Note: If the start page has moved to a web server of the type Aggregating Web Server and the previous (source) web server is part of this Aggregating Web Server:
- the connection of the ServerManager will get lost in the last migration step. However, the migration will be completed simultaneously and the start page can be accessed again shortly afterwards.
- the start page should “not be uninstalled”. Otherwise the start page is no longer accessible via the corresponding web server until the next FirstSpirit restart.
|
From this moment, the FirstSpirit server is no longer accessible via the previous web server! |
|
Recommended: After completion of the transfer, the FirstSpirit server should be restarted. |
Finally, the source web server can be deactivated.
Example: If the source web server is the integrated web server “InternalJetty”, the value of the parameter INTERNAL_SERVLET_ENGINE in the configuration file <FirstSpiritROOT>/conf/fs-server.conf can be changed from 1 to 0.