

Web applications
| Table of contents |
FirstSpirit global web applications (fs5root, fs5preview, fs5webedit, etc.), for example by creating/adding project-specific enhancements (such as input components, services, applications). See also Individualizing the global FirstSpirit web applications.
You can also define and configure your own (global) Web applications, which are then available in all projects of the server (“globally”, see Installing global web applications). For instance, custom web applications for the FirstSpirit AppCenter (see FirstSpirit AppCenter documentation) can be installed.
Force update: Click this button to update all existing FirstSpirit web applications (global web apps and web apps that are local to a project) in all projects. The update is performed the next time the server is restarted.
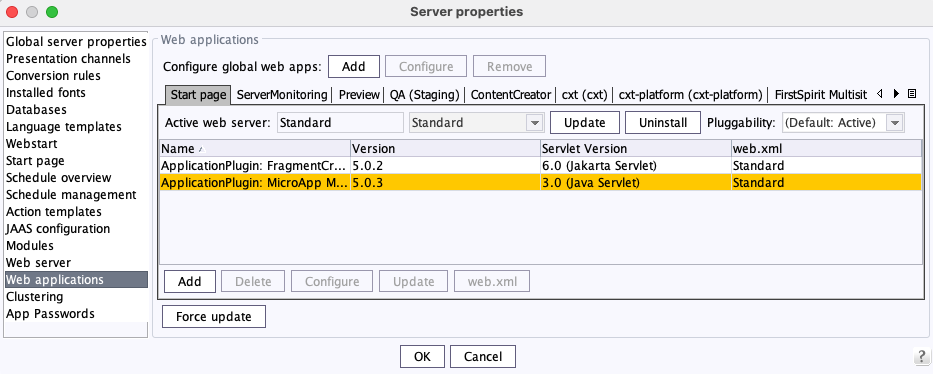
Installing global web applications (Add)
The Add button next to “Configure global web app” is used to install a new web application on the server.
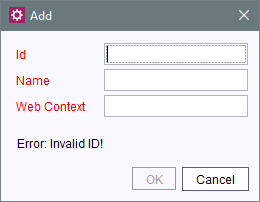
Adding a new web application
Id: a unique identifier must be entered here for the web application. This identifier is used to create a subdirectory on the server for web applications. Only lower/uppercase letters, numbers and the underscore character may be used. The ID can never be changed once it is saved.
Using a web application ID via the FirstSpirit Access API, the URL to a global web application can be determined using the de.espirit.firstspirit.agency.LegacyModuleAgent interface.
Name: the name used as the display name must be entered here. This can be changed at a later time, if necessary.
Web Context: a context name, which forms part of the web application URL, must be entered here. The name must be unique across all global web apps and must for example not match the name of any FirstSpirit web applications already included by default (e.g., fs5root, fs5preview, fs5staging, fs5webedit, fs5webmon) or other global web apps.
Configuring web applications
Applications
Every web application is displayed and configured in its own tab. The default web applications are:
- Start page: configuration for the FirstSpirit start page
- Preview: configuration for the preview
- QA (Staging): configuration for the generated project QA (Staging) contents
- ContentCreator: configuration for the ContentCreator editing environment
For more information about configuring ContentCreator please refer to Chapter ContentCreator configuration, too. - ServerMonitoring: configuration for FirstSpirit ServerMonitoring
Web server
A web server can be set for each web application: 
Any web servers that were configured in the Web server area can be selected.
Different conversion steps are required depending on the type of web server:
- Aggregating Web Server
- External web server
- Generic web server
- Jetty Web Server
- FirstSpirit Embedded Tomcat Web Server (2023.9)
- Tomcat
Install/Update: This button installs the web application on the selected web server. If the button is disabled, the web application is already installed.
After installation the web server is activated for the application. The links to the web application (e.g. on the start page) are automatically switched to the new web server.
If the web server selected is a generic web server without the required script functionality, or, if applicable, an Aggregating or external web server, the Download button will be displayed instead.
Download: This button is used to download an application's WAR file, which needs to be installed manually on the web server. The button is only displayed in order to configure generic web servers without the required script functionality or, where applicable, external web server, and Aggregating Web Server if one of the included web server can not be controlled by FirstSpirit.
Uninstall: This button removes the web application from the selected web server. If the button is disabled, the web application has not been installed yet. If a web application is uninstalled, the relevant entry is removed from the fs-server.conf configuration file.
Pluggability: “Web Framework Pluggability” was introduced with version 3.0 of the Java Servlet Specification and is provided by the servlet engine. However, the latter function requires that all classes must be scanned for annotations when the web application is deployed (and implicitly each time the application server is started).
This allows, for example:
- web.xml modularization or
- the configuration of components via Java annotations.
If the functionality is not needed, it can be disabled globally or for individual web applications so that deployment on the web server does not take longer than necessary.
Scanning of Java classes and TLDs can also be disabled directly via the servlet engine.
Pluggability configuration options in FirstSpirit:
- Manual setting for all web applications: Via the WEBAPP_ENABLE_PLUGGABILITY_FEATURES_DEFAULT parameter.
- Manual setting for individual web applications: Via the “Pluggability” selection field
- Automatic setting: Via the metadata-complete and absolute-ordering attributes.
Re 1) For all web applications:
In FirstSpirit, “Web Framework Pluggability” is enabled globally via the WEBAPP_ENABLE_PLUGGABILITY_FEATURES_DEFAULT parameter (default value “true”) within the fs-server.conf configuration file (see section: Area: Web Applications (fs-server.conf)):
- WEBAPP_ENABLE_PLUGGABILITY_FEATURES_DEFAULT=true (default value) allows the servlet engine to search for pluggability for all web applications.
- WEBAPP_ENABLE_PLUGGABILITY_FEATURES_DEFAULT=false disables the servlet engine's search for pluggability for all web applications.
Re 2) For individual web applications:
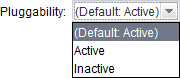
pluggability features are handled using the “Pluggability” checkbox, either for the global web applications in this area or for the web components of a project via Project properties/Web components.
Possible values:
- Active: Allowing the servlet engine to search for pluggability, Java classes are scanned for annotations during deployment. This is the default value.
- Inactive: Disables the servlet engine's search for pluggability, Java classes are not scanned.
Re 3) Pluggability is automatically enabled if at least one web component of a web application requires pluggability. The pluggability of a web component is affected by the attributes metadata-complete and absolute-ordering(*).
(*) An empty absolute-ordering tag matches the metadata-complete="true" setting. If the settings for metadata-complete and absolute-ordering conflict, pluggability is also enabled.
This behavior ensures that fewer conflicts arise due to incorrect configuration. If necessary, the explicit setting “Inactive” for the pluggability in this area will be overridden by the forced enabling.
Example: The ContentCreator requires “Pluggability”. When using the ContentCreator, the pluggability mode is automatically enabled by the system (log message):
WARN (...) Force enabled pluggability for 'fs5webedit' in project '-1'.).
The different settings in the individual areas have the following effect:
Pluggability (manual setting in FirstSpirit) | Setting for metadata-complete | Pluggability (result) |
|---|---|---|
active | regardless of the value | enabled |
inactive | no web component with metadata-complete="false" | disabled |
inactive | at least one web component with metadata-complete="false" | enabled |
 |
The forced enabling of the “pluggability” has no effect on the interface, so the “Pluggability” option in ServerManager may be set to “Inactive” even though the option is activated. |
Background: Web applications configured in FirstSpirit are combined in a WAR file for deployment. Only when all configurations are saved together in one WAR file, FirstSpirit is able to determine whether the “Inactive” setting for the “Pluggability” option must be overridden or not.
Web components

For each web application, web components on the server can be added, removed, configured and updated using the buttons “Add”, “Delete”, “Configure” and “Update” below the table. The functions are similar to that of the web components in the project properties. No order is defined when components are added in ServerManager.
To assist in the detection of WebApp components that require an update to the Jakarta Servlet version, these are shown accordingly (highlighted in yellow).
web.xml
Each web component can be individually configured for the required web area. You can either select the default configuration by pressing the “Configure” button or you can edit the “web.xml” file manually. During installation on the web server, all the necessary components are installed and a web.xml file is created. This combines all the files that have been configured so far (the web.xmls of the individual components) into one.
The following principles apply when merging multiple web components into a single web.xml:
- welcome-file-list are merged. The welcome-file-lists of the web components are added all at once and any duplicate entries are filtered out.
- context-param must be uniquely assigned and are not merged.
- session-config are merged.
- session-timeout must be uniquely assigned and are not merged.
- display-name is ignored.
- metadata-completemust not be specified, if the (entire) web application requires pluggability. Default value is “false”. The value only needs to be set to “true” once for the attribute to be evaluated all the time.
- absolute-ordering must not be specified, if the (entire) web application requires pluggability (e.g. ContentCreator and FragmentCreator)
Configuring Aggregating Web Server
for a web application
It is only possible to select an Aggregating Web Server if a corresponding web server instance was previously added to the server (see Creating a web server).
Aggregating Web Server behave like a combination of the selected web servers. If one of the included web servers can not be controlled by FirstSpirit (web servers of the type “Generic” without the required script functionality or, if applicable, “External”), a WAR file must be downloaded manually and installed onto the included web servers. The Download button will be displayed instead of the Install button. See also the following paragraph Configuring an external web server for a web application , “Download the war file” option.
If all selected web servers can be controlled by FirstSpirit, the WAR file can be copied and unpacked automatically by the included web servers by clicking the Install button. The web application then runs on all web servers included in the Aggregating Web Server. The URL which is configured for the “Default” web server is used universally to generate URLs for all web servers of the Aggregating Web Server.
Configuring an External Web Server
for a web application
It is only possible to select an external server if a corresponding web server instance was previously added to the server (see Adding a web server).
Control of an external web server may be supported by FirstSpirit, if it is configured appropriately (see Configuring an external web server).
If an external web server is to be activated for a FirstSpirit web application, the following steps are required:
1) Download the war file option is activated:
- Select the entry from the combo box for the desired external web server.
- The Download button becomes active. Use this button to download the application's WAR file.
- After download is completed the configuration of the web application is switched to the external web server. The links to the web application (e.g. on the start page) are automatically switched to the new web server. The URL entered under “Web server URL” is used.
- The WAR file must be installed manually on the external web server. The installation is either done manually via the administrative interface of the external web server or automatically from the web server file system. The start page URL should be on its own virtual server so that the FirstSpirit start page in the /fs5root web application can be defined as the root application and so that it can be accessed, for instance, directly from http://fs5.yourdomain.net. However, a URL with a prefix such as http://appserver.yourdomain.net/fs5 is also possible.
The WAR file must be reinstalled every time FirstSpirit Server is updated.
2) As war file in web directory or Unpacked in web directory option is activated:
- Select the entry from the combo box for the desired external web server.
- The Install button becomes active. Use this button to copy the WAR file into the defined directory (“As war file in web directory” option) or to unpack it into the defined directory (“Unpacked in web directory” option).
- After installation is completed the configuration of the web area is switched to the external web server, which is then displayed as the active web server for this area.
The FirstSpirit Server recognizes if the version of the web applications on the FirstSpirit Server and the web server are not consistent (for example because the FirstSpirit Server has been updated), and will trigger an update.
Configuring a Generic Web Server
for a web application
It is only possible to select a generic server if a corresponding web server instance was previously added to the server.
Control of the generic web server is not provided by default, but it is possible using scripts. If these scripts are not available, the procedure is identical to that of the external web server with activated “Download the war file” option.
If a generic web server is to be activated for a FirstSpirit web application (e.g., Tomcat), the following steps are required:
- Select the entry from the combo box for the desired generic web server.
- The Install button becomes active. As long as the relevant functionality has been provided by a script, the web application can be installed on the generic web server by clicking on this button.
- After installation is completed the configuration of the web application is switched to the generic web server, which is then displayed as the active web server for the application. The links to the web application (e.g. on the start page) are automatically switched to the new web server. The URL entered under “Web server URL” is used (see Configuring a generic web server).
Configuring the Jetty Web Server
for a web application
It is only possible to select the Jetty Web Server if a corresponding web server instance was previously added to the server.
Control of the “Jetty Web Server” is supported by FirstSpirit and takes place automatically. Installation on the web server and registering the web components is handled by FirstSpirit.
If the Jetty Web Server is to be activated for a FirstSpirit web application, the following steps are required:
- Select the entry for the Jetty Web Server from the combo box.
- The Install button becomes active. This button copies the WAR file, which is automatically unpacked by the web server.
- After installation is completed the configuration of the web area is switched to the Jetty Web Server, which is then displayed as the active web server for this area.
The FirstSpirit Server recognizes if the version of the web applications on the FirstSpirit Server and the web server are not consistent (for example because the FirstSpirit Server has been updated), and will trigger an update.
Configuring the FirstSpirit Embedded Tomcat Web Server
for a web application
It is only possible to select the FirstSpirit Embedded Tomcat Web Server if a corresponding web server instance was previously added to the server.
Control of the “FirstSpirit Embedded Tomcat Web Server” is supported by FirstSpirit and takes place automatically. Installation on the web server and registering the web components is handled by FirstSpirit.
If the FirstSpirit Embedded Tomcat Web Servers is to be activated for a FirstSpirit web application, the following steps are required:
- Select the entry for the FirstSpirit Embedded Tomcat Web Servers from the combo box.
- The Install button becomes active. This button copies the WAR file, which is automatically unpacked by the web server.
- After installation is completed the configuration of the web area is switched to the FirstSpirit Embedded Tomcat Web Server, which is then displayed as the active web server for this area.
The FirstSpirit Server recognizes if the version of the web applications on the FirstSpirit Server and the web server are not consistent (for example because the FirstSpirit Server has been updated), and will trigger an update.
Configuring a Tomcat Web Server
for a web application
It is only possible to select a Tomcat server if a corresponding web server instance was previously added to the server (see Adding a web server).
Control of a Tomcat web server is supported by FirstSpirit and takes place automatically (see Configuring a Tomcat web server). Installation on the web server and registering the web components is handled by FirstSpirit.
If a Tomcat web server is to be activated for a project-specific web area, the following steps are required:
- Select the entry from the combo box for the desired Tomcat web server.
- The Install button becomes active. This button copies the WAR file, which is automatically unpacked by the web server.
- After installation is completed the configuration of the web area is switched to the Tomcat web server, which is then displayed as the active web server for this area.
The FirstSpirit Server recognizes if the version of the web applications on the FirstSpirit Server and the web server are not consistent (for example because the FirstSpirit Server has been updated), and will trigger an update.