

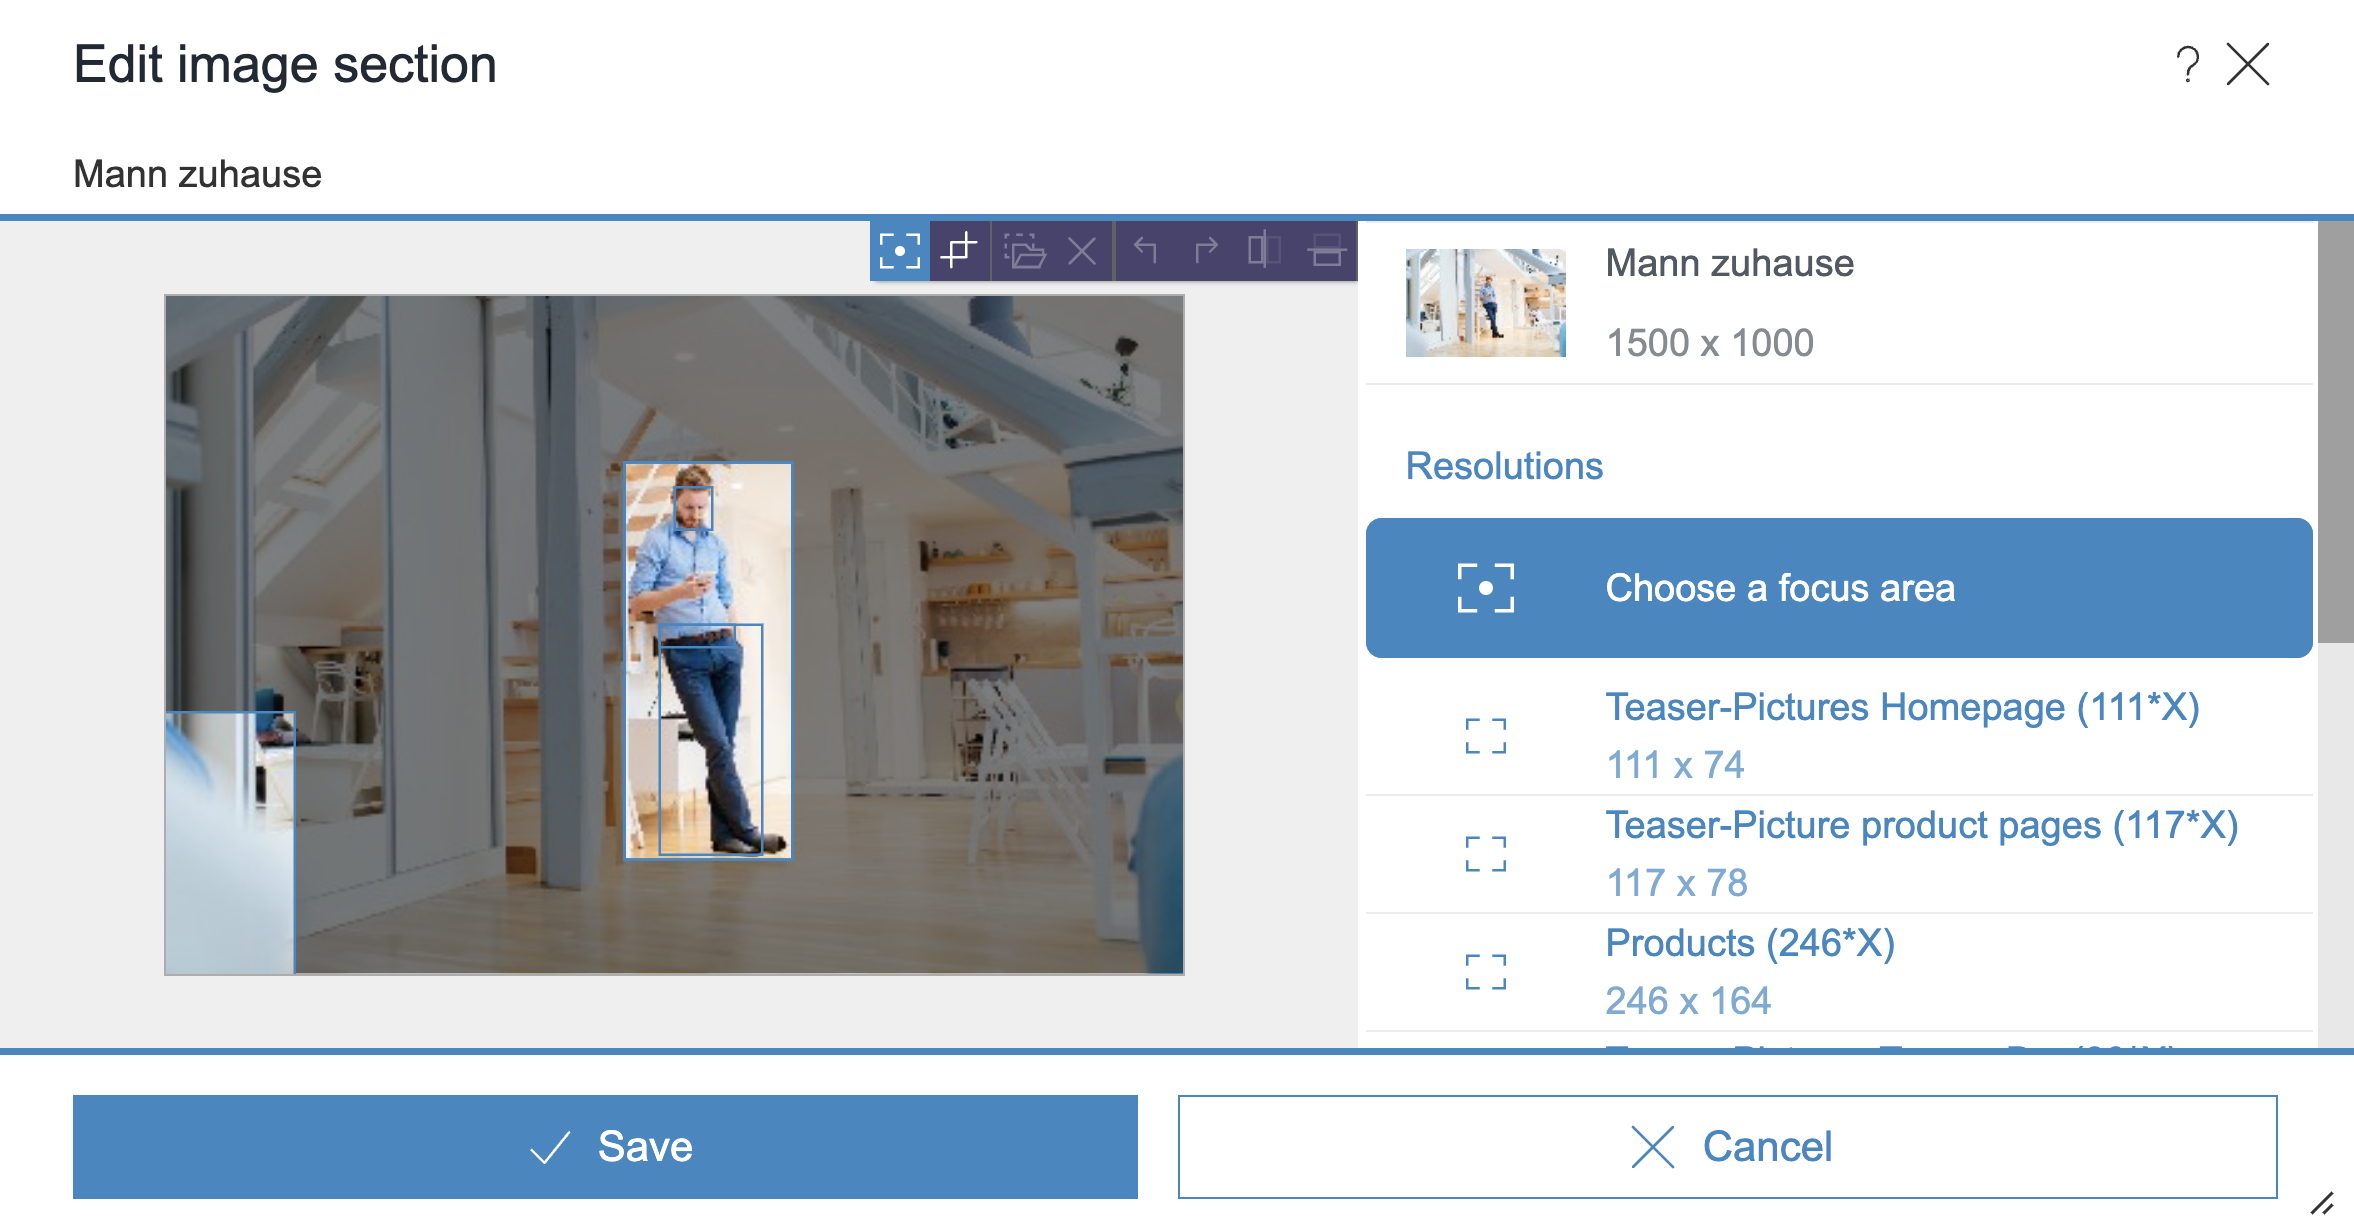
Edit image section
| Table of contents |
Often, image material must first be cropped so that it can be optimally used for a website: For example, if the proportions of the original image do not fit the proportions and sizes needed for the website. Or if, in the case of images with several motifs or objects, a particular section is to be placed in the center.
For this purpose, variants of an image (also “resolution”) can be edited In this dialog. The (original) image originally uploaded to the project remains untouched in this case, so that changes can be undone if necessary.
The editor is supported by the system in various ways when cropping images - depending on the project configuration, images are automatically cropped directly during upload (using artificial intelligence), motifs (“focus areas”) are suggested, or the editor can conveniently select a suitable crop simultaneously for all variants of an image.
Cropping modes
In principal, the dialog offers two modes of editing image sections. These can be accessed via icons that are displayed above the image when the mouse is moved:
 Smart Cropping:
Depending on the project configuration, different functions are available here:- System-supported manual selection of a suitable section for all resolutions of an image at the same time
- Selection from several automatically detected motifs per click (“AI-assisted motif detection”)
- Check automatic image cropping and adjust if necessary (Automatic cropping, “AutoCropping”)
 Manual cropping:
If required, cut-outs for single resolutions can be selected and changed.
Additionally, images can be rotated and mirrored in this mode.
 |
Changes to an image variant will result in the changed image variant being displayed on all pages where the image is used in this variant. |
For more information about working with images please see also page Working with media.
Image information
The name of the image is displayed in the upper left corner above the image and on the right edge of the dialog.
The right edge of the dialog also shows the image dimensions of the original image in pixels.
The term “Usages” in the dialog header indicates that the current image (or variants) may be used in other places on the website; for example, on another page or in a dataset. The number indicates how many places the image is used in. This usually counts the page on which the editor is currently located.
Clicking on the link opens a window listing the places where the current image is also being used, together with the name and element type icon.
![]() Click on this icon to open the References report. You can check there which elements are referenced with this image.
Click on this icon to open the References report. You can check there which elements are referenced with this image.
Resolutions
At the right border the resolutions of an image are displayed with
- the name of the resolution
- the predefined pixel dimensions
(in brackets; also “target resolution”; an X stands for a flexible width/length, which results from the relation to the side lengths of the original image) - the actual pixel dimensions
Click on a resolution to select the respective resolution.
Resolution groups / focus areas
Depending on the mode and the processing status, resolutions are grouped into different groups.
A processing can be performed for
- a resolution or
- a group of resolutions
To edit a resolution, click on the desired resolution. Only the selected resolution will then be edited.
Groups are displayed in the list of resolutions below a group name.
If a group is selected by clicking on the group name, the following editing affects all resolutions of this group.
Depending on the project configuration and processing status, there are the following groups or focus areas:
- Automatic scaling
The resolutions in this group have been calculated automatically by the system and have not (yet) been edited manually. - Manual cropping
For resolutions in this group, no automatic image recognition and no automatic cropping is activated, or manual cropping has been performed. - Crop selection
This is a manual crop. - Choose a focus area
If several motifs were automatically detected in an image, the desired one can be selected by clicking on it.
Tooltips are displayed for the focus areas on mouse-over, describing which motif is involved in each case.
Clicking in one of the frames pulls apart overlapping focus areas so that they can be selected individually.
If no focus areas are available, a focus area can be set manually by frame.
In both cases, all resolutions are automatically cropped based on the selected focus area. You can roughly check which ones these are by looking at the frames in the image.
For a check of the individual resolutions, the crop automatically calculated for the respective resolution is highlighted on mouse-over over the list of resolutions on the right side of the dialog. - Face
A face was automatically detected on the image. This was defined as the focus area (indicated by the frame) and all resolutions were automatically generated based on this focus area. - Around x faces
Multiple faces were automatically detected on the image. A frame around them is used as the focus area by default and the clippings to the resolutions are created automatically based on this focus area. - Object
An object was automatically detected on the image. This was set as the focus area (indicated by the frame) and all resolutions were automatically created based on this focus area. - Around all objects
Several objects were automatically detected on the image. The clippings to the resolutions are automatically created based on the focus area. - Image center
No object was detected on the image. A focus area was automatically defined, which is about 80% of the uploaded image and spans the center of the image.
If necessary, the focus area can be adjusted manually by moving and resizing it.
Note: After resetting the “Image center” focus area (via X) and saving, it cannot be automatically restored.
Note: What is primarily recognized on images in the case of automatic image cropping (“AutoCropping”) can be influenced by the choice of which folder an image is uploaded to. Ask your project developer about this.
All croppings can be edited manually (![]() ).
).
Cropped resolutions are suitably sorted into groups.
Single resolutions can be moved into groups by drag-and-drop.
Manually cropped or uploaded resolutions can be reset as a group.
Viewing angle
![]() By default, intelligent croppings are oriented towards the center of the image, so that the cropping is automatically extended towards the center of the image (“Automatic orientation”).
By default, intelligent croppings are oriented towards the center of the image, so that the cropping is automatically extended towards the center of the image (“Automatic orientation”).
Use the “Viewing angle” function to define in which direction of the original image the cropping should be extended (top, bottom, right, left, extend, shorten...). With this angle of view you can thus control which area of the image is relevant for the resolutions and should be considered for the automatic cropping. (“Manual orientation”)
In pictures with people, for example, the viewing angle can ideally be selected so that the person and his or her viewing direction as well as the target is in the focus area.
Resetting image sections and orientation
Selected image sections can be reset (in both modes) using the following functions:
 in the editing bar on mouseover: for the currently selected resolution or the current group
 on groups: for the selected group
In some cases, the context menu of the icon ![]() is used for resetting.
is used for resetting.
Depending on the project configuration, the automatically determined focus areas are then displayed again in the dialog, for example, and a different selection can be made.
If an angle of view was selected manually (“Manual orientation”), this can also be reset via the corresponding X icon (“Reset orientation”).
Defining image sections manually
![]() Use this function to draw a frame to select an image section.
Use this function to draw a frame to select an image section.
By clicking and dragging the frame, it can be moved within the image. The size of the frame can be changed using the handles.
Upload resolution manually
![]() Use this function to upload images for specific resolutions.
Use this function to upload images for specific resolutions.
The upload functionality is only available if a single resolution has been selected.
By clicking this icon you can choose a specific image using a file selection dialog. You can additionally upload an image via drag&drop.
Status information
The status can be checked for each resolution as follows:
 Automatic scaling
This is a resolution automatically calculated by the system. It has not (yet) been processed. Smart cropping
For this resolution, an smart cropping was performed. Crop selection
This is a manual cropping. The selected section is too small for the resolution in question. In this case, there may be a loss of quality because the system automatically scales the image larger.
On the other hand, if a larger area than the target size is selected, the system will automatically scale the image down to the resolution size.
Further editing options
![]() Use this icon to turn the image 90° to the left.
Use this icon to turn the image 90° to the left.
The selection area has to be moved into the image or made smaller as needed, so that the selection can be taken over.
![]() Use this icon to turn the image 90° to the right.
Use this icon to turn the image 90° to the right.
The selection frame has to be moved into the image or made smaller, as needed, so that the selection can be taken over.
![]() Use this icon to flip the image horizontally.
Use this icon to flip the image horizontally.
![]() Use this icon to flip the image vertically.
Use this icon to flip the image vertically.
Saving
Use the Save button to save the image in its current processing state and close the dialog. If necessary, other sections can be selected later or the resolutions can be reset to the initial state.