

Project
| Table of contents |
Add new
This menu item is only available to server administrators.
Use this function to create a new project on the server.
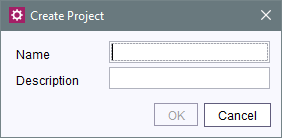
Project – Create
Name: The assigned project name must be unique server wide for being able to – especially in the case where there is more than one project on the Server – identify it afterwards. It is helpful to assign a meaningful name. Amongst others, the name will be displayed in the headline of the SiteArchitect.
Description: the description specified here appears in the project selection list after the user logs in.
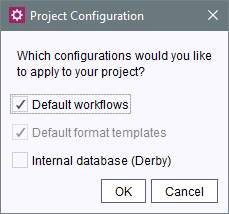
Project configuration
After entering the project name and project description, the project will then be defined in the next dialog.
Selecting these checkboxes applies the respective configurations to the project.
Default workflows: if this checkbox is selected, the default workflows included with FirstSpirit are imported to the “Workflows” node (within the project's template store). There are two workflows integrated in FirstSpirit:
- “Task”: workflow for general editing of tasks in the project.
- “Release request”: workflow for release of objects that were created or changed in the project.
See also Workflows (→FirstSpirit Online Documentation).
Default format templates: the default format templates (see also Format templates (→FirstSpirit Online Documentation)) included with FirstSpirit are imported to the format template node (within the project's template store). Editors are also able to prepare text in bold or italics in the DOM Editor input component. This option cannot be deselected.
Internal database (Derby): if this checkbox is selected, the internal database (Derby) provided with FirstSpirit is activated for the project. The standard layer can be used in FirstSpirit SiteArchitect for a database schema. This automatically sets write access to the database for this project (see Databases).
 |
The Derby DBMS contained in FirstSpirit is not suitable for productive use and should therefore be used for tests only. |
Clicking OK to confirm the configuration will immediately add the new project to the ServerManager project list; the project can then be configured using the Change properties button.
The Add new button offers the same functionality.
Add new from template
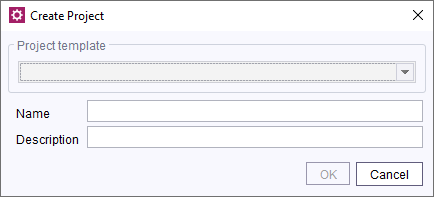
Project - Create new from template
This menu item is only available to server administrators.
The Project template field is visible if project templates are available on the FirstSpirit server.
A project template is created by setting up and exporting a project accordingly (see Export).
Note: The name of the project is used as the display name of the template.
The project export file has to be moved in the folder <FirstSpiritROOT>/data/templates/projects.
Project templates stored there are offered for selection in a drop-down list. If one of these projects is selected, the corresponding project will be imported (Schedule entries are activated. If necessary, the “Select target databases” dialog is displayed (see Import)).
Copy
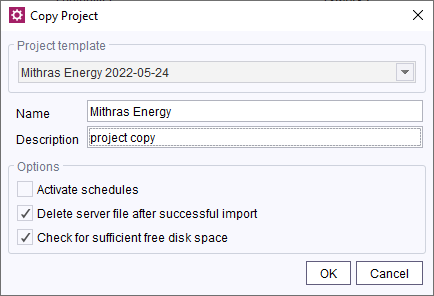
Project - Copy
This menu item is only available to server administrators.
Using this function, projects located on the server can be copied directly without using the Export and Import functions separately.
In the Project template field, the desired project that should be copied can be selected.
The options can be freely defined (see also the Import section).
If database contents are used within the project to be copied, these contents must be mapped to a new database layer. A new database layer or one that already exists on the server must be assigned to each individual schema of the project.
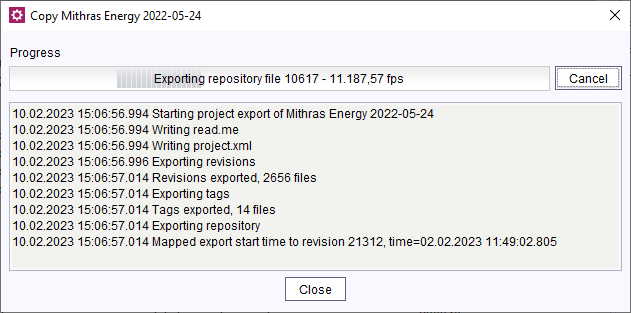
Closing the progress window and the ServerManager have no effect on the process.
Import
This menu item is only available to server administrators.
Using the Import Project dialog, you can reimport projects to the server that had been exported (see below).
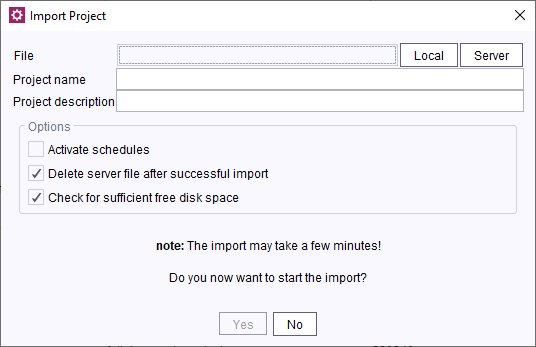
File: the “Local” and “Server” buttons can be used to select a compressed project export file. The Local button is used to search through the computer file system.
The Server button is used to view a list of packed files from the server's export directory. The desired project can be selected from this list.
Project name: a unique name for the project to be imported must be entered in this field. See also above.
Project description: a project description for the project to be imported must be entered in this field. See also above.
Importing New Users: If this checkbox is selected, all users of the project will be retained. Users not present on the server will be created anew, and existing users will be assigned to the project. If the checkbox is not selected, only users that are already present on the server will be assigned to the project.
Activate schedules: If this checkbox is selected, all schedule entries (see Schedule management) remain in the same status that they were in at the time the project was exported. This means that active schedule entries continue to remain active and are executed at the configured time. This option should therefore only be activated with caution and when the entries are known, since otherwise undesirable deployments may result. If this checkbox is not selected, the schedule entries for a project are preserved, but are deactivated.
Delete server file after successful import: If this checkbox is selected, the project export file is deleted from the server after the project is imported. It will no longer be available in the File Import list.
Check for sufficient free disc space: If this checkbox is selected, a check is made before the import as to whether a project import is possible with the available disk space without the free disk space decreasing to such an extent that the FirstSpirit server would be shut down (see hdd.limitparameter and Disk space check).
Note: This check assumes that database contents do not occupy the disk space available to FirstSpirit. Furthermore, the additional disk space required over and above pure data storage (e.g. for the search index, reference graph, ...) is estimated during the check. In rare cases it can therefore happen that the server shuts down despite this check due to a lack of memory.
The import is started by clicking Yes.
If the project to be imported was created in a later version of FirstSpirit Server, a warning will appear after the file is analyzed.
|
There is no guarantee that importing projects that were created with a later version of FirstSpirit Server will work! This type of export/import is technically possible, but may result in unpredictable problems due to changes in software behavior. |
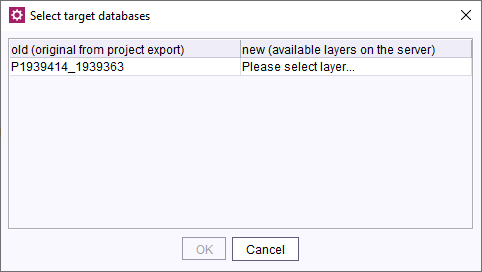
If database content is used within the project, this content must be mapped to a new database layer before importing the project. When importing a project, a new or existing database layer on the server will have to be assigned to each schema of the project:
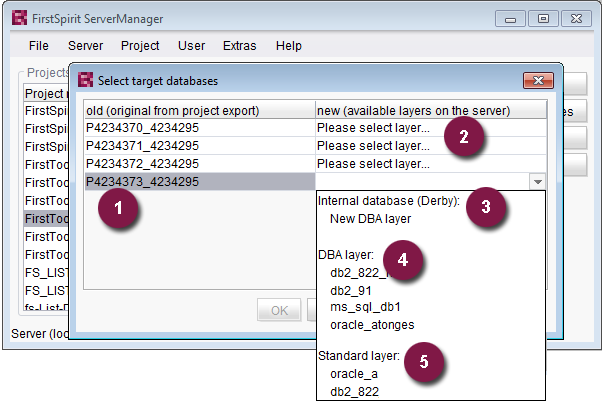
Select target databases
All schemata existing in the project export file are listed in the “Select target databases” dialog (left-hand side (1)). The following options are listed on the right-hand side of the dialog (2) to assign a new layer:
- use a new Derby DBA layer (3)
- assign an existing DBA layer (4)
- assign an existing standard layer (5)
|
The Derby DBMS contained in FirstSpirit is not suitable for productive use and should therefore be used for tests only. |
The layer type selected determines whether FirstSpirit users can personally add new schemata to the project after the import (possible with DBA layers) or not (not permitted for standard layers, for more information, see Description of the optional parameters).
|
More detailed information on the different layer types is available under Create schema (→FirstSpirit Online Documentation). |
The import process may take several minutes, depending on the size of the project. The progress of the entire import process, including individual steps, is displayed in the Import dialog.
|
If errors occur while a project is being imported, importing of the project will not be canceled, but will continue (e.g., in the case of failed database synchronization). At the end of the import process, an error message will appear. The corresponding exceptions will appear in the import log. The project is then deactivated after import. |
Export
This function is used to create an export file for each project.
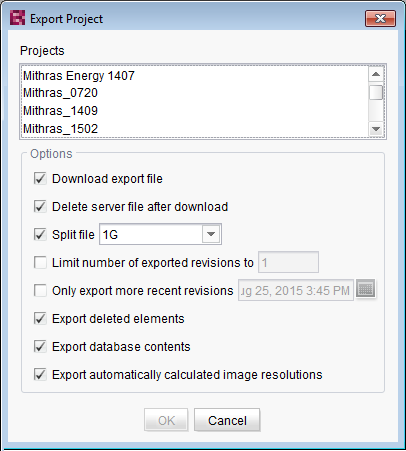
All projects currently on the server are listed in the upper section of the dialog box. The project to be exported can be selected from these projects.
Download export file: if this option is selected, the export file will also be saved to the local computer's file system.
After confirming these settings by clicking OK, a window appears where the user can select the destination for the export file.
Delete server file after download: this option can only be selected when the export file is downloaded locally. If this option is selected, the export file on the server will be deleted immediately after it is downloaded to the local computer.
Split file: this option specifies a maximum size limit for the export file. Several export files are then created based on the set limit. (This option is required for particularly large projects, for instance, so that they can be copied to external data storage media.)
This option only affects the export file download. In the case of a server-side export, a project that is larger than 1 GB is always split into files 1 GB in size. There is no way to modify the size of this split.
Limit number of exported revisions to: this specifies the number of revisions created during export. When limiting the revisions to 1, only the current state of the project is exported (see Repository Manager).
Only export more recent revisions: this sets a maximum age limitation for the revisions that are to be exported. If the current date is used for this setting, only the current state of the project will be exported.
Export deleted elements: selecting this option includes deleted elements in the export file. If the option is disabled, all deleted elements are ignored during the export and are no longer available for re-import under the “Restore deleted elements” context menu item (see Context menu - Special (→Documentation FirstSpirit SiteArchitect)).
Export database contents: this option makes it possible to control the export of database content. If this option is selected, all data sources and their content are exported. If the option is disabled, the data sources alone are exported without their content. Only the empty tables are left.
|
Subsequent changes to the “Allow empty value” option within the FirstSpirit database schema configuration (deletion of the attribute nullable=1, changing from NULLABLE to NOT NULLABLE) are not applied in the database (not even if the Schema sync option is activated). This can lead to problems when exporting and reimporting a project. This situation is checked when a project is exported: If the project to be exported already contains maintained database content with an empty value in a column (NULL), for which the Allow Empty value option was subsequently deactivated (NOT NULLABLE), then the project export is not successfully completed (with corresponding error message). |
Export automatically calculated image resolutions: If required, resolutions that have been defined for a project (see Resolutions) can be automatically calculated by the system and saved on the server side. This method speeds up generation times. (Generating large numbers of media in many different resolutions is very time-intensive.) This option can be used to export the server-side image cache for automatically calculated resolutions (default setting).
However, if the export file needs to be as small as possible, the option should be deactivated. In this case, the content of the server-side image cache (MEDIA_STORE_CACHED_PICTURES) is not exported.
Deactivate
This menu item is only available to server administrators.
If a project is removed temporarily (but not completely deleted) from the project list, it can be deactivated here.
Here, the project to be deactivated is selected from the displayed list and its selection is confirmed by clicking OK. It is possible to select multiple items at once by pressing the SHIFT or CTRL key at the same time. If there are still open sessions on a project, a warning will appear before it is deactivated. The project can still be deactivated.
Deactivating a project is also required before a project can be deleted.
Note: Project-local web applications are automatically uninstalled from the configured web server when deactivated (if accessible).
In this way, corresponding resources on the web server are released and possible subsequent problems during a server update are prevented.
Reactivate
This menu item is only available to server administrators.
Here you can re-release deactivated projects for editing. A selection window displays the currently deactivated projects.
Delete
This menu item is only available to server administrators.
This function allows users to delete files completely from the server. For reasons of security, however, only those projects that were previously deactivated may be deleted. A picklist displays these projects.
Multiple projects can be selected in the picklist for simultaneous deletion.
A confirmation prompt appears before the projects are deleted.
|
Deleting a project means that all of the project files are completely removed from the server hard disk. This procedure is irreversible. |
|
When deleting a project, databases for which a schema exists in the project are also deleted if neither the option “Read-only” nor “No schema sync” is activated (see page Databases). If you do not want to delete these databases, you can uncheck the “Delete project related databases” checkbox. |
Properties
When this function is called, a window appears where a project must first be selected.
After selecting the project, the project settings dialog appears. For more information, refer to the Project settings.
Archive
The “Archive” function is used to display data from archived files that were created during a archiving schedule:

After selecting a project all available archive files are displayed with their creation date, number of files (archived elements), archive file size and file name. Deleted archive files are shown in gray.
Display entries: clicking this button shows all entries of an archive file. They are displayed on three separate tabs covering components, database entries and revision information:
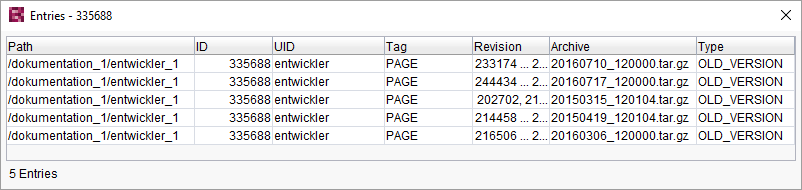
Archived tree elements
The following data are displayed in this list for each archived tree element from the FirstSpirit stores:
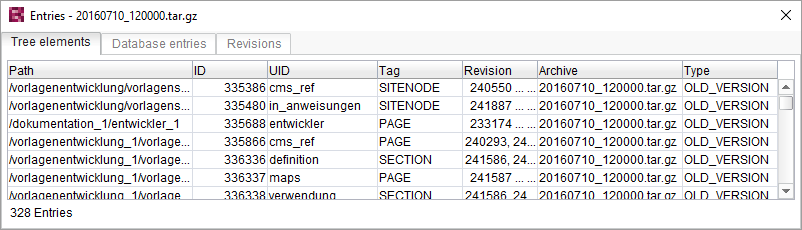
Path: path to the element where the data have been archived.
ID / UID: ID or reference name of the archived element.
Tag: type of archived element (e.g. Medium, Template, Workflow).
Revision: revision number(s) of the archived element. Up to three revision numbers are shown in their entirety. If there are more than three revisions, the first and last revisions are shown and the number of archived revisions is displayed next to them in parentheses.
Archive: name of file in which the element was archived.
Type: shows the reason for archival (for instance, OLD_VERSION means that an older and thus obsolete version of the object has been archived, DELETED means that a deleted object has been archived).
Archived database entries
If database entries were archived using the archiving schedule, they will appear in this list with the following information:
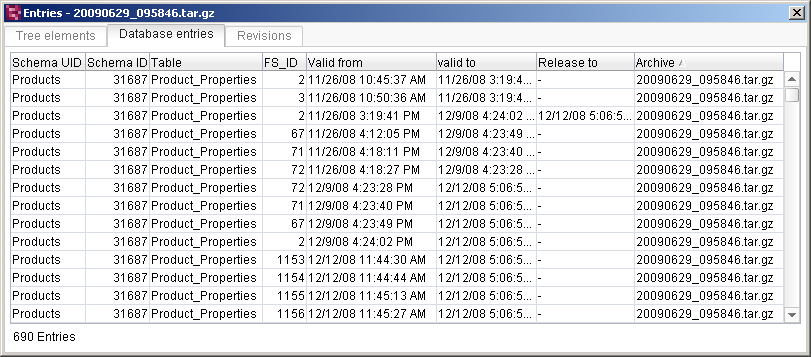
Schema ID/UID: ID or reference name of the schema from which the archived information related to the respective data record originates.
Table: name of the table from which the archived information related to the respective dataset originates
FS_ID: ID of the dataset for which the information was archived. Entries with the same FS_ID indicate that changes were made to the respective dataset.
Valid from/Valid to: similar to revisions for tree elements, these data specify the period in which an unchanged version of the dataset was present. If changes were made to a dataset, the different versions of the dataset can be identified based on this space of time.
Release to:specifies the point in time up to which the dataset was released.
Archive: name of the file in which the information on the database entry is archived.
Archived revisions
If the “System data” option in the objects section of the project archive dialog is selected, the archived revisions are displayed in this list with the following information:
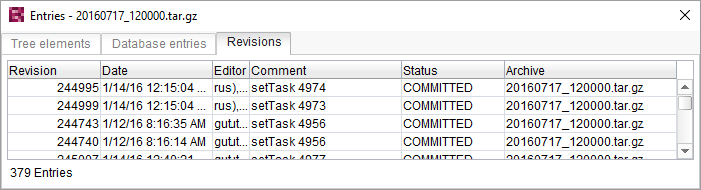
Revision: the archived revision number.
Date: revision date.
Modifier: name of user who made the modification.
Comment:automatically assigned comment.
Status:specifies the editorial status of the revision (e.g. COMMITTED for concluded revisions, UNCOMMITTED for revisions that have been made, but are not finished)
Archive: name of file in which the revision was archived.
Install archive: this button is used to re-install the selected archive in the project along with all associated elements. The archive file is not deleted as a result of installation and can be reinstalled at a later date.
If you want to restore an archive file after further archiving operations have been performed, you must also install all the other archive files stretching right back to the one you want. These archive files must be installed in reverse order (in reverse date order), i.e. starting with the one that was created last. Otherwise, gaps may be created in the version history.
Example:
it is assumed that the archived element you want to restore is located in the archive file from March 16, 2014:
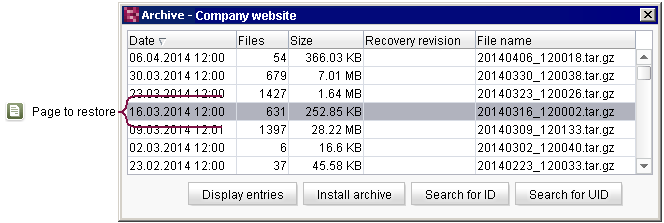
Archived element to be restored
In this case, the archive files below must be restored in the following order (Install archive button):
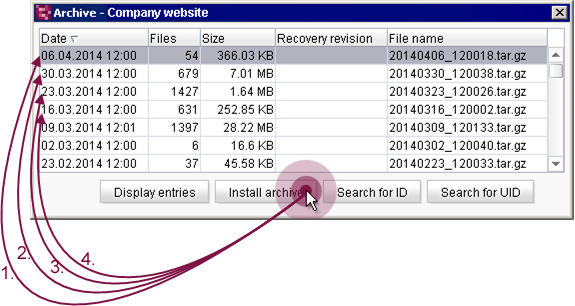
Restoring archived elements
- Installation of archive file dated April 6, 2014, 12 p.m.
- Installation of archive file dated March 30, 2014, 12 p.m.
- Installation of archive file dated March 23, 2014, 12 p.m.
- Installation of archive file dated March 16, 2014, 12:00 p.m.
|
Deleted archive files cannot be installed. |
If this order of installation is not followed, IllegalArgumentException error messages appearing as
unknown revision id: 18, latest: 46
may occur when calling up the version history for an affected object.
Search for ID: this button is used to search through the archives for IDs of the archived elements. The search runs through all of the project's existing archives.
Search for UID: this button is used to search through the archives for UIDs of the archived elements.
List of search results for "deleted" UIDs
The search runs through all of the project's existing archives. The results are listed in the following window: