

Special context menu functions
| Table of contents |
Special context menu functions are only available on selected objects in the individual stores.
Display preview
The function is available on the following objects: page ![]() , dataset
, dataset ![]() , page reference
, page reference ![]() , and document group
, and document group ![]() .
.
This function generates a preview of the current page. This enables the user to check how the page currently being edited will appear on the website, if the integrated preview has not been activated.
This function can be carried out separately for all project languages, template sets as well as for the current and the released state (context menu entry “Display preview (release)”). The preview of the released state is always displayed in the external browser.
It can also be called via the ![]() icon in the tool bar.
icon in the tool bar.
Display preview errors
The function is available on the following objects: page ![]() , dataset
, dataset ![]() , page reference
, page reference ![]() , and document group
, and document group ![]() .
.
This function can be used to display any errors which occurred during preview rendering.
This function can be carried out separately for all project languages, template sets as well as for the current and the released state (context menu entry “Display preview errors (release)”).
This funktion can also be called via the ![]() icon in the tool bar.
icon in the tool bar.
Export
The function is available on the following objects: folder, page ![]() , medium , page reference
, medium , page reference ![]() , objects in the Template Store.
, objects in the Template Store.
 |
This function is available to administrators only. |
This function can be used to combine the selected object with all the necessary information into a compressed zip file and saved to the local file system to the hard disk, from where it can later be imported again in another project (“target project”, see following paragraph). A window opens with the file structure of the computer to enable you to specify a suitable storage location for the export.
|
The “Export” function is a client-side function and therefore puts great strain on the main memory of the client system when large quantities of data are involved. As a result, it should only be used to export small quantities of data. |
There are some rules that should be respected for the different object types of the template store (see Composition of templates (→FirstSpirit Online Documentation):
- Exporting folders: The directory structure from the target project is retained when exporting.
- Exporting templates: If templates are to be exported from a source project and imported into a target project frequently, the use of the license-dependent “FirstSpirit CorporateContent” function is recommended (see Composition of templates (→FirstSpirit Online Documentation)) since more information is available in the target project for assignment and for the update state.
- Style and table format templates: are closely linked with each other and should therefore be exported together if at all possible. To accomplish this, it is best to combine them in one folder.
- Table format templates: For table format templates, the style templates used as the standard style template and in the display rules always have to be exported as well.
- Exporting schemata: You can decide if you want to export just the schema but not the schema's data or the schema with the current data. The table templates associated with the schema are added to the export file automatically.
- Exporting table templates and queries: Can be exported individually without the schema. In this case, the template (and/or query) has to be imported in the target project at the appropriate schema node. Otherwise there may be errors in the project since the mapping for the table template no longer matches the schema's tables (“The referenced table 'xy' does not exist”).
- Workflows: Both individual workflows and folders with all included subfolders and workflows can be exported. If scripts are used within a workflow, they can also be added to the export file. To accomplish this, the desired workflow first has to be selected in the tree view and then the script using Ctrl+KLICK. Both objects are then included in the zip file if the “Export” function is selected using the context menu.
Import
The function is available on the following objects: root node, folder, page ![]() , certain objects in the Template Store.
, certain objects in the Template Store.
This function can be used to import an previously created export file (see previous paragrah) with all the necessary information back into a target project. A window opens with the file structure of the computer enabling you to select the required export file.
If the imported contents do not fit the context of the target project, they are imported into the correct target project context automatically (as far as this is possible). In this case, the import is carried out independently of the object where the “Import” context menu entry was selected. If, for example, a user tries to import a script's export file into the “Workflows” area, the selected script is imported into the target project regardless, but it is placed in the correct “Scripts” area of the target project instead of the “Workflows” area.
This automatic correction does not work in all cases. An error message is displayed instead if the system cannot determine which target project object the import file can be assigned to.
The available selection depends on the object type for which the context menu or function was called.
Templates: Assigning template sets in the target project
When importing a template from a source project to a target project, an attempt is made to transfer the contents of the template sets as well:
- The import process first attempts to identify target template sets by name (name in the source project to the name in the target project). This means that if the names of the template sets are identical in the source and target projects, the contents are applied to these template sets in the target project.
- If assignment using the name is not successful because the template sets are labeled differently in the target project, assignment is next attempted using the template set (name in the source project to the template set in the target project). In this context, a template set from a source project with the name “html” would be assigned to the first located “HTML” template set in the target project (regardless of the name of that channel in the target project).
- If the template set cannot be assigned using the name or the template set, the contents of the template sets cannot be imported into the target project from the source project and have to be created or copied manually, if necessary.
Importing style and table format templates
Style templates can be imported individually. Table format templates should be imported together with any style templates they use. If style templates referenced by a table format template weren't exported, the table format template may still be imported, however, references to unavailable style templates will be lost. This functionality should be executed on the root node “Format templates” or on a child folder within this root node.
Importing a schema
When importing a schema, the desired database layer must be selected from a list of active layers. The import process also requires users to decide if any existing data, which was added to this schema via the Data Sources store in the source project, should be imported into the target project. If the schema in the source project contained table templates, these templates will be imported with the schema automatically; any imported data of this schema will become visible in the Data Sources store once data sources are defined which are associated with these table templates. The imported schema's data may be edited, i.e. it is not write-protected in the target project.
This functionality should be executed on the root node “Database Schemata” or a child folder within this root node.
Restore deleted objects
The function is available on the following objects: root node, folder, page ![]() , content area
, content area ![]() , data source
, data source ![]() , page templates, section templates, format templates, link templates, and scripts.
, page templates, section templates, format templates, link templates, and scripts.
Deleted objects
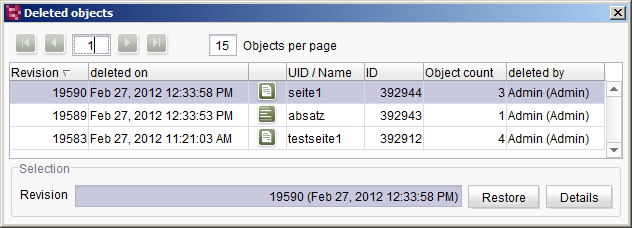
This function can be used to restore deleted objects which have been removed from the tree structure by mistake. If a dataset has been deleted from a data source inadvertently, this can also be restored via this function. After clicking, a window opens with the deleted objects.
All objects from the selected store for which a backup exists are displayed at root level, while only the objects located below this object are displayed on all the other objects. The following information is given for each object:
Revision: Version number of the deleted object.
deleted on: Date and time when the object was deleted.
Type of object: Object icon indicating the type of object that was deleted.
UID / Name: The reference name of the deleted object.
ID: The unique ID number for the deleted object.
Object count: The number of objects located below the deleted object in the tree structure. These hierarchically lower-level objects are also inserted again by the restore function.
deleted by: Name of the user that deleted the object.
Column name: When restoring on a data source, the names of the individual table columns are listed too. Brief information on the contents is displayed in the individual columns.
In the Page area, the arrow buttons can be used to page through the list of deleted objects. The buttons are only active if more than one page with deleted objects exists. In addition, the “Objects per page” input field can be used to set how many objects are to be displayed on each page. The input field also shows the user the page where they are currently located. This field can be used to directly enter a page number too. When the input is confirmed with Return, the focus then switches directly to the required page.
The Update button can be used to update the open list of deleted objects, if necessary, to the current state, because new deleted datasets may have been added in the meantime.
Click the Details button to open a window with the complete contents of the listed versions.
To restore, simply select the required object and press the Restore button. Another dialog opens with some restoration options:

Restoration options
Check only – do not restore: If this checkbox is activated, no restore operation is performed, the system simply checks that a restore could be executed without errors.
Standard restore: If this option is enabled, the selected object and all the child elements it possessed when it was deleted are restored.
Specific restoration – Restore parent element (if necessary): If this option is enabled, on restoring a deleted page the entire folder chain is restored to the same state it was in prior to the deletion. For example, if several pages of a folder were deleted first, followed by the folder and any other higher-level folders, with a standard restore all these elements would have to be restored individually too.
Specific restoration – Ignore missing dependent objects: If this option is enabled, an object is still restored if dependent objects are missing. For example, if a page which links to a page reference in the Site Store was deleted from the Page Store, followed by the page reference itself, the page could not be restored via a standard restore, since the deleted page reference (a dependent object) would be missing.
Once the restoration options have been selected, a position where the object should be restored can then be chosen.
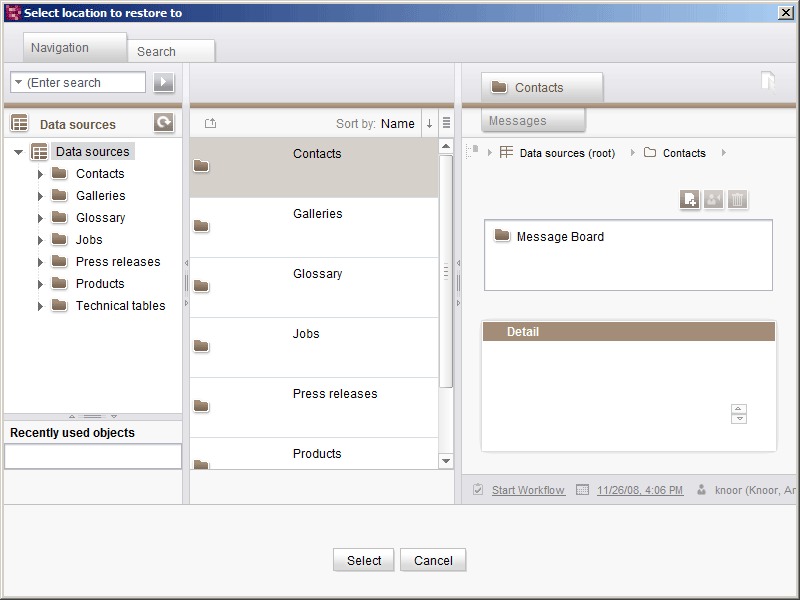
Selecting the restoration position
If possible, restored objects should be inserted at the same position where they were located prior to being deleted. Therefore, the object's position before it was deleted will be displayed where possible.
However, if, for example, a folder which contained a page or data source to be restored has also been deleted (and is to remain deleted), this page/data source is inserted directly below the tree node at which this function was opened.
|
Important in the Site Store: If on restoring it is found that the referenced page is no longer in the Page Store, this is brought to the user's attention by a new window and they are faced with the choice of whether the remaining pages are to be restored or not. |
|
If the process is continued, all page references which cannot be restored are irrevocably lost. If these are to be kept, the user is urgently advised to cancel this process and to restore the required pages in the Page Store. |
|
After restoring folders, all the information stored in them (page groups, images for navigation, texts, etc.) are also available once more. However, if individual page references are restored, all information relating to the corresponding page saved in the opposite folder is lost (e.g., affiliation and position within a page group). |
Change position
The function is available on the following objects: section ![]() .
.
Each section can be moved in its position relative to the other sections to facilitate the subsequent insertion of new sections and enable better handling when changing their order where more extensive page restructuring is involved.
The position change involves moving one position up or down or, helpful for pages with many sections, directly to the first or last position.
Add all displayed datasets to feature
The function is available on the following objects: data source ![]() .
.
This license-dependent function allows you to conveniently reuse project content between projects.
A detailed description of this is given in the FirstSpirit CorporateContent module documentation.
New bookmark
The function is available on the following objects: dataset ![]() .
.
This function can be used to set bookmarks for individual datasets in the Data Store. For information about using see bookmarks.
Edit externally
The function is available on templates ![]() .
.
This function is subdivided into several areas: All the template sets which have been set for this project in the ServerManager are listed, plus there are also the Form and Rules areas.
If one of the available editing areas is activated, then the corresponding source file opens in an external editor. An editor should be entered in the user settings of the Global settings for editing a source file in an external editor.
When the external editor is opened, a window is opened at the same time in which all elements opened externally are listed.
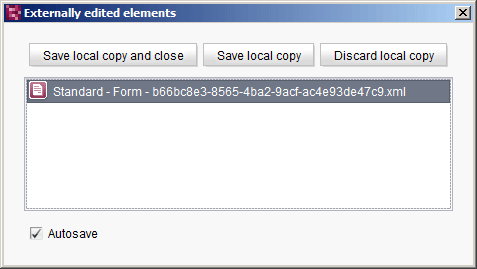
Externally edited elements
Modifications to the source text are saved, after the templates are highlighted, using the Save local copy and close or Save local copy button. If the first button is selected, the editor is then exited. Likewise, unsaved modifications can be undone using Discard local copy.
Autosave: If this is checked, then all of the modifications saved in the external editor are also saved in SiteArchitect automatically.