

Functions of the “Extras” context menu
| Table of contents |
The context menu functions below “Extras” are available only on selected objects of the individual stores.
Release
This function is available on the following objects: root node, folder, page ![]() , medium
, medium ![]() , page reference
, page reference ![]() , document group
, document group ![]() .
.
 |
This function is available to administrators only. |
It can be used to directly release the current object or a specific release option can be activated instead.
See detailed information on the specific release options.
Delete metadata
This function is available on the following objects: root node, folder, page ![]() , medium
, medium ![]() , page reference
, page reference ![]() , document group
, document group ![]() .
.
It can be used to delete all metadata defined for the current level in the tree structure.
Change permissions
This function is available on the following objects: root node, folder, page ![]() , medium
, medium ![]() , page reference
, page reference ![]() , document group
, document group ![]() , data source
, data source ![]() .
.
It can be used to define the permissions for the current node in the tree structure.
See detailed information on the definition of permissions.
Accept template changes
This function is only available for page templates ![]() .
.
Changes to the definition of the content area of a page template (see Properties tab (→FirstSpirit Online Documentation)) can be applied for existing pages.
If, for instance, a content area is added to a page template, this change does not automatically affect an existing page. The “Accept template changes” function can be used to update existing pages if a change is made to a page template.
The function checks the definition of the content areas in the page template against the content areas of pages that use this template:
- If content areas are found that are defined in the template but not present on the existing page, these content areas are added to the page.
- If, conversely, content areas are found that are missing in the templates but are present on the page, then
- they are removed from the page if they do not contain any sections.
- they remain on the page if they contain sections.
Reset write protection
This function can be used to cancel write protection which is enabled on the selected object due to an active workflow. (Write protection is indicated by italic lettering in the tree.)
View Template
This function is available on the following objects: page ![]() , section
, section ![]() , data source
, data source ![]() , dataset
, dataset ![]() .
.
It can be used to jump to the template in the Template Store which is used for the selected object. The name of the template used is also displayed at the bottom right in the status bar. You can jump to the corresponding template in the Template Store with one click.
Select another template
This function is available on the following objects: page ![]() , section
, section ![]() .
.
|
This function is available to administrators only. |
This function allows a different template to be selected for individual pages or sections.
After clicking this function, a selection dialog opens in which all page or section templates that are available for this node are listed. Existing content is transferred to the same input elements of the new template wherever possible.
|
The process is canceled if a new page template is selected which does not permit all of the content areas and sections currently present on the page. The message “The selected template cannot be used” appears. A version with the old template and all available content at the time can be restored using the version history in the Page Store if necessary. |
Jump to source section
This function is available on the following objects: section reference ![]() .
.
It can be used to display the referenced section in the tree structure and edit it, if required (and if authorized to do so) (see also Creating section references in the Page Store).
Edit validity period
This function is available on the following objects: section ![]() .
.
It can be used to specify in which period a section should be presented on the website.
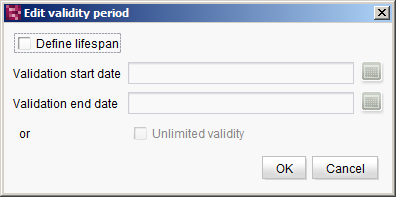
Edit validity period
Define lifespan: Activate this option to enable a validity period to be defined for the selected section.
Validation start date: Click the calendar icon after the line to open a new window in which the validation start date can be set to the nearest minute:
Validation end date: The end of the validity can then be set in the same way by clicking the calendar icon after the line.
Unlimited validity: If this option is active, the selected section is valid for an unlimited period from the validation start date. Any defined validation end date is then ignored.
Outside this period the section is not generated on the website. If a validity period has been defined, it is displayed in the status bar as soon as the section is selected in the tree view.

Status bar with defined validity period
The validity period is displayed in gray if the current date is within the specified period. The validity period is displayed in red if the current date is outside the specified period.
Show usages
Ctrl+U
This function is available supported for the following objects: ![]() page,
page, ![]() section,
section, ![]() dataset,
dataset, ![]() medium,
medium, ![]() page reference.
page reference.
This function is used to determine where (else) in the project the corresponding object is referenced. A window opens in which the reference points are listed.
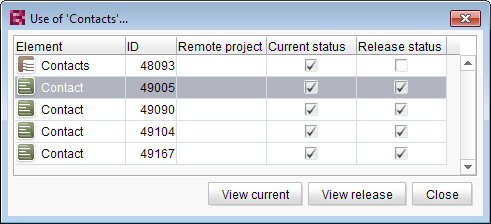
On templates or datasets
In the case of templates and datasets, the referenced objects can be displayed in both the current and released states, if applicable. Click the View current or View released button to display the object in the corresponding state.
Alternatively, the current state can be displayed by double-clicking the corresponding reference. If the object is only available in the last released state, it is displayed in this state in response to double-clicking.
On all other object types
If the function is called on another object type, the current state of the referenced elements is always taken into account. Click the View button or double-click to switch to corresponding referenced element.
Change reference name
This function is available on the following objects: folder, page ![]() , medium
, medium ![]() , page reference
, page reference ![]() , document group
, document group ![]() , data source
, data source ![]() .
.
Each FirstSpirit object has a reference name, which must be unique in each store. Each object can be identified by its reference name.
|
Reference names are only shown in the project if the “Display reference names” checkbox below the View – Preferred display language menu item have been activated. |
In general, reference names are issued automatically when objects are created and are based on the display name. These reference names can be subsequently changed using the “Change reference name” menu item. However, the user must have “Change” permission for the respective object. The reference name should only be changed if the object is not yet referenced in the project (e.g., an image has not yet been used on a page or in a section of the Page Store or a page of the Page Store has not yet been used in the Site Store (“page reference”)), as otherwise the existing reference becomes invalid. The following dialog is displayed:

Change reference name
The reference name should consist of no more than 128 characters. If the reference name is changed despite an existing reference, it may be necessary to restore the reference manually using a new selection.
Depending on the project administrator's settings, the menu entry may be grayed out regardless of the “Change” permission; in this case the reference name cannot be changed.
Display properties
Alt+P
This function is available on the following objects: root node, folder, page ![]() , section
, section ![]() , section reference
, section reference ![]() , medium
, medium ![]() , page reference
, page reference ![]() , document group
, document group ![]() , data source
, data source ![]() , dataset
, dataset ![]() .
.
It can be used to show technical and editorial information on individual project content in a separate dialog and to collate it into a system report. The information can vary, depending on the object type.
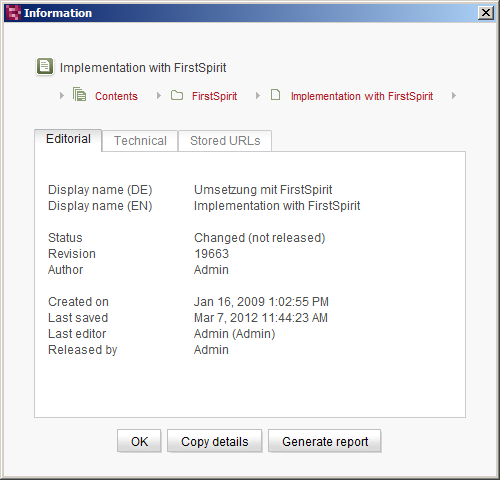
Properties of a page – Editorial
This path allows you to navigate to other objects in the tree structure, making it possible to display the properties of other objects without closing the window.
OK: Click this button to close the dialog.
Copy details: Click this button to copy all the dialog's information onto the clipboard.
Generate report: Click this button to output the information as an HTML page in the form of a system report. An additional comment can also be entered, for example, an error description.
Editorial tab
The editorially relevant properties of an object are displayed on this tab:
Display name: The language-dependent display names of the object are displayed here.
Status: Shows the status (e.g., “Not released”, “Released”, “Changed (not released)”)
Revision: Shows the revision
Author: Name of the user that created the object
Created on: Time when the object was created in SiteArchitect, with date and time
Last saved: Time when the object was last saved, with date and time
Last editor: Name of the user that edited the object last
Released by: Name of the user that released the object
Technical tab
The technically relevant properties of an object are displayed on this tab:
Label path: Path to the current object (display name)
Reference name (UID):Reference name (UID) for the object
UID path: Path to the current object (reference name)
ID: Object ID
ID path: Path for the current object (IDs)
|
The path information can also be requested using the keyboard shortcut Ctrl+Shift+Q. |
Template name: Display name for the underlying template
Template ID: ID for the underlying template
Depending on the object type, a Display template link is displayed, with which it is possible to switch directly to the template on which the object is based.
Stored URLs tab
The URLs stored for the current page are displayed on this tab. They can be reset to page references via the context menu entry “Extras – Reset stored URLs” (for more details see URL settings).
Display dependencies
Ctrl+R
This function can be used to check dependencies of the selected object by means of a reference graph. This makes it possible to identify the dependencies of a project even in complex projects. The reference graphs for individual datasets of the Data Store are queried via the context menu of the respective dataset.
See detailed information on the reference graph.
Release displayed lines
This function is available on the following objects: data source ![]() .
.
|
This function is available to administrators only. |
Call this function to release all datasets, which are displayed depending on the current filter settings of the data source. All available filter settings are taken into account:
- Persistent filters via the “Extras / Set filter” context menu on the data source
- Temporary filters via the “Set filter” link above the table
- Temporary filters via the “Search” link above the “Data search” icon below a table
- Temporary limitation of number of datasets displayed using the combobox above the table.
Set filter
This function is available on the following objects: data source ![]() .
.
It is used to filter a data source for datasets and can also set a sort order. This makes it easier to work with data sources which may contain many, potentially similar, datasets. Data sources for which a permanent filter (“Filter Configuration” area in the following dialog) has been set are identified by a corresponding filter symbol ![]() . Data sources for which temporary filters are set (not via the context menu entry “Extras / Set filter”) are identified by the icon for unfiltered data sources
. Data sources for which temporary filters are set (not via the context menu entry “Extras / Set filter”) are identified by the icon for unfiltered data sources ![]() .
.
|
To create filters, the user needs the “Create folders” permission. To further edit filtered datasets, however, the “Change” permission is sufficient. |

Filtering datasets
Filter Configuration
Select a query: This dropdown list provides the predefined state filters “not released” (current datasets) and “deleted” (released datasets) as well as predefined database queries of the Template Developer from the Template Store for filtering purposes.
After a query is selected, all the parameters specified for that query are listed in the table underneath it. The given values of a parameter can be changed by clicking the relevant row.
Sort Order
The sort order of the filtered datasets can be defined here. Any table column can be used as the sort key. The output can be displayed either in ascending or in descending order and language-dependent or language-independent.
![]() Add ordering by column: Click this icon to use a selection box to specify another table column as the sort rule.
Add ordering by column: Click this icon to use a selection box to specify another table column as the sort rule.
![]() Remove sort order: Click this icon to delete the activated sort rule.
Remove sort order: Click this icon to delete the activated sort rule.
![]() Move up/down: Click these icons to move the selected sort rule up or down by one position in the list.
Move up/down: Click these icons to move the selected sort rule up or down by one position in the list.
If several sort rules are specified, the top sort rule in the list is used for sorting first. All entries for which this first sort rule is identical are then sorted by the second sort rule, whereby the first sorting is retained as a whole. The procedure is the same for each additional sort rule.
Click OK to apply and save the filter and sort settings.
The editing area for the data source now only shows the filtered datasets with the required sorting. The tree view now shows an icon for filtered data sources ![]() , rather than the usual icon for data sources
, rather than the usual icon for data sources ![]() .
.
The filter configuration and sort order can be changed again by calling the Set filter function once more. Select “[All datasets]” to remove the filter from the data source again.
Delete data source
This function is available on the following objects: data source ![]() .
.
|
This function is available for administrators only. |
Calling this function deletes the selected data source (after verifying a confirmation prompt).
Make medium language-(in)dependent
This function is available on the following objects: medium (language-independent) ![]() , medium (language-dependent)
, medium (language-dependent) ![]() .
.
It can be used to subsequently transform a language-independent medium into a language-dependent medium or vice versa.
To convert a language-independent medium into a language-dependent medium it is necessary to give the language for which the existing medium is to be used. If a language-dependent medium is to be converted into a language-independent medium, then it is necessary to give the language for which the medium is to be retained, if it already exists for different languages.
The permissions set for the old medium are imported into the new medium!
Reset stored URLs
This function is available on the following objects: medium ![]() , menu level
, menu level ![]() , page reference
, page reference ![]() .
.
This function is only available if the user at least has the “Change” permission for the Global settings / URL settings area.
If a path generation method which stores the generated URLs was used for generating the current project (PathGeneration with “(SEO)” in generation schedules, see also Execute generation (→Documentation for Administrators)), these URLs remain valid by default, even if the values of relevance for the URL generation process (depending on the path generation method selected, for example, changed display or reference names, relocated pages or media in a tree, changes in datasets) should change. You can reset stored URLs by using this function so that changes in the tree structure or in display names will be reflected in the URL. See also URL settings.
This function affects elements located in the tree structure below the element on which the function was called. For example, you can reset all the stored URLs in a subtree by calling this function at the top menu level from which you want to reset the URLs. The stored URLs for all the page references and menu levels beneath this menu level are then reset.
View page
This function is available on the following objects: page reference ![]() .
.
It can be used to go to the currently referenced page in the Page Store.
Edit page
This function is available on the following objects: page reference ![]() .
.
It can be used to edit the currently referenced page in the Page Store.
Create copy of this workflow
This function can be called for workflows. It creates a copy of the selected workflow below the “Workflows” node.