

Identifying and transferring content areas
In FirstSpirit, each page has one or more content areas. Sections are added to these areas once a FirstSpirit page has been created. In the example shown below, there are three content areas (left-hand area, right-hand area, central area) which control how the sections are assigned to individual areas of the HTML page (for more information on content areas, see here).
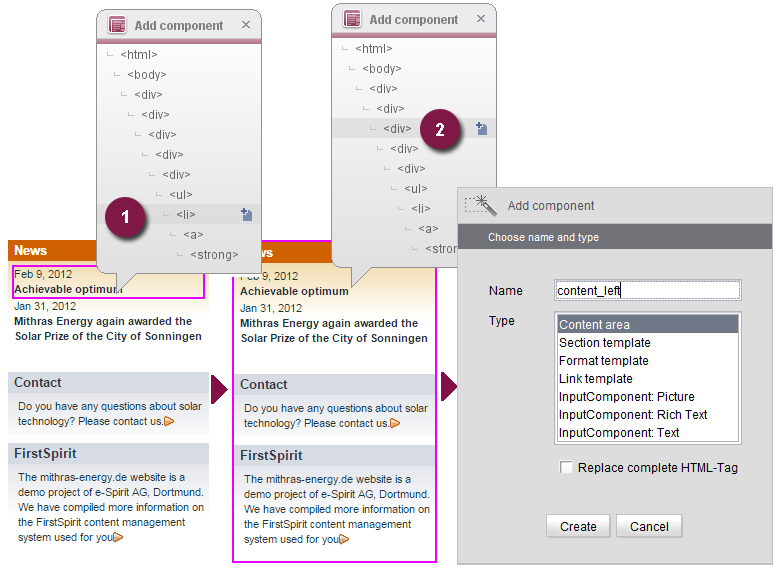
To add content areas to the existing page template in the template wizard, you should select the relevant HTML DIV container within the preview. Clicking the area opens the overlay window with the HTML structure for the area concerned (1). Starting from the point you have clicked on, all the higher-level HTML elements in the hierarchy are displayed right back to the root node. The current element is highlighted within the preview by means of a frame. Keep moving the mouse pointer up until the entire content area has a frame around it in the preview (2). If the correct DIV element has been identified, click the relevant entry in the overlay window. This opens the Add component (3) dialog. Here, you must assign a name to the component, e.g., “content left” and select the required type (in this case: “Body”). You should leave the “Replace entire HTML tag” box unchecked (default behavior).
 If the box is checked, the entire HTML tag is replaced by FirstSpirit-specific syntax. This is only necessary for a small number of use cases and so the box is left unchecked by default.
Explanation:
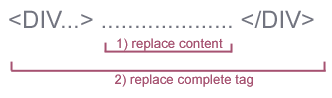
The original HTML tag for the content area is: <div class="leftCol">.....</div>.
1) If the template is imported via the template wizard (without checking the “Replace entire HTML tag” option), only the content of the tag is replaced with FirstSpirit syntax (1): <div class="leftCol">$CMS_VALUE(#global.page.body("content_left"))$</div>.
2) If the “Replace entire HTML tag” option is checked, the entire DIV container is removed and just the content is replaced with FirstSpirit syntax (2):
$CMS_VALUE(#global.page.body("content_left"))$.
As a result, the assignment between the content and the left-hand area of the HTML structure would be lost in this particular example.
List view of the created components
When you click the Create (3) button, the new component is transferred to the list view in the bottom section of the window:
Transferring changes to the import project
As soon as you click the ![]() button to save the changes in the HTML preview, the new component is transferred to the “Overview” tab as well:
button to save the changes in the HTML preview, the new component is transferred to the “Overview” tab as well:

The element is labeled with the “New” state (see State information).
Using this technique, additional content areas can now be identified and created in the template wizard. After that, the next step is to create the section templates in the import project (see Creating section templates).
 |
If no content area is defined with the template wizard, a default content area called “body” is added to the new page template. |
Multiple selection in the template wizard preview
In some application scenarios, the existing HTML structure cannot be aligned with the FirstSpirit template structure. If a grouped <div> is missing from the HTML structure, for example, content areas cannot be selected as expected via the Overlay menu.
In the example, a grouped element is missing from the center content area. The main heading “Welcome to ...” and the text underneath should be assigned to the page template, while the text/image sections below should be part of the section template. This assignment cannot be made via the Overlay menu due to the missing <div> container. When the <div> element (1a) is selected, the entire area is highlighted and when the <div> element (1b) is selected, only an individual section is highlighted.
Problems like this involving incorrect or incomplete HTML structures can be circumnavigated in the template wizard with the multiple selection feature. Multiple selection can be called up in combination with the Strg key. It enables exactly the required elements to be transferred to the content area regardless of missing structural elements in the HTML template:
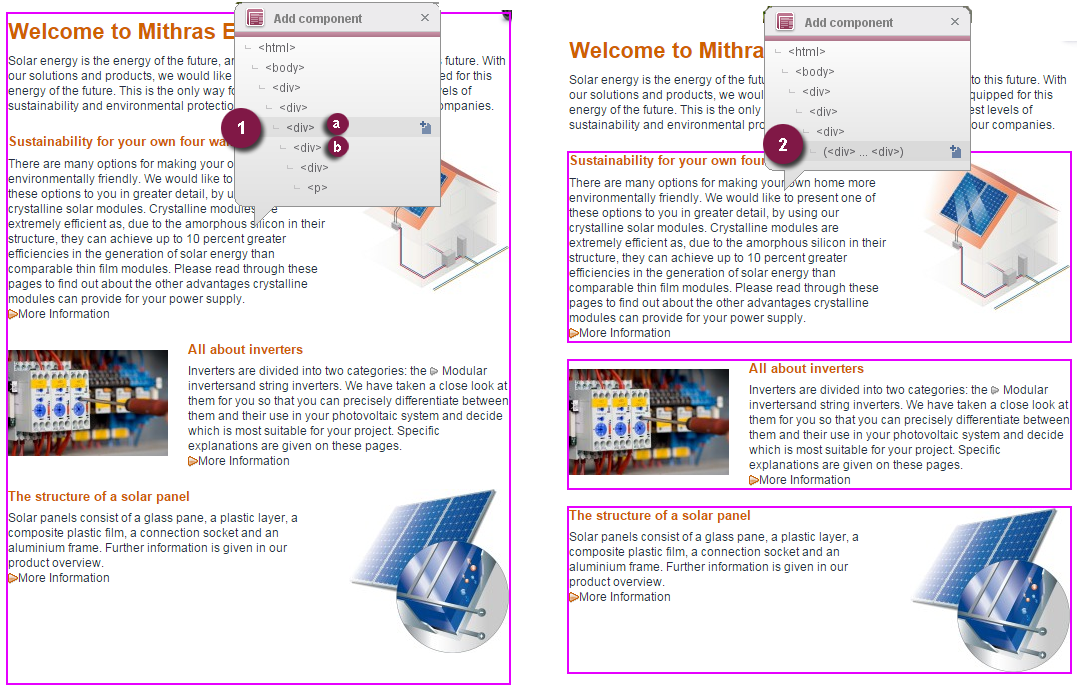
If you save the items that have been selected via 2 – Multiple selection as a “center” content area, the main heading (“Welcome to ...”) and the text below it (“Solar energy is ...”) cease to be elements of this content area (in contrast to 1 - Single selection). When the corresponding input components are created for these two HTML areas (see Creating input components), the components are automatically assigned to the page template.