

Preparatory tasks – How to prepare a new import project in three steps
| Contents |
Several preparatory tasks must be completed before you can use the semi-automatic template creation process that is available in the template wizard.
Firstly, you must create an (empty) FirstSpirit project or open an existing one in FirstSpirit SiteArchitect. Secondly, you must create an“ import project”. This project must contain all the mockup content supplied by the agency (i.e., the HTML and XML files, the layout specifications, and all the images and files integrated into/referenced by the structure). The import project subsequently serves as the basis for subsequently transferring the content into a FirstSpirit project.
Step 1) Start the template wizard
Clicking the “Template Wizard” icon in the FirstSpirit SiteArchitect tool bar opens a new tab in the application area. The dialog shown here guides the template developer through the three steps that are required to create an import project.
If the template wizard is already open, the dialog can also be accessed by going to the the project tool bar and clicking the ![]() Create or load an import project button.
Create or load an import project button.
Step 2) Load/create an import project
Creating a new import project
A new import project should always be created first. This action is performed using the start dialog box:
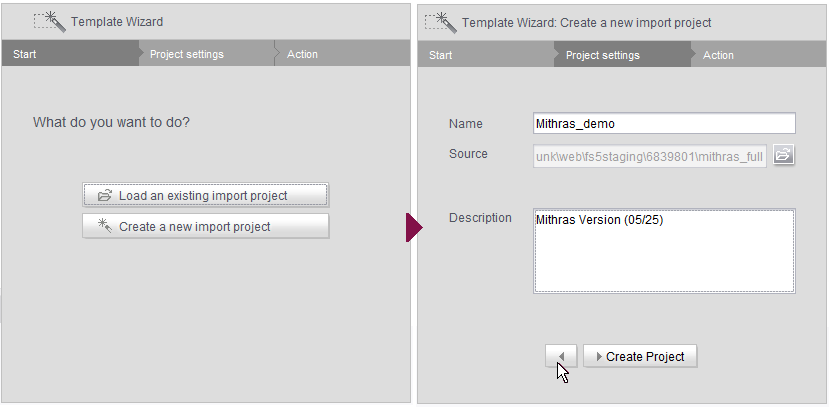
Click the Create new import project button to open the dialog for creating a new import project.
- Name: Specify a name for the import project. The project can be subsequently reloaded in the list of import projects under this name.
- Source: Select a root directory for the import project. This directory must contain all the files required to create the templates in FirstSpirit. Consequently, the root directory must also contain all the graphics and CSS files referenced within the HTML mockup.
- Description: An optional description can be provided here.
The name and description can be changed when the import project is saved (“Save” icon in the project tool bar).
Click the Create Project button to create a new and empty import project with the defined parameters. Content (HTML, XML, JPG, etc.) can then be added to the import project during the next step.
 Click this button to go back to the first step.
Loading an existing import project
As an alternative to creating a new and empty import project (step 2a), you can also open an existing import project for editing.
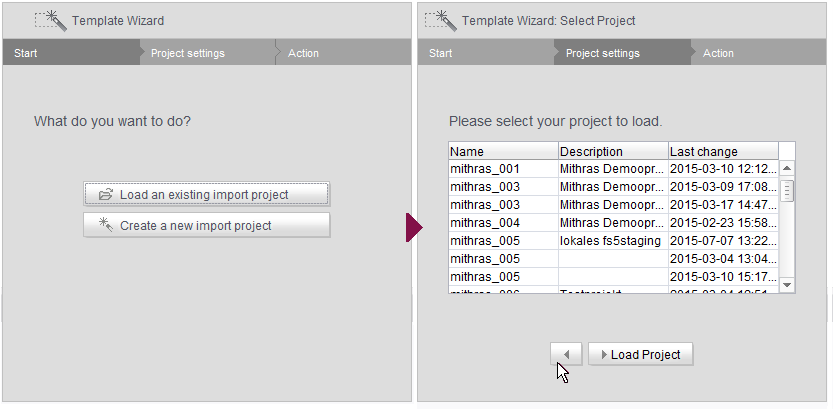
Click the Load an existing import project button to open the “Select Project” dialog for selecting an existing import project. Once they have been created, projects are available on a server-wide basis:
- Name: Name under which the import project was created
- Description: Optional description
- Last change: Date and time when the import project was last changed
To sort the list in ascending/descending order, click the required column header.
Click the Load Project button to load the project that has been selected in the list.
 FirstSpirit ensures that import projects can only be edited by one user at a time. If the selected import project is already open in the template wizard and being used by another FirstSpirit template developer, the message “Agency Project is already locked by [...]”.
In this case, the project cannot be loaded until the other user closes it in the template wizard.
Click this button to go back to the first step.
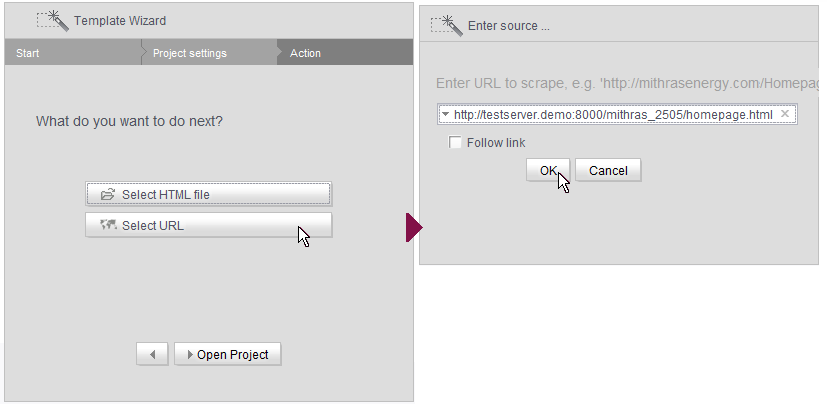
Step 3) Add HTML content
Via the local file system
In the final dialog, content can be added to the import project. Here, the required HTML structures (from the HTML template supplied) can be transferred into the import project.

Click the Select HTML file button to open a file selection dialog (the root directory of the import project is selected by default). Here, you can select the HTML structures that are to serve as the basis for creating FirstSpirit objects.
After selecting the file and confirming your choice with the Open Project button, the HTML file is transferred to the template wizard along with the images and files referenced by it.
Via an external source (using a URL)
As well as structures that are stored locally in the file system, it is also possible to load external HTML structures into the import project. Clicking the Select URL button opens the “Enter source ...” dialog for specifying an external source. A URL can be passed here. The URL must be specified in full (entire path incl. the referenced HTML file). When you confirm the dialog with OK, the external structures (including the images and files referenced by them) are transferred to the template wizard.
Follow link: By default, the checkbox is not checked; this is to restrict “crawling” to the HTML structure transferred here. In this case, only the transferred HTML structure is analyzed and added to the import project. Other URLs referenced within the HTML structure are not analyzed.
If the checkbox is checked, all URLs referenced in the transferred HTML structure are analyzed and added to the import project. If these URLs then in turn reference other URLs, they too are analyzed, etc. In this case, you must ensure that the nesting depth is not too deep, as the import process can potentially take a long time if there are a large number of URLs.
The template wizard overview now shows an initial element of the PAGE_TEMPLATE type.
The next step is to analyze the existing HTML structure and break it down into FirstSpirit objects (body areas, form elements, etc.) (see Preparing content).