

Integrating tables
In the rich text editor, tables can also be integrated in the text flow (so-called “inline tables”). The tables provide a variety of layout options, down to the cell level.
 |
Whether the inline function is available in the rich text editor or not depends on the template developer's specifications. If the  tool bar is available in the rich text editor, the inline tables function is also available. tool bar is available in the rich text editor, the inline tables function is also available. |
To insert a table into the rich text editor, the cursor is placed at the position within the text at which the table is to be inserted. Click the ![]() icon to insert a new table. If more than one template is available, they will be displayed for selection below the icon. If only one template is available, the table will be created directly on the basis of this template in the rich text editor:
icon to insert a new table. If more than one template is available, they will be displayed for selection below the icon. If only one template is available, the table will be created directly on the basis of this template in the rich text editor:
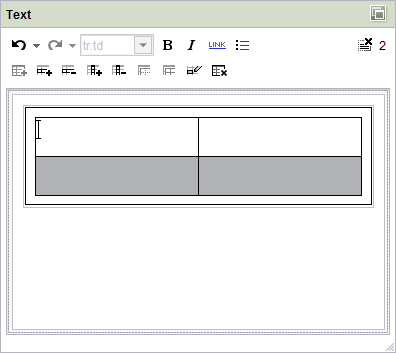
Table inserted
The number of rows and columns and the formatting of the inserted table depend on the template developer's settings.
Editing inline tables
The functions available for editing the inserted table depend on the template developer's specifications, e.g., whether and how many rows and columns can be added or deleted, what format they have, and which cells may be additionally formatted. The following icons above the table are only active in the cells which may be edited according to the developer's specifications. To do this, the cursor must be placed in the required cell:
![]() Insert row: Click this icon to add a row to the table below the cell in which the text cursor is positioned. As many rows as necessary can be added, until the maximum number preset by the developer is reached. The icon is then disabled, and no further rows can be added.
Insert row: Click this icon to add a row to the table below the cell in which the text cursor is positioned. As many rows as necessary can be added, until the maximum number preset by the developer is reached. The icon is then disabled, and no further rows can be added.
![]() Delete row: Click this icon to delete from the table the row, including contents, in which the text cursor is positioned. As many rows as necessary can be deleted, until the minimum number preset by the developer is reached. The icon is then disabled, and no further rows can be deleted.
Delete row: Click this icon to delete from the table the row, including contents, in which the text cursor is positioned. As many rows as necessary can be deleted, until the minimum number preset by the developer is reached. The icon is then disabled, and no further rows can be deleted.
![]() Add column: Click this icon to add a column to the table to the right of the cell in which the text cursor is positioned. As many columns as necessary can be added, until the maximum number preset by the developer is reached. The icon is then disabled, and no further columns can be added.
Add column: Click this icon to add a column to the table to the right of the cell in which the text cursor is positioned. As many columns as necessary can be added, until the maximum number preset by the developer is reached. The icon is then disabled, and no further columns can be added.
![]() Delete column: Click this icon to delete from the table the whole column, including contents, in which the text cursor is positioned. As many columns as necessary can be deleted, until the minimum number preset by the developer is reached. The icon is then disabled, and no further columns can be deleted.
Delete column: Click this icon to delete from the table the whole column, including contents, in which the text cursor is positioned. As many columns as necessary can be deleted, until the minimum number preset by the developer is reached. The icon is then disabled, and no further columns can be deleted.
![]() Merge cells: Several cells positioned next to each other can be selected and joined together by clicking this icon. The content of the selected cells is retained. The formatting of the top left-hand cell is applied to the merged cell.
Merge cells: Several cells positioned next to each other can be selected and joined together by clicking this icon. The content of the selected cells is retained. The formatting of the top left-hand cell is applied to the merged cell.
![]() Split cells: Click this icon to separate previously merged cells again. The content of the merged cells is retained and is moved into the top left-hand cell. The format of the individual cells is reset to what it was before the merge.
Split cells: Click this icon to separate previously merged cells again. The content of the merged cells is retained and is moved into the top left-hand cell. The format of the individual cells is reset to what it was before the merge.
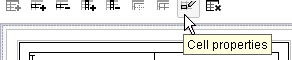
Example: Cell properties
![]() Cell properties: Click this icon to open a window with properties which can be assigned to the current cell. Several cells to which the same property can be applied according to the template developer's specifications can be simultaneously selected and edited.
Cell properties: Click this icon to open a window with properties which can be assigned to the current cell. Several cells to which the same property can be applied according to the template developer's specifications can be simultaneously selected and edited.
The required property can be selected from the combobox and saved with the OK button. Click the ![]() icon to remove the property again later.
icon to remove the property again later.
![]() Delete table: Click this icon to remove the table in which the cursor is currently positioned and all the table's contents.
Delete table: Click this icon to remove the table in which the cursor is currently positioned and all the table's contents.
Accepting/overwriting the default selection of layout properties
The layout properties of a table cell are defined by the template developer using the style sheets. Depending on the configuration set for the style sheets by the template developer, these layout properties can, however, be changed when editing the table in the rich text editor. In this case the “Cell properties” button in the top part of the rich text editor is active:
Click the ![]() icon to open a window with properties which can be assigned to the current cell:
icon to open a window with properties which can be assigned to the current cell:

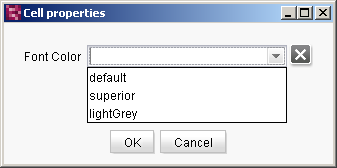
Example: properties of a table cell
Several cells to which the same property can be applied according to the template developer's specifications can be simultaneously selected and edited.
Values preset by the template developer are identified by pink-colored marking. You can manually overwrite these values or accept them for the respective cell by clicking the ![]() icon. In both cases the pink marking disappears. Click the
icon. In both cases the pink marking disappears. Click the ![]() button at any time to reset the value to the value preset by the developer.
button at any time to reset the value to the value preset by the developer.
The desired properties can be selected from the input components and saved with the OK button. Click ![]() to remove the property again later.
to remove the property again later.
|
If invalid values are used for the background color (e.g., #ZZZZZZ), the cell concerned is displayed with a white background color in the rich text editor and in the subsequent output. |
Alternating continuous text and tables

Inserting a text section in front of an inline table
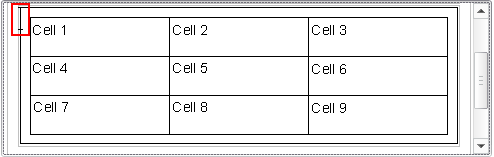
To insert a new text section in front of an inline table, the cursor is positioned in the first cell of the required table and is moved to the left using the cursor key. The cursor is now displayed as follows (framed in red here):
The Enter key is then pressed to add a new text section in front of the table.
Inserting a text section after an inline table
To insert a new text section after an inline table, the cursor is positioned in the last cell of the required table and is moved to the right using the cursor key. The cursor is now displayed as follows (framed in red here):
The Enter key is then pressed to add a new text section after the table.
Keyboard control of inline tables
The cursor keys ←, →, ↑ and ↓ can be used to navigate the cells of inline tables (see also keyboard shortcuts). Use the Tab key to move to the respective next cell. If the cursor is in the last cell of a row, it goes to the first cell of the following row. At the end of a table, Tab is used to add a new row, provided the template developer's specifications allow this. If no more rows may be added, the cursor remains in its current position. Use Shift+Tab to move the cursor backwards through the cells within the current table.
Press Enter to insert new rows within a cell. Press the Back key to move the cursor through empty cells in the same way as with the cursor key ←.
Further formatting options
The editor can use all format and link templates available in the rich text editor for entering text, e.g., bold, underline, internal and external links. The insertion and editing of (nested) lists is also the same as in “simple” rich text editors.