

Integrated cropping function
If the cropping function is called using the ![]() icon, the system first checks whether a resolution already exists and whether it is based on the original image or another image:
icon, the system first checks whether a resolution already exists and whether it is based on the original image or another image:
- If no resolution exists yet, the original image is opened for editing in the following dialog.
- If a resolution exists which is based on the original image, the original image is also opened for editing in the following dialog.
- If a resolution exists which is not based on the original image but on an uploaded image, a message first appears: “This resolution is not based on the original medium. Further resizing can cause loss in quality.” and then the uploaded image is opened for editing in the following dialog.
 |
In this case only the cropped image is saved, the sizing can only be made smaller at a later date. |
Dialog cropping function for images
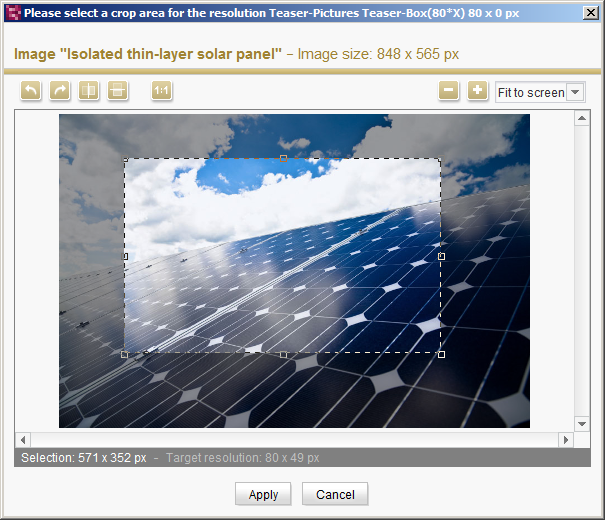
Cropping function for images
The selected image can now be edited in this dialog. Apart from the image name, the current image size is also displayed (here: 848 x 565 pixels).
The following editing options are available:
![]() If the image is larger than the target resolution, the frame can be used to select a suitable cutout from the image. The first time the image is edited, as a default the frame is displayed centered in the size of the target resolution. The image area outside the frame has a gray background. If the image has already been edited, the frame is shown in the size and in the location where it was previously saved.
If the image is larger than the target resolution, the frame can be used to select a suitable cutout from the image. The first time the image is edited, as a default the frame is displayed centered in the size of the target resolution. The image area outside the frame has a gray background. If the image has already been edited, the frame is shown in the size and in the location where it was previously saved.
Click inside the frame and drag to move it within the image. The size of the frame can be changed with the help of the handles. In the case of resolutions for which the “Keep aspect ratio” option was activated in the project properties (see Resolutions (→Documentation for Administrators)) or which have a fixed size (e.g., 400 x 300 pixels), the frame can only be enlarged or reduced in size proportionally. The frame therefore only has handles in the corners. In the case of resolutions without a specific aspect ratio, the frame also has handles on the sides. The corner handles can be used to proportionally enlarge or reduce the size of the image by simultaneously pressing the Shift key.
|
If the original image is to be edited, a frame must be manually pulled onto it first. |
Selection: These pixel dimensions specify the current size of the frame. If a smaller cutout than the target resolution is selected, the size details appear in yellow lettering. In this case a loss in quality can occur as the system will automatically scale the image larger. If a larger cutout than the target resolution is selected, the system automatically scales down the image to the resolution size.
Target resolution: These pixel dimensions specify the size defined for this resolution in the project properties (see the FirstSpirit Manual for Administrators).
![]() Rotate 90° to the left: This icon can be used to rotate the image through 90° to the left. If necessary, the selection frame must be moved or reduced in size within the image so that the selection can be accepted.
Rotate 90° to the left: This icon can be used to rotate the image through 90° to the left. If necessary, the selection frame must be moved or reduced in size within the image so that the selection can be accepted.
![]() Rotate 90° to the right: This icon can be used to rotate the image through 90° to the right. If necessary, the selection frame must be moved or reduced in size within the image so that the selection can be accepted.
Rotate 90° to the right: This icon can be used to rotate the image through 90° to the right. If necessary, the selection frame must be moved or reduced in size within the image so that the selection can be accepted.
![]() Flip horizontally: This icon can be used to mirror the image horizontally.
Flip horizontally: This icon can be used to mirror the image horizontally.
![]() Flip vertically: This icon can be used to mirror the image vertically.
Flip vertically: This icon can be used to mirror the image vertically.
![]() Selection in 1:1 scale: This icon can be used at any time to reset the selection frame back to the size of the target resolution.
Selection in 1:1 scale: This icon can be used at any time to reset the selection frame back to the size of the target resolution.
|
If the image is smaller than the target resolution, this icon is inactive here, as well as in the original image. |
![]() Reduce zoom size: As a default, the size of the image to be edited is adjusted to the size of the edit window. This icon can be used to reduce the size of the zoom to enable a larger area of the image to be viewed.
Reduce zoom size: As a default, the size of the image to be edited is adjusted to the size of the edit window. This icon can be used to reduce the size of the zoom to enable a larger area of the image to be viewed.
![]() Increase zoom: This icon can be used to increase the zoom to examine a cutout of the image in greater detail. A pixel grid is also provided for high zoom levels.
Increase zoom: This icon can be used to increase the zoom to examine a cutout of the image in greater detail. A pixel grid is also provided for high zoom levels.
Alternatively, the mouse wheel can be used to zoom into and out of the image.
 : This combobox can be used to select predefined zoom levels. Use the “Fit to screen” option to return to the initial zoom view.
The Accept button is used to save the image with its current edit status and the pop-up window closes. If the edited image is based on the original image, another image cutout can be selected later, if necessary. If the image is not based on the original image, the cropped image is saved. The sizing can only be made smaller at a later date. The same applies if the original image has been edited.
The image is now displayed in the list of resolutions with its file type, image size, and file size. The ![]() icon indicates that the image has been edited using the cropping function.
icon indicates that the image has been edited using the cropping function.