

Editing images
| Table of contents |
FirstSpirit provides various options for making simple changes to images from the Media Store without having to open them in external image editing software. In this way, images can be cropped, rotated or mirrored, for example. At the same time, the user is also able to make more extensive changes either using external image editing programs or via integrated image editing in the AppCenter area of SiteArchitect.
Functions in the editing area
The following functions can be performed for every resolution. To do this, the required resolution must be selected first by clicking the respective row. The icons are then only active if the corresponding function can be performed for the resolution.
![]() Crop image: Click this icon to open an editing window in which you can edit the resolution with Integrated cropping function.
Crop image: Click this icon to open an editing window in which you can edit the resolution with Integrated cropping function.
 |
The original image can also be edited. In this case a confirmation prompt is displayed: “Do you really want to crop the original image?” |
![]() Resolution checked: This icon is only active if the original image of a cropped image has been subsequently replaced. The resolution of the cropped image is not automatically adjusted to the size of the new original image and must therefore be manually checked and, if necessary, adjusted. Click this icon to change the
Resolution checked: This icon is only active if the original image of a cropped image has been subsequently replaced. The resolution of the cropped image is not automatically adjusted to the size of the new original image and must therefore be manually checked and, if necessary, adjusted. Click this icon to change the ![]() icon in the list of resolutions to
icon in the list of resolutions to ![]() .
.
![]() Delete stored image: This icon can be used to undo the editing of a resolution (by cropping, uploading a new image or editing in the external editor); the resolution is rendered once again from the original image. The original image itself cannot be deleted with this icon.
Delete stored image: This icon can be used to undo the editing of a resolution (by cropping, uploading a new image or editing in the external editor); the resolution is rendered once again from the original image. The original image itself cannot be deleted with this icon.
![]() Select new image: Click this icon to open a window in which you can move through the file structure at your workstation to search for the required image.
Select new image: Click this icon to open a window in which you can move through the file structure at your workstation to search for the required image.
|
If the size of the uploaded image does not match the size of the specified resolution, the |
![]() Edit: Click this icon to open the current image in the editor entered for the respective file format in the User Settings (Global settings) or set in the operating system. If a resolution already exists, it is loaded in the editor; otherwise the original image is opened. After the changes have been made in the external editor, the image must be saved in the external editor (it is not necessary to give file names or directory paths). When the external editor is opened, a window is opened at the same time in which all elements opened externally are listed.
Edit: Click this icon to open the current image in the editor entered for the respective file format in the User Settings (Global settings) or set in the operating system. If a resolution already exists, it is loaded in the editor; otherwise the original image is opened. After the changes have been made in the external editor, the image must be saved in the external editor (it is not necessary to give file names or directory paths). When the external editor is opened, a window is opened at the same time in which all elements opened externally are listed.
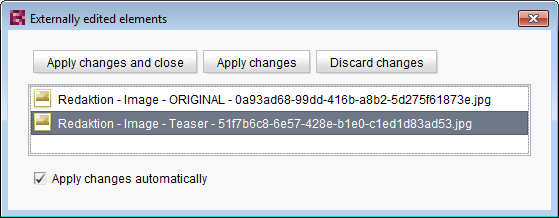
If the “Apply changes automatically” option is active, the changes saved in the external editor are always automatically adopted from the local storage location into the Media Store of SiteArchitect. (Only changes saved in the external editor can be automatically adopted.) When the window is closed, all open files can be discarded.
If the “Apply changes automatically” option is not active, then the changes saved in the external editor have to be adopted into the Media Store of SiteArchitect by clicking the Apply changes and close or Apply changes button. If the Discard changes button is used, the changes already saved externally are discarded and are not adopted in SiteArchitect.
|
If the size of the edited image does not match the size of the specified resolution, the |
![]() Save local copy: If changes saved in the external editor are not automatically integrated in SiteArchitect, click this icon to copy the edited image from the local storage location into the Media Store of SiteArchitect.
Save local copy: If changes saved in the external editor are not automatically integrated in SiteArchitect, click this icon to copy the edited image from the local storage location into the Media Store of SiteArchitect.
![]() Preview: Opens a preview of the resolution in a pop-up window or on a separate tab in the AppCenter area (if the “integrated preview for media” option has been activated) in 1:1 display format as the content would be displayed on the website.
Preview: Opens a preview of the resolution in a pop-up window or on a separate tab in the AppCenter area (if the “integrated preview for media” option has been activated) in 1:1 display format as the content would be displayed on the website.
![]() Download: Downloads a copy of the selected resolution in the relevant file format to the local file system on the workstation. The required download folder can be selected via the file selection dialog.
Download: Downloads a copy of the selected resolution in the relevant file format to the local file system on the workstation. The required download folder can be selected via the file selection dialog.
In addition, the following icons are used in the list:
![]() Cropped: This icon indicates that the image has been edited using the Integrated cropping function.
Cropped: This icon indicates that the image has been edited using the Integrated cropping function.
![]() Uploaded: This icon indicates that the image has been uploaded using the
Uploaded: This icon indicates that the image has been uploaded using the ![]() icon or edited using the
icon or edited using the ![]() icon.
icon.
![]() Checked: This icon indicates that the deposited image corresponds to the predefined resolution or can be automatically rendered by the system.
Checked: This icon indicates that the deposited image corresponds to the predefined resolution or can be automatically rendered by the system.
![]() Wrong resolution: This icon indicates that in the case of images uploaded using the
Wrong resolution: This icon indicates that in the case of images uploaded using the ![]() icon or edited using the
icon or edited using the ![]() icon, the deposited image does not correspond to the predefined resolution. The image is output on the website exactly as it was deposited.
icon, the deposited image does not correspond to the predefined resolution. The image is output on the website exactly as it was deposited.
![]() Not yet checked: This icon is displayed if a cropped resolution exists and if the original image was replaced after the cropping. The cropped resolution should be checked and, if necessary, adjusted. Several options are available for this:
Not yet checked: This icon is displayed if a cropped resolution exists and if the original image was replaced after the cropping. The cropped resolution should be checked and, if necessary, adjusted. Several options are available for this:
 : The image is edited internally. In this case the original image is used. After saving, the
  icon in the list of resolutions becomes a
  .
. : A new image is uploaded. If the dimensions of the uploaded image match the resolution, the icon in the list of resolutions becomes a . Otherwise a
  is displayed.
 : The image is edited in an external editor. The resolution of the edited image is not checked and has to be manually confirmed using the
  icon. The icon in the list of resolutions becomes a .
- : The current sizing is retained without changes. The icon in the list of resolutions becomes a .
|
Resolutions that were not edited beforehand are automatically re-rendered with the new original image and displayed if the original image has been replaced. |
Excursus: Controlling automatically generated images in projects
Image-type media can occur in different file types (such as JPEG or PNG) and resolutions (e.g. 72 dpi) in a project. Each image is stored as the file type and in the resolution it was originally uploaded with (resolution ORIGINAL).
Some actions trigger an automatic generation of new image files, depending on the original image files, for example:
- generating a preview image
- creating new resolutions
- using an automatically generated resolution
- cropping an image in SiteArchitect
This generation process can be edited per API with the custom ImageWriterParams project property.