

Creating media
This function can be used to add a new medium to the Media Store. Click and a window opens in which the details for the new medium can be entered.
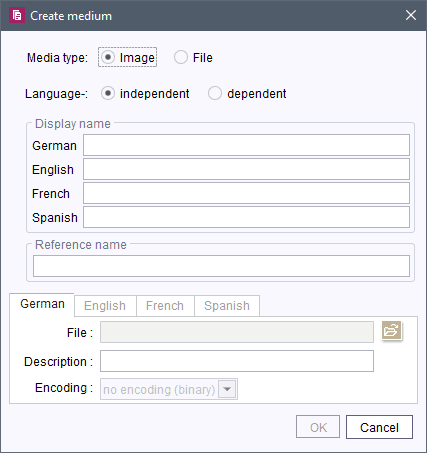
Create medium
Media type: Here you can select whether the medium is an image or a file.
Language(in)dependent: Define whether the new medium is to be created language-dependent or language-independent.
Display name: For each editing language defined via the ServerManager a language-dependent display name can be assigned to the new medium. Either the display names or the reference name are then displayed in the tree view, depending on the setting in the View – Preferred display language menu.
Reference name: This field is automatically filled with the value entered for the first display name by the editor, but can be changed (up to the initial creation of the object). The reference name may not contain any spaces, special characters or symbols. This is taken into account accordingly when the field is filled automatically.
 |
The “Reference name” field is only displayed if this setting was configured accordingly via the ServerManager. |
In the bottom part of the window you can select a medium for each language of language-dependent media, otherwise select a medium for the master language only.
File: Click the ![]() icon to select the required image or file from the directory structure of the workstation.
icon to select the required image or file from the directory structure of the workstation.
The selection of media can also be restricted to files of a specific size and format according to the project configuration (see Media constraints (→Documentation for Administrators)). The file selection dialog's sort functionality can be deactivated for speeding up work with this dialog.

File selection dialog
Media that are larger than the maximum size defined in the project properties and/or have a file name extension which is not allowed are not made available to choose from in the file selection dialog. The restrictions are displayed again in the “Files of Type:” field. In the example in the figure, files with file name extensions gif, jpg and png and up to a size of 3.91 MB may be selected and uploaded. Click Open to copy the selected medium into the dialog “Create Media”.
|
A corresponding warning appears if files from the workstation's directory structure that are not allowed on the basis of the media restrictions are added to the Media Store by means of drag-and-drop. The files will not be added to the Media Store. |
Description: Here, you can enter an explanatory text for the medium. Depending on the project configuration, it can be output as an alternative text on the web page (alt tag).
Encoding: When adding files, use this field to set the standard by which the original file is to be converged. More precise information on the individual character sets are given under Media constraints (→Documentation for Administrators).
Click the OK button or to take over the medium to the Media Store; the dialog will then close.