

Enhanced image editing
Depending on the configuration in the project properties, images and individual resolutions can also be edited using Advanced Image Editor via the Enhanced image editing button.
Note: The release for use of the Advanced Image Editor is explicitly given “without function guarantee” for the application itself. In other words, Crownpeak does not provide a guarantee for the image editing functions, neither explicitly nor implicitly, and instead they are released for use “as is”. If using image editing functions is critical for production, external editing software with the appropriate manufacturer support should be used. Use of the Advanced Image Editor on the Mac OS is currently severely limited.
Enhanced image editing – Advanced Image Editor
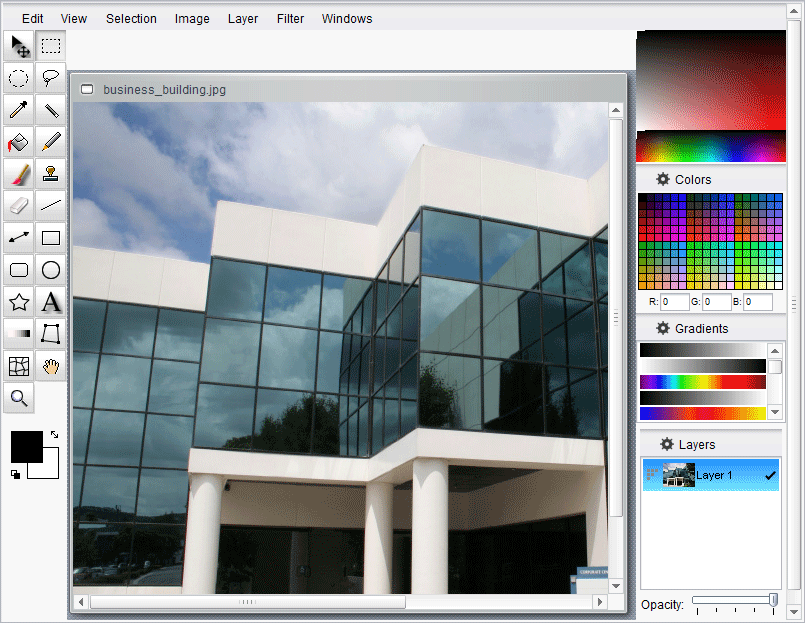
After clicking this button, the editor with its editing functions and tools, plus the image file with the resolution selected in the ribbon are displayed in the edit window below the ribbon:
Changes to images/resolutions first have to be copied into the Media Store of SiteArchitect by clicking the ![]() icon. You can then continue editing the image. Finally, the changes must be saved using the “Save” or “Exit Editing” button.
icon. You can then continue editing the image. Finally, the changes must be saved using the “Save” or “Exit Editing” button.
Click the Enhanced editing button again to close the editor; any changes not saved are not adopted in FirstSpirit.
The functions available in Advanced Image Editor are comparable with those in other relevant image editing/processing programs.
 |
Several menus, tool tips, and configuration dialogs (e.g., for filters) cannot be localized for technical reasons and are therefore only available in English. |
|
Several of the keyboard shortcuts displayed in the menus do not work for the editor, but instead perform the function known to date in SiteArchitect. |
Tool bar
Some tools provide enhanced configuration options. These are displayed above the image, below the menu bar.
Selection tools ![]() This icon can be used to move a selection or to resize it using the selection handles.
This icon can be used to move a selection or to resize it using the selection handles.
![]()
![]()
![]() Use these icons to select a square/rectangular, round/oval or user-defined cutout of the image for further editing. Such a selection can, e.g., be applied using the “Edit” menu, modified using the “Selection” menu, and moved using the
Use these icons to select a square/rectangular, round/oval or user-defined cutout of the image for further editing. Such a selection can, e.g., be applied using the “Edit” menu, modified using the “Selection” menu, and moved using the ![]() icon. All painting tools (see below) are only applied within a selection. Additional functions are available with the Ctrl key pressed.
icon. All painting tools (see below) are only applied within a selection. Additional functions are available with the Ctrl key pressed.
![]() This icon can be used to select contiguous areas, which have the same or a similar color.
This icon can be used to select contiguous areas, which have the same or a similar color.
![]() Use this icon to select through the color of pixels in the image.
Use this icon to select through the color of pixels in the image.
Painting and drawing tools ![]() Use this icon to fill adjacent areas with a similar color.
Use this icon to fill adjacent areas with a similar color.
![]() This icon can be used to draw a hard-edged freehand line.
This icon can be used to draw a hard-edged freehand line.
![]() This icon can be used to draw soft colored lines.
This icon can be used to draw soft colored lines.
![]() This icon can be used to duplicate a defined area of the image.
This icon can be used to duplicate a defined area of the image.
![]() This icon can be used to make pixels of the image transparent.
This icon can be used to make pixels of the image transparent.
![]()
![]() These icons can be used to create straight lines and arrows with a definable width and fill method.
These icons can be used to create straight lines and arrows with a definable width and fill method.
![]()
![]()
![]()
![]() These icons can be used to create filled or unfilled squares/rectangles, with angular or rounded corners, circles/ovals or stars.
These icons can be used to create filled or unfilled squares/rectangles, with angular or rounded corners, circles/ovals or stars.
View![]() If the image window has scroll bars due to the zoom level set, this icon can be used to move the image within the window.
If the image window has scroll bars due to the zoom level set, this icon can be used to move the image within the window.
![]() This icon can be used to increase/reduce (Ctrl) the zoom level (zoom in/out).
This icon can be used to increase/reduce (Ctrl) the zoom level (zoom in/out).
Other![]() This icon can be used to insert a layer with text into the image.
This icon can be used to insert a layer with text into the image.
![]() This icon can be used to add color gradients.
This icon can be used to add color gradients.
![]()
![]() These icons can be used to modify the perspective of the image by moving the corner points or to distort the image using a grid.
These icons can be used to modify the perspective of the image by moving the corner points or to distort the image using a grid.
![]() These icons are used to display the current foreground and background color. They can be swapped using the arrow icon. Use the black & white icon to select black and white as the background/foreground color.
These icons are used to display the current foreground and background color. They can be swapped using the arrow icon. Use the black & white icon to select black and white as the background/foreground color.
Menu levels
“Edit” menu
This menu is used to apply selections. They can be
- cut (Cut)
- copied (Copy)
- pasted (Paste)
- deleted (Delete)
- If several layers exist on top of each other, Copy Merged is used in the selected area to create a copy of all visible layers reduced to one layer.
- In addition, editing steps can also be undone (Undo).
“View” menu
This menu is used to control the view of the image:
- Use the Zoom in and Zoom out entries to gradually zoom the image.
- Use the 1:1, 2:1, 4:1, 8:1, and 16:1 entries to set a specific zoom level.
- The Show Grid entry displays a grid overlay on the image.
- Use the Show Selection as Mask entry to display the selection as a mask.
“Selection” menu
Use this menu to modify an existing selection:
- Select All: Selects the whole image.
- Select None: Empties the selection so that there is no longer any selection in the image.
- Invert: Selects the area of the image previously not selected.
- Feather...: Creates a selection with soft edges. The radius can be specified.
- Grow: Increases the selection by the specified radius.
- From Layer Transparency: Selects all transparent areas of the image.
- New Layer from Selection: Creates a layer based on the selection.
“Image” menu
Use this menu to modify the whole image:
- Crop: Removes all parts of the image except for the selection.
- Image Size...: This can be used to change the size of the image.
- Flip Horizontal/Vertical/Diagonal: Mirrors the image horizontally/vertically along the vertical axis or diagonally about the transverse axis.
- Rotate 90/-90/180/…: Rotates the image through 90° in the clockwise or anticlockwise direction, or through 180° in a clockwise direction or by the number of degrees defined by the user.
- Fill Selection: Fills the whole current selection with the selected foreground color.
“Layer” menu
This menu is used to create, modify and delete layers. On exiting the Advanced Image Editor, several layers are merged to form one; the next time the Editor is started, only this layer is available.
- New Layer/via Copy/via Cut: Creates a new empty layer, creates a layer with the content of the current selection or creates a layer with the content of the current selection and removes the selection from the existing layer.
- Delete/Duplicate Layer: Deletes or duplicates the currently selected layer.
- Rename...: This menu entry can be used to change the name of the layer. The new name is not saved on exiting the Editor and is no longer available the next time the Advanced Image Editor is started.
- Move up/Move down: Moves the current layer one position up/down.
- Merge Down: Merges the currently selected layer with the layer(s) underneath it.
- Flip Horizontal/Vertical/Diagonal: Mirrors the selected layer horizontally/vertically along the vertical axis or diagonally about the transverse axis.
- Rotate 90/-90/180: Rotates the selected layer through 90° in a clockwise or anticlockwise direction, or through 180° in a clockwise direction.
“Filter” menu
This menu can be used to apply filters to the image, the current layer or the current selection.
- Repeat Last Filter: Applies the last applied filter again.
- Show Last Filter: Displays the last applied filter or the corresponding configuration dialog.
“Windows” menu
This menu can be used to hide or show the palettes on the right-hand side.
Palettes
- Colors: The foreground color can be selected here with a click.
- RGB colors: The foreground color can be selected here by setting RGB values.
- Swatches (“Colors”): Here the foreground color can be selected from a library. As a default, a palette of colors is used, which can be used, platform-independent, by all browsers (“web colors”). If necessary, you can import your own libraries (and save them again later). Uploaded color libraries are not saved on exiting the Editor and are no longer available the next time the Advanced Image Editor is started.
- Gradients: A color gradient can be selected here. The existing ones can be used and edited or the user's own gradients can be loaded. Uploaded or edited color gradients are not saved on exiting the Editor and are no longer available the next time the Advanced Image Editor is started.
- Layers: New layers can be created, edited or deleted here. See also section “Layer' menu” point. In addition, fill methods can be set for the current layer. On exiting the Advanced Image Editor, several layers are merged to form one; the next time the Editor is started, only this layer is available.