

FirstSpirit AI: prompt configuration
| Table of contents |
You can configure prompts for the Content Assistant, Analyze Assistant, Image Assistant, and Code Assistant in both the ContentCreator and the ServerManager.
In the ContentCreator, you can manage prompts for the AI Assistant Suite directly through the AI Configuration and edit them if necessary.
In the ServerManager, you can manage prompts for the AI Assistant Suite in the FirstSpirit AI Configuration service and the FirstSpirit AI Configuration ProjectApp. Prompt management in the FirstSpirit AI Configuration service is only possible if you operate a local FirstSpirit server.
Prompting levels
Depending on your user permissions, you can view and edit prompts of different levels.
As a server administrator, you can configure the following:
- Plugins (ServerManager only): The plugin defines the connection between the FirstSpirit AI API and the selected AI model.
- System prompts: These prompts are used during the execution of each operation. They are necessary to ensure the correct interpretation and execution of operations. System prompts can only be edited by system admins.
- Global prompts: Global prompts are available in all projects on a server. Global prompts can only be edited at the server level by server admins.
- Shared prompts: Similar to global prompts, shared prompts are available in all projects on a server. Shared prompts can be managed by server or project admins at the server or project level.
As a project admin, you can configure the following prompts:
- Shared prompts: Shared prompts can be adjusted at the project level by project admins.
- Project prompts: These prompts are only available in individual projects.
Global, shared, and project prompts consist of the following configurable parts:
- Operations: An operation is a task that is executed in one of the assistants or in a custom script.
- Options: You can assign an option to one or more operations. Options allow you to amend the task with predefined values.
- Tags: Use tags to assign processes and options to one or more assistants or custom scripts. You can customize tags at all levels to manage the visibility of operations and options for users.
- Functions: Allow FirstSpirit AI to access one or more functions of configured function servers via plugins, e.g., the MCP Connector Plugin, and use the corresponding data in content creation.
Prompt configuration in the ContentCreator
To open the prompt configuration in the ContentCreator:
- In the ContentCreator, under Actions, click on Open AI Configuration.

→ The Edit prompt configuration window opens. Here, you can edit or add prompts at different levels depending on your user rights (see Prompting levels).
 |
Only server and project admins can access the AI configuration in the ContentCreator. |
System prompts
|
System prompts can only be viewed and edited by server admins. |
System prompts enable the correct processing of input components and ensure the smooth generation of output text for each operation.
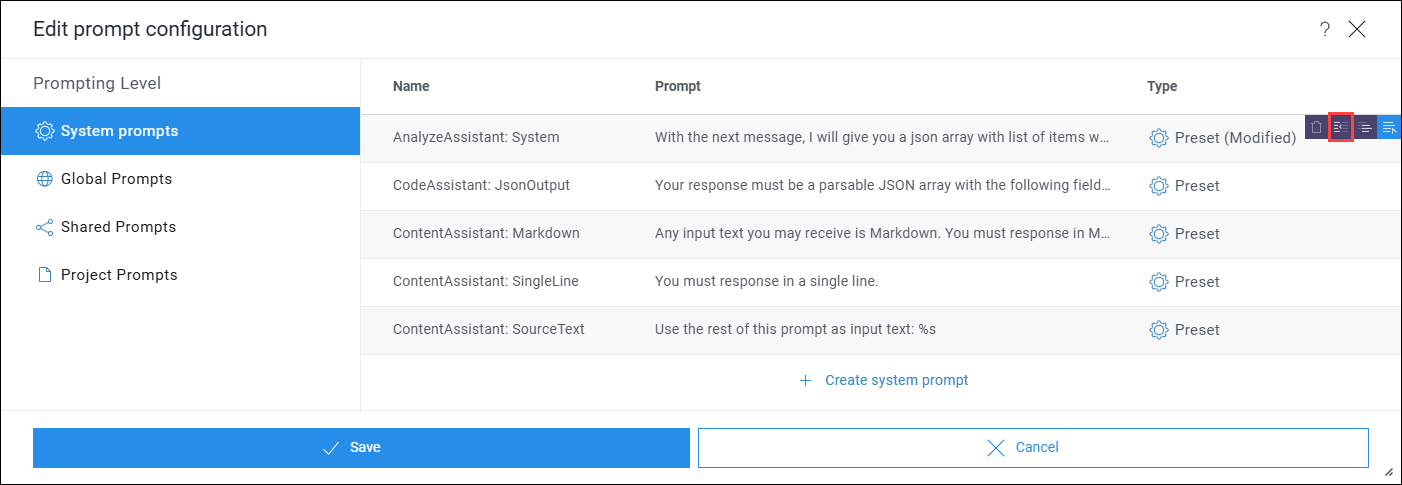
System prompts can be of different types, which are shown in the Type column:
- Preset: Crownpeak offers default settings for the system prompts of all assistants. Default prompts cannot be deleted.
- Preset (Modified): These system prompts are default system prompts that have been edited by the server admin.
- Custom: Custom system prompts have been added and defined by a server admin.
|
Preset system prompts for the Content Assistant, Analyze Assistant, and Code Assistant are already set up and fully functional. They are kept up to date by Crownpeak. We recommend using them without modification. |
You can perform the following actions for system prompts:
- Editing a preset system prompt
- Resetting a modified system prompt
- Duplicating a system prompt
- Adding a custom system prompt
- Deleting a custom system prompt
Editing a preset system prompt
- Under System prompts, select a prompt of the type Preset.
- Click Edit system prompt.
→ A new window opens. Edit the prompt.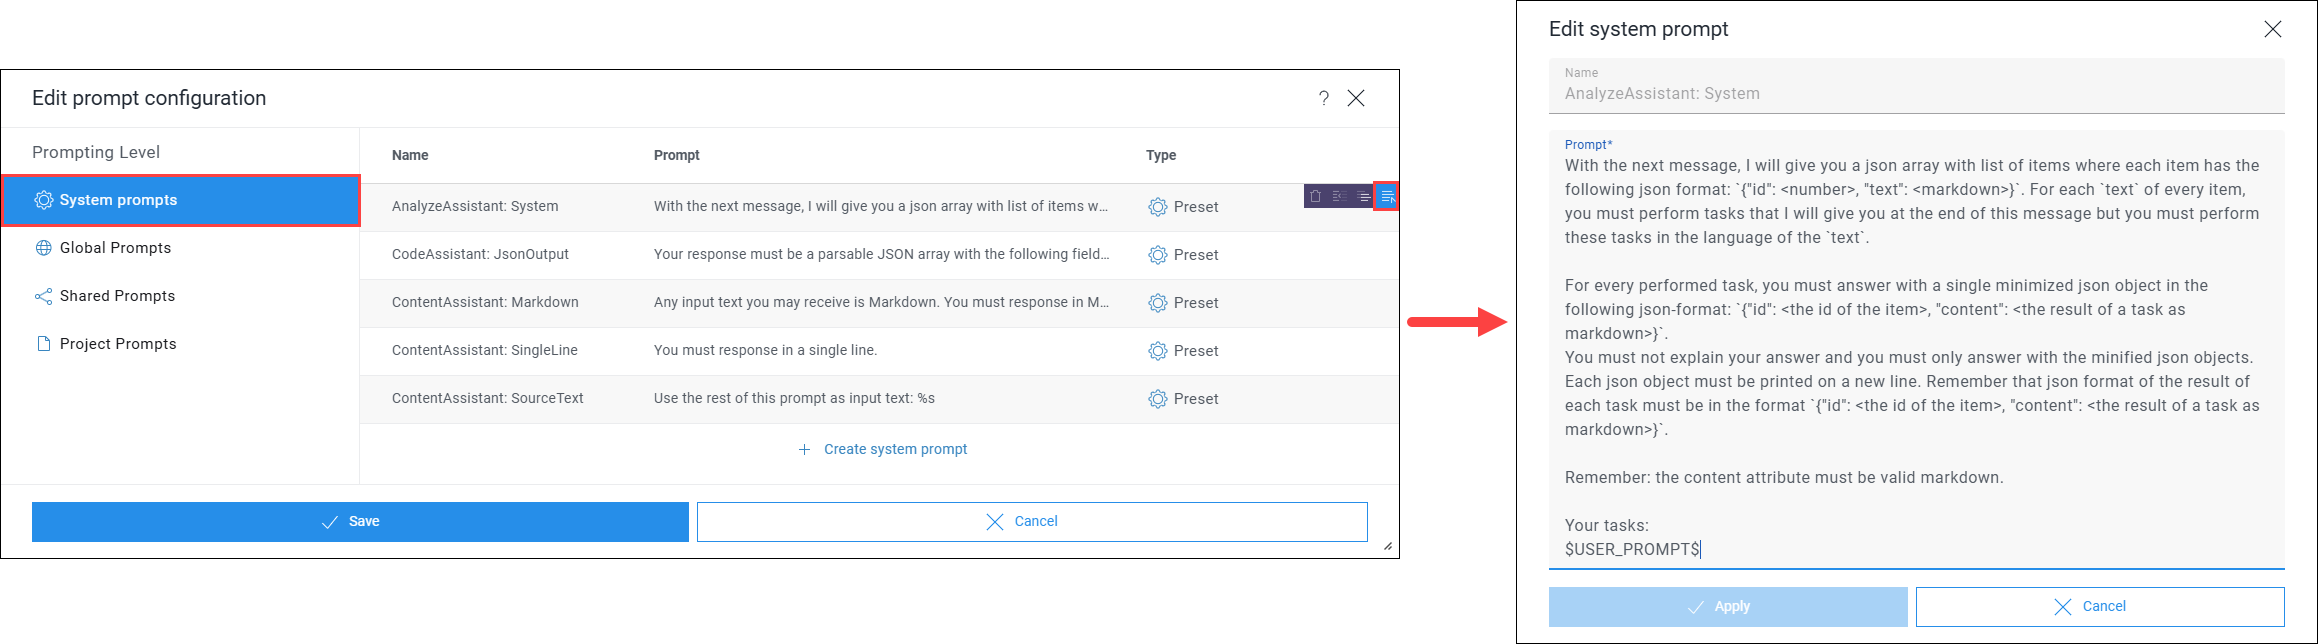
- Click Apply to save the changes.
→ The prompt will be marked as Preset (Modified) in the Type column.
Resetting a modified system prompt
- Under System Prompts, hover the mouse over the prompt you want to reset to default.
- Click Restore system prompt preset.
→ The reset system prompt will be marked again as Preset in the Type column.
Duplicating a system prompt
- Under System prompts, hover the mouse over the prompt you want to duplicate.
- Click Duplicate system prompt.
→ A new window opens.
- Change the Name.
- Optional: Change the Prompt.
- Click Apply to save your changes.
→ The duplicated and modified system prompt now appears in the list.
Adding a custom system prompt
You can add a task-specific system prompt to use when utilizing the FirstSpirit AI API in a custom script or module action.
- Under System prompts, click Create system prompt.
→ A new window opens.
- Enter a descriptive name for your custom system prompt in the Name field, e.g., "MyCustomAssistant: System".
You can use the name specified in this field in your custom script to access your custom system prompt. - Enter a prompt in the Prompt field.
- Click Apply to save your changes.
Deleting a custom system prompt
- Under System prompts, hover your mouse over the custom prompt you want to delete.
- Click Delete system prompt.
Global, shared, and project prompts
The following actionable items are identical for global, shared, and project prompts:
- Change the visibility of list items
- Add an operation
- Test an operation
- Add an option
- Edit an existing operation or option
- Duplicate an operation or option
- Move an operation or option
- Delete an operation or option
- Activate a function
Additionally, the following prompting-level specific actions are available to you:
The displayed list provides the following information by default:
- Position: The display position of the operation that the end user also sees when selecting an operation
- Name: The name of the operation that the end user also sees when selecting an operation
- AI Assistant: The assistants to which the operation is assigned
- Options: The options assigned to the operation
- Prompting Level: The level at which a prompt has been defined
|
Operations and options that are marked as Preset in the Prompting Level column are in their original state as provided by Crownpeak. Entries that are marked as Preset (Modified) have been edited by admins. |
|
Under each prompting level, the operations and options of the current and all parent prompting levels are displayed; for example, under Shared Prompts, both shared and global prompts are shown. |
Change visibility of list items
The visibility is set to "all" by default, meaning that all operations and options are displayed in the list regardless of which assistant they are assigned to.
To change the visibility of list items:
- Select which assistant you want to view the visibility settings for, e.g., ContentAssistant.
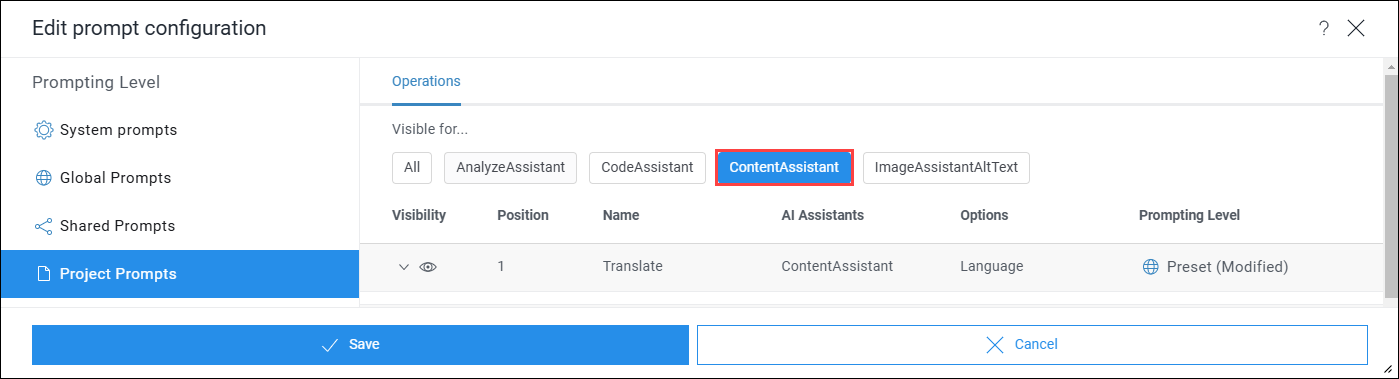
→ The Visibility column appears. This indicates which operations are shown to the end-user when using the ContentAssistant. Other prompts will still be displayed in the list but will be grayed out. - Optional: Change the visibility setting of an entry to display or hide it when using the ContentAssistant. Use the drop-down menu in the Visibility column in the row of the corresponding entry.
Adding an operation
- In the Edit prompt configuration window at the desired prompting level, click Create operation.
→ A new window opens where you can define the new operation.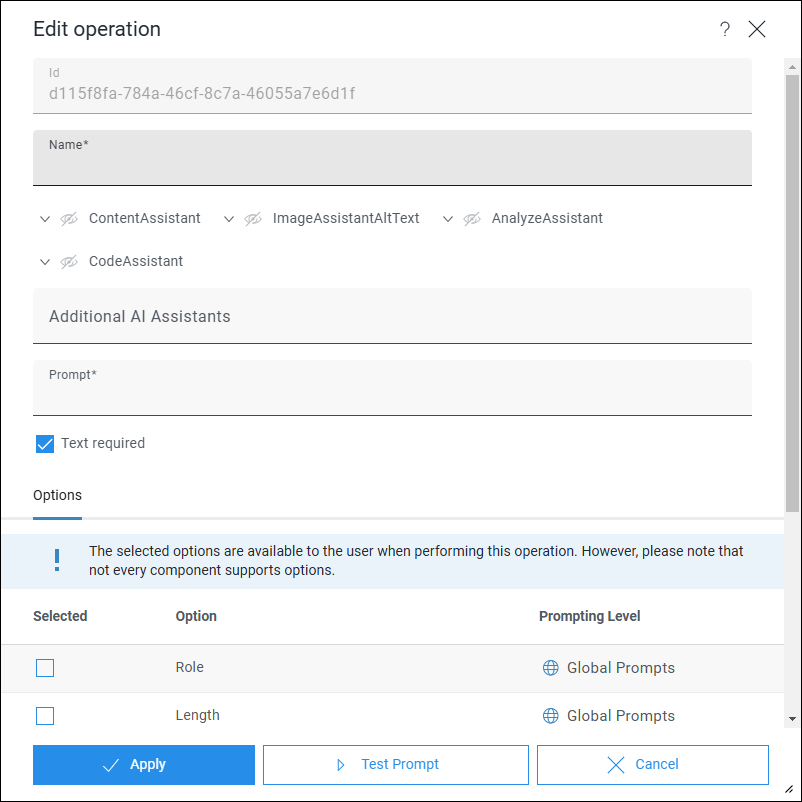
|
You can use the ID to reference this specific operation in your custom script or module action. |
- Enter a name for the operation in the Name field. This name will be displayed to the user in the ContentCreator.
- (De-)activate the visibility for each assistant or custom script or module actions in which a user should be able to use this operation.
- Optional: Create a new custom AI assistant in the Additional AI Assistants input line.
→ The operation will be directly assigned to the new assistant. This must also be evaluated accordingly in the custom script or module. - Enter your prompt in the Prompt field.
|
You can find more information about prompt creation in the starter package and in the prompting tips. |
- Optional: Activate the checkbox Text required if your prompt uses input text.
- Optional: Add one or more options to your prompt by checking the appropriate boxes under Options.
- Optional: Click Create option to add a new option.
- Optional: Activate a function to allow the use of it in the operation.
- Optional: Test your operation.
- Click Apply to save your changes.
Testing an operation
- Choose an operation and click Edit operation.
→ A new window opens. - Click Test Prompt.
→ A new speech bubble opens.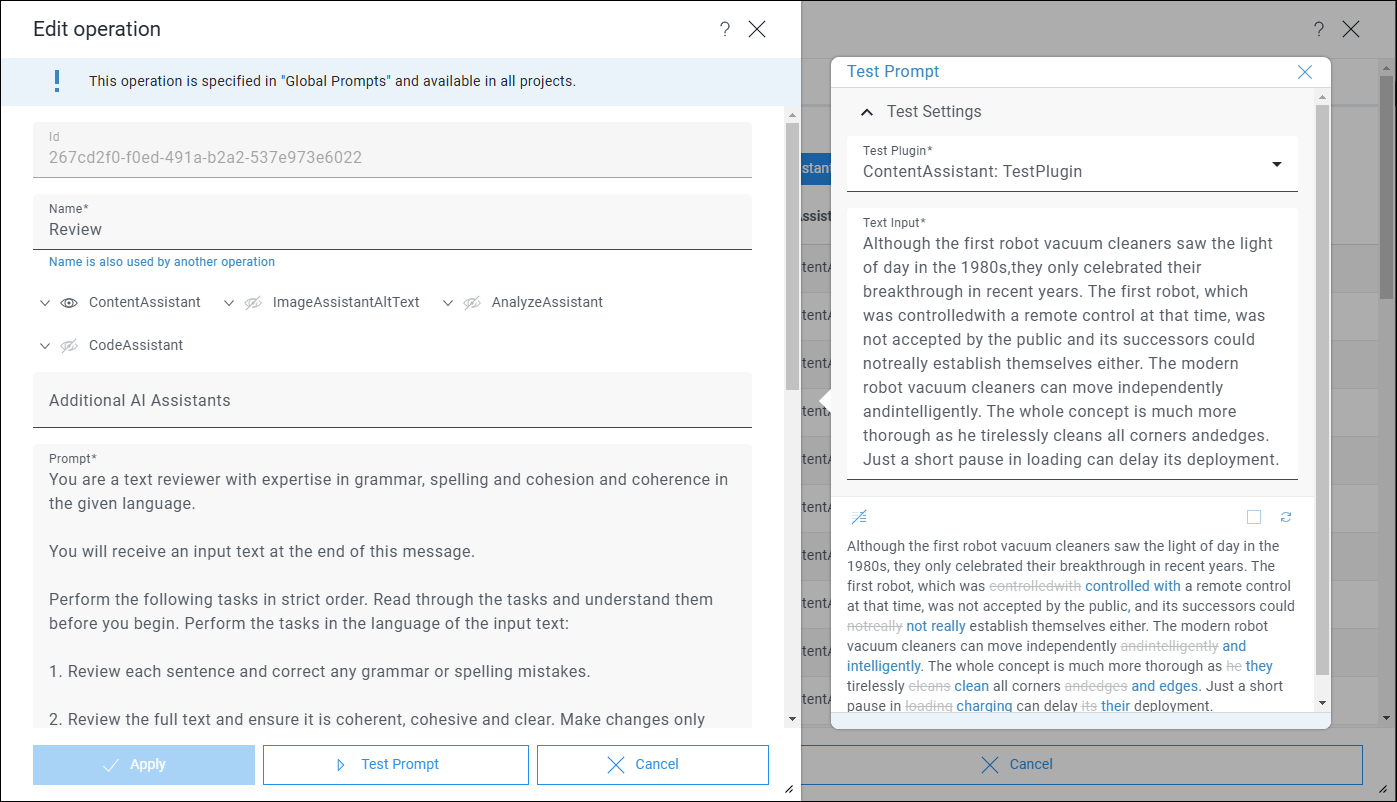
- Expand the Test Settings.
- Choose a Test Plugin to test your prompt in a specific environment, e.g., ContentAssistant: TestPlugin to test your prompt for use in the Content Assistant.
→ The text in the Text Input field changes based on the chosen test plugin. - Optional: If the operation to be tested has an assigned option, select an option value to test.
- Optional: Edit the text in the Text Input field.
→ Based on your prompt and the provided example text, the generated text will be streamed in the bottom field. - Optional: Edit your prompt in the Prompt field if the API response was unsatisfactory and test it again.
Adding an option
|
Note that depending on the level at which you add an option, it can only be assigned to corresponding operations. For example, an option defined at the project prompt level cannot be assigned to a global prompt. |
- In the Edit prompt onfiguration window, click Create option.
→ The Edit option window will open.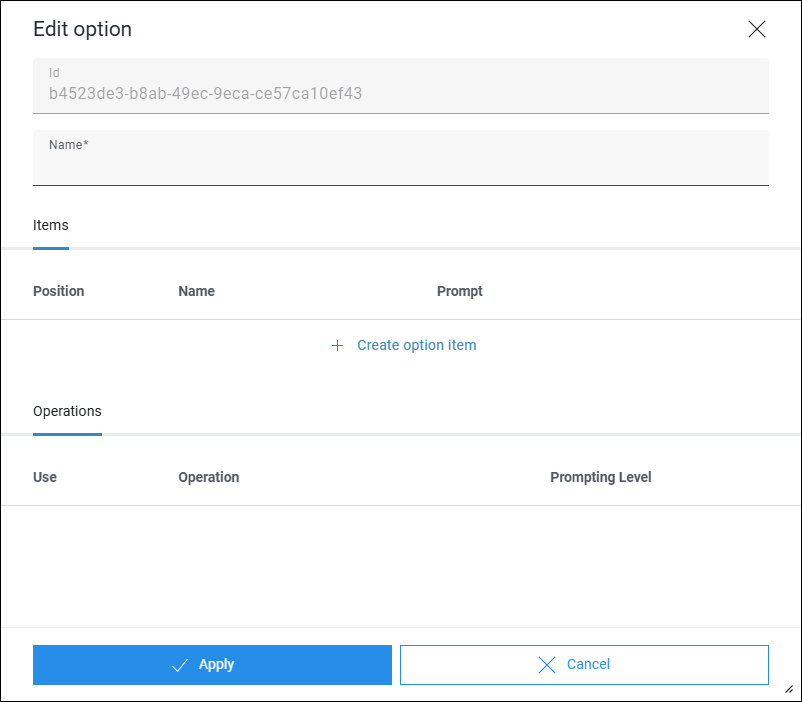
|
You can use the ID to reference this specific option in your custom script or module action. |
- In the field Name, enter the display name of the option.
- Click Create option item to add a new option item.
→ The Edit option item window opens.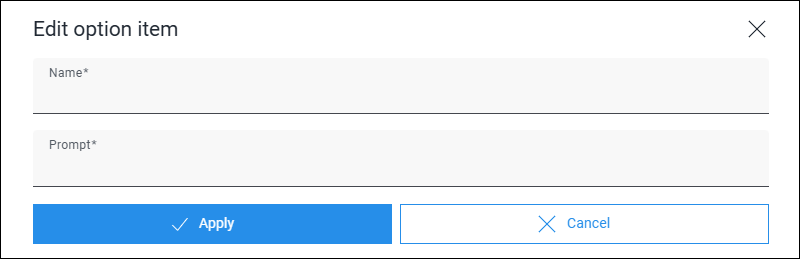
|
You can use the name to reference this particular option value in your custom script or module action. |
- In the Name field, specify the display name of the option value.
- In the Prompt field, specify the prompt of the option value.
- Click Apply to save your changes.
- Optional: Add more entries.
- Under Operations, assign your newly added option to an operation by setting the appropriate checkboxes.
- Click Apply to save your changes.
Editing an existing operation or option
- In the Edit prompt configuration window, click on the Edit operation/Edit option icon for the desired operation/option.
→ The Edit operation/Edit option window opens. - Change the display name or prompt as well as other settings.
- Save your changes.
|
If you edit a shared operation and save your changes, these will be applied server-wide. |
Duplicating an operation or option
- In the Edit prompt configuration window, select an entry, either an operation or an option, and click on Duplicate
 .
.
→ The Edit operation/Edit option window opens. - In the Name field, adjust the name.
- Optional: Adjust the prompt or any other settings of the duplicated operation or option.
- Save your changes.
Moving an operation or option
Move an operation or option to change its display position:
- In the Edit prompt configuration window, hover your mouse over the operation or option you want to move.
- Press and hold the
 icon and move the entry to the desired position.
Alternatively: Click on /
/  to move the entry up or down.
 - Save your changes.
|
If an operation or option is assigned to multiple assistants, moving the entry may affect the display position of said entry in all assigned assistants. |
Deleting an operation or option
- Hover the mouse over the operation or option you wish to delete.
- Click Delete operation/Delete option.
|
You can only delete operations and options at the level where they were created. |
Activate a function
Allow the use of a function from a previously configured server, e.g., MCP server:
- In the Edit operation window, navigate to the Functions section.
→ Here, all configured servers are displayed, along with the functions of each server that are allowed for use in this operation.
If none of the functions available for a server are activated for the operation, (none) is displayed in the Function column. If all functions available for a server are activated for the operation, (all) is displayed in the column.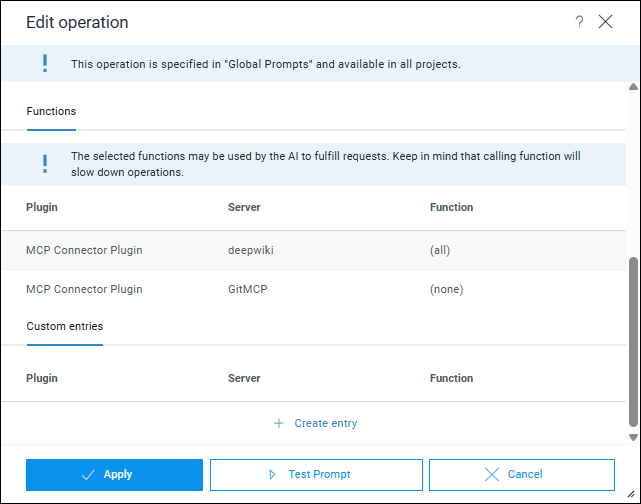
|
The MCP servers DeepWiki and GitMCP shown here are only exemplary and are not included. |
|
The list Custom entries contains functions that no longer exist, for example, because the corresponding server configuration has been removed. |
- To (de)activate one or more functions of a function server, click Edit entry
 .
.
→ The plugin window of the configured server will open. Here you can view all the functions available for the server.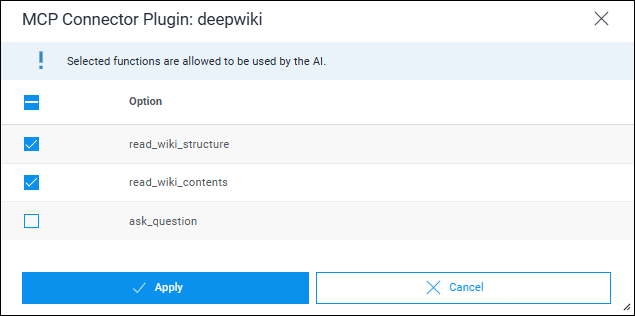
- To activate an individual function, click on the corresponding checkbox. A checkmark indicates that the function is activated.
- Optional: (De)activate all options available for a server by clicking the checkbox in the top row.
- Click Apply to save your changes.
→ The operation can now use the activated functions.
|
The AI autonomously decides whether to use a function to execute a prompt, i.e., the function call is not enforced. To enforce a function call it can be explicitly mentioned in the operation prompt. For optimal use of MCP server functions, you should observe the respective instructions provided by the MCP server. |
Resetting a global operation
- Under Global Prompts, hover your mouse over the operation you want to reset to the default setting. (You can only reset entries that are marked as Preset (Modified).)
- Click on Restore operation preset.

→ The reset operation will be marked as Preset again in the Prompting Level column.
Sharing an operation at the project prompt level
- Under Project Prompts, hover your mouse over the operation at the project prompt level that you want to share server-wide.
- Click on Share operation.
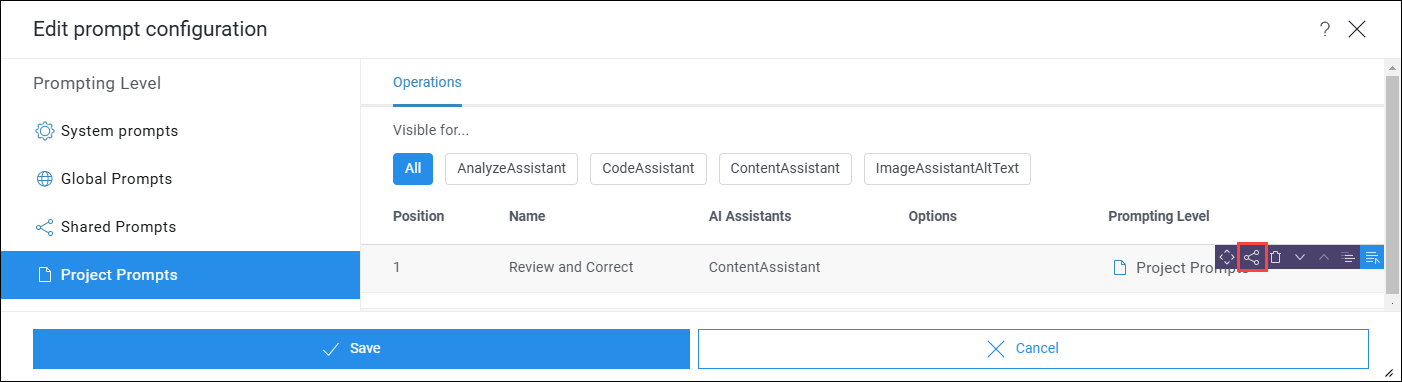
→ The operation will be marked as Shared Prompt in the Prompting Level column and can now be used server-wide.
Prompt configuration in the Server Manager
|
The FirstSpiritAI Configuration ProjectApp is automatically added for all projects on a server when using the FirstSpirit AI Configuration service. |
As a server admin, you can configure the following in the FirstSpirit AI Configuration service:
- Plugins
- System prompts
- Global prompts
- Shared prompts
As a project admin, you can configure the following in the FirstSpirit AI Configuration ProjectApp:
- Shared prompts
- Project prompts
FirstSpirit AI Configuration service
|
A configuration is only possible if you operate a local FirstSpirit server. |
To configure prompts in the FirstSpirit AI Configuration service:
- Navigate to the module list.
ServerManager > Server > Properties > Modules - Enable Show Services and type "AI" in the search bar.
→ The FirstSpirit AI Configuration service is shown in the results.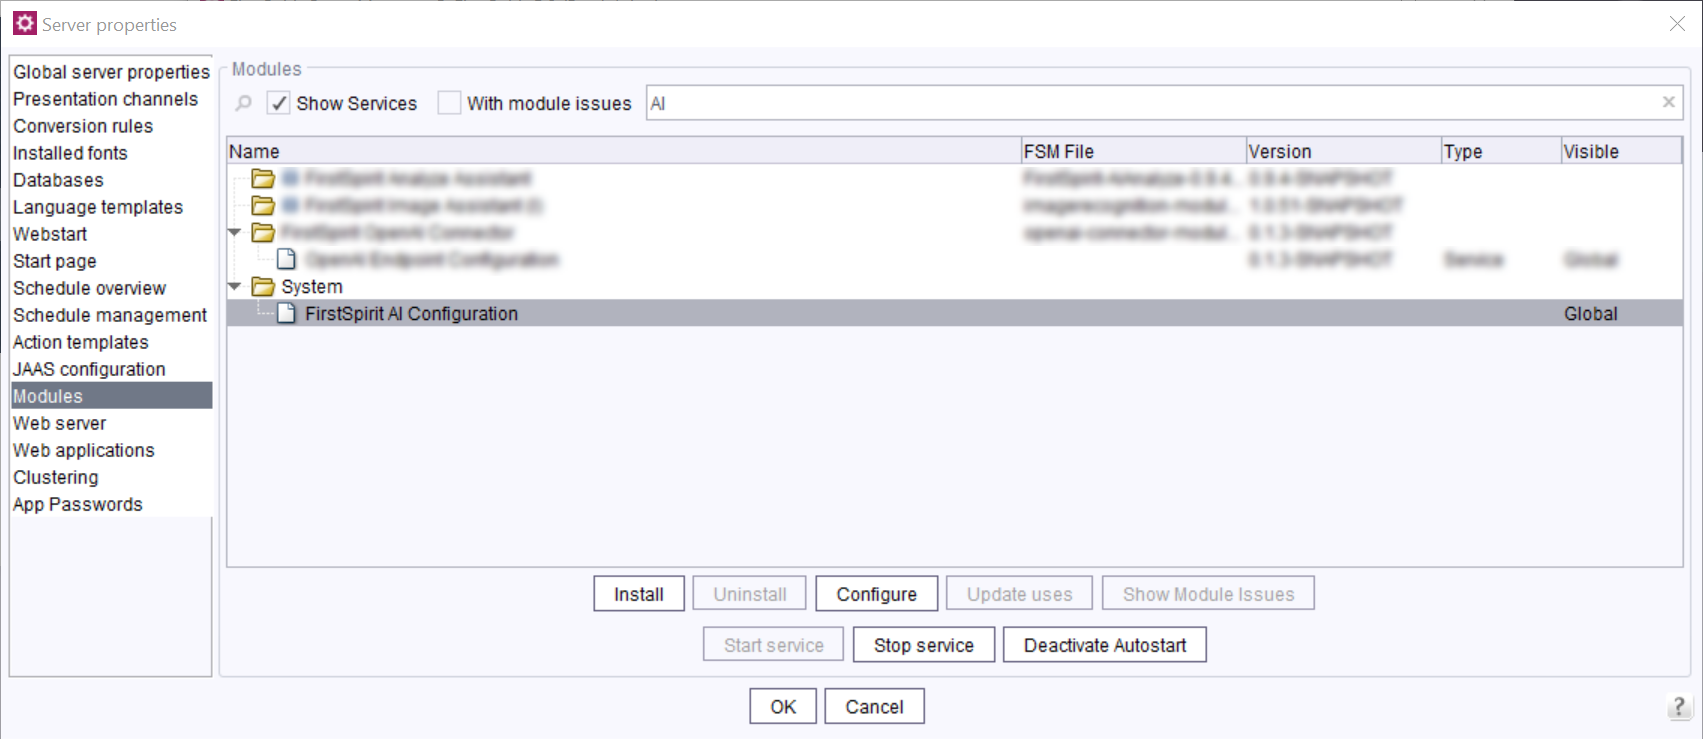
- Select the service and click Configure.
→ A new configuration window opens.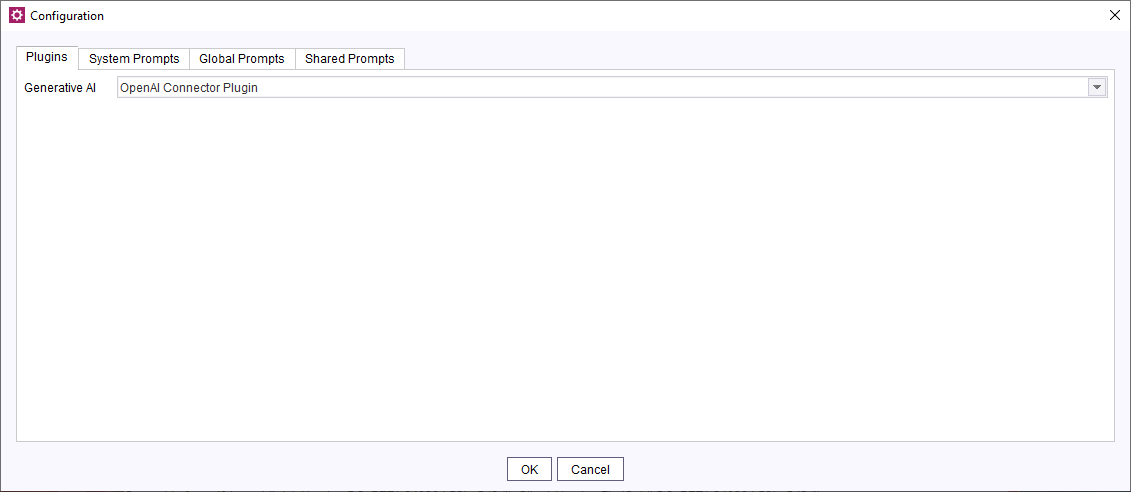
System prompts
System prompts can be of the following types shown in the Type column:
- Default: Crownpeak provides default system prompts for both the Content Assistant and Analyze Assistant. Default system prompts cannot be deleted.
- Modified: These system prompts are default prompts that have been modified by a server admin.
- Custom: Custom system prompts have been added and defined by a server admin.
|
Default system prompts for the Content Assistant, Analyze Assistant, and Code Assistant are already pre-configured and fully functional. They are kept up to date by Crownpeak. We recommend using them unchanged. |
Editing a default system prompt
- In the System Prompt tab, select the prompt you want to edit.
- Click Edit.
→ A new window opens in which you can edit the selected system prompt.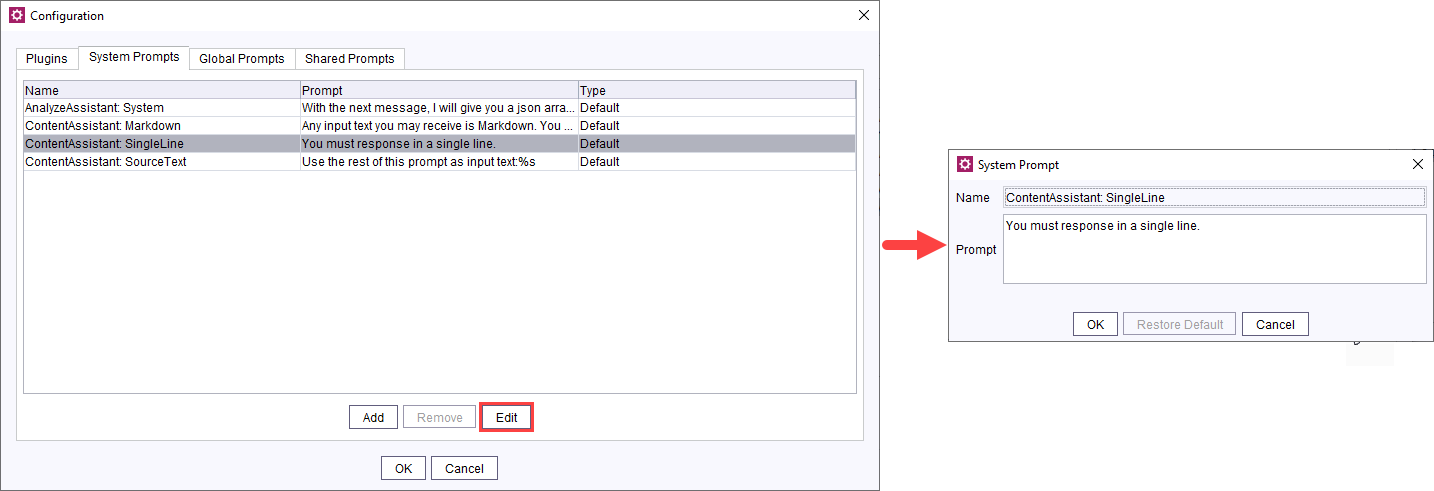
- Click OK to save your changes.
→ The prompt is marked as Modified in the Type column.
Restoring a default system prompt
- In the System Prompt tab, select a modified the prompt you want to restore.
- Click Edit.
→ A new window opens. - Click Restore Default.
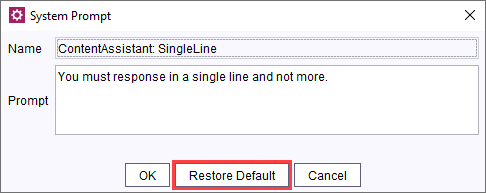
- Click OK to save your changes.
→ The restored system prompt is marked as Default again in the Type column.
Adding a custom system prompt
You can add a task specific system prompt when using the FirstSpirit AI API in a custom script or module action.
- Navigate to the System Prompt tab in the FirstSpirit AI Configuration service.
- Click Add.
→ A new window opens. - In the Name field, enter a descriptive name for your custom system prompt, e.g. "MyCustomAssistant: System".
In your custom script, you will use the name defined in this field to call upon your custom system prompt. - In the Prompt field, enter a prompt.
- Click OK to save your changes.
→ Your newly created system prompt appears in the list and is marked as Custom in the Type column.
Global prompts
You can use global prompts in Content Assistant, Analyze Assistant, Image Assistant or a custom script or module action. Global prompts are available for all projects on a given server. Global operations and options can only be added, edited or deleted at the server-level by server admins.
Global operations and options can have the following sources shown in the Source column of either the Operations or the Options tab:
- Preset: These entries are in the original state as provided by Crownpeak. Preset global prompts cannot be deleted.
- Preset (Modified): These entries were provided by Crownpeak but have been modified by a server admin.
- Global: These entries have been created by a server admin.
Adding an operation
- In the Operations tab, click Add.
→ A new window opens in which you can define the new operation.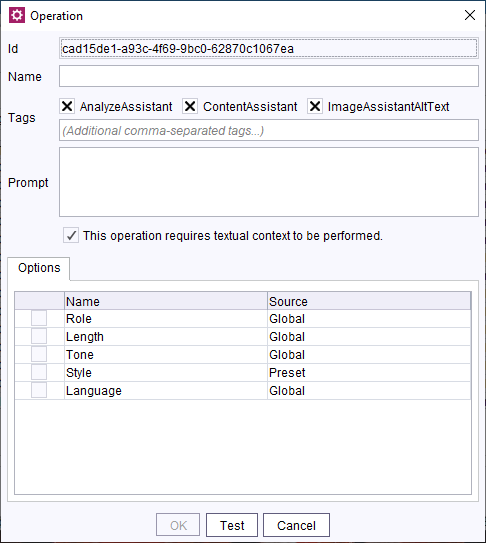
|
You can use the ID to reference specific operations in your custom script or module action. |
- In the Name field, enter a name for the operation. This name will be shown to the user in the ContentCreator.
- (Un-)select tags for each assistant or custom script or module action in which a user should be able to use this operation.
- Optional: Create a new custom tag in the Tags input line.
→ The operation is directly assigned to the newly created tag. - In the Prompt field, enter your prompt.
|
For more information on how to write a successful prompt take a look at the starter pack and prompting hints. |
- Optional: Select This operation requires textual context to be performed if your prompt uses input text.
- Optional: Select one or more options to complement your prompt by checking the respective boxes in the Options tab.
- Optional: Activate one or more functions that can be used during the execution of the operation. Functions are provided by configured function servers, e.g., MCP servers, and allow the integration of external content in AI-based content creation.
- Optional: Test your prompt.
- Optional: Use the Move Up and Move Down button or Drag&Drop to move operations. This represents the order the end user sees in the ContentCreator.
- Click OK to save your changes.
→ Your prompt appears in the list marked as Global in the Source column.
Activation of a function for an operation
To allow the use of a function of a configured server, e.g., an MCP server, for an operation, you must enable it for the operation:
- In the window where you define a new operation, open the Function Calling tab.
- Click Add.
- Specify Plugin, Server, and Function.
- Click OK to save the change.
Testing a prompt
- Select a prompt and click Edit.
→ A new window opens. - Click Test.
→ A new window opens.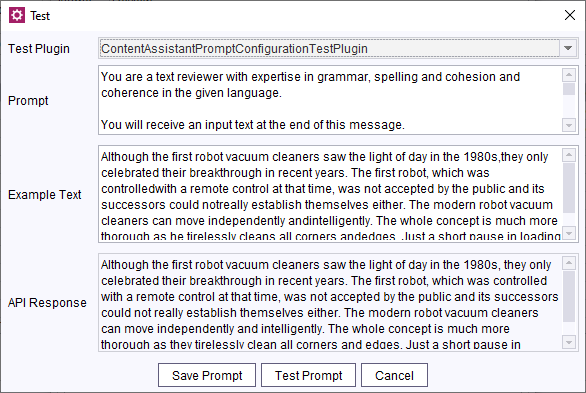
- Choose a Test Plugin to test your prompt in a specific environment, e.g. ContentAssistantPromptConfigurationTestPlugin to test your prompt for use in the Content Assistant.
→ The text in the Example Text field changes depending on the Test Plugin you have chosen. - Optional: Edit the text in the Example Text field to better match your envisioned use case.
- Click Test Prompt.
→ Based on your prompt and the provided example text, the generated text is streamed in in the API Response field. - Optional: Edit your prompt in the Prompt field if the response was unsatisfactory and test it again.
- Click Save Prompt.
Adding an option
- In the Options tab, click Add.
→ A new window opens.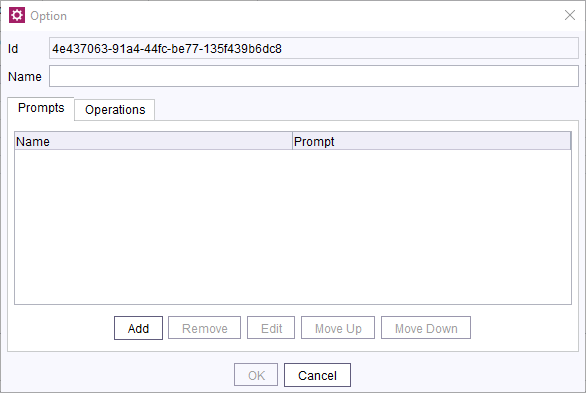
|
Use the ID shown in the window to reference this specific option in a custom script or module action. |
- In the Name field, enter a name for the option.
- In the Prompts tab, click Add to add an option value.
→ A new window opens.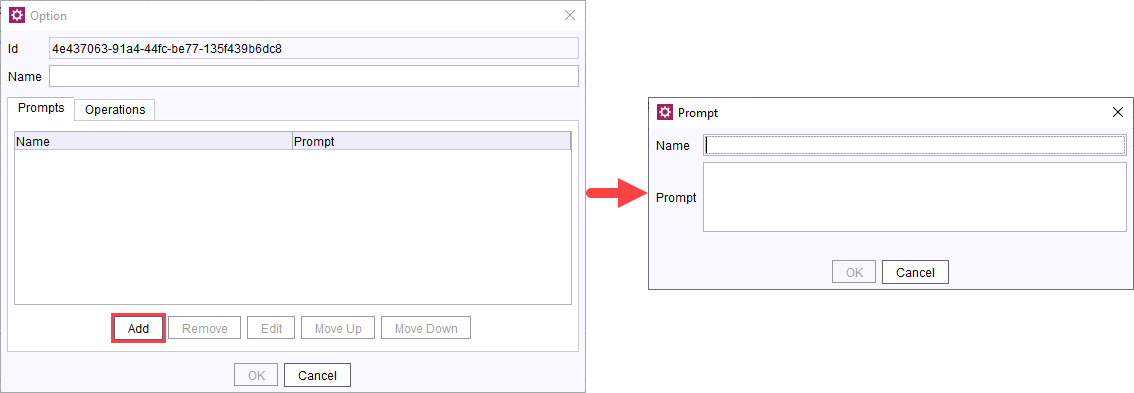
- In the Name field, enter the option value's name.
→ The user can select the value by this name in the option's dropdown in the Content Creator.
|
Use the name shown in the window to reference this specific option value in a custom script or module action |
- In the Prompt field, enter a value prompt.
- Click OK to save your changes.
- Create as many values as needed for the option.
- Optional: Use the Move Up and Move Down button or Drag&Drop to move option values. This represents the order the end user sees in the ContentCreator.
- In the Operations tab, select one or more checkboxes.
→ The option is connected with the selected operations. - Click OK to save your changes.
Duplicating an operation or option
- In the Operations or Options tab, select an entry and click Duplicate.
→ The entry is copied and saved on your current level. - Optional: If the duplicated operation is combined with options:
In the pop-up, select Duplicate if the options that are combined with the operation should also be duplicated. Select Reference if the already existing options should be combined with the duplicated operation. - Optional: Adjust the prompt or other settings of the duplicated operation or option.
Adding a tag
Create a custom tag to assign operations to custom scripts or module actions.
- In the Tags tab, click Add.
→ A new window opens.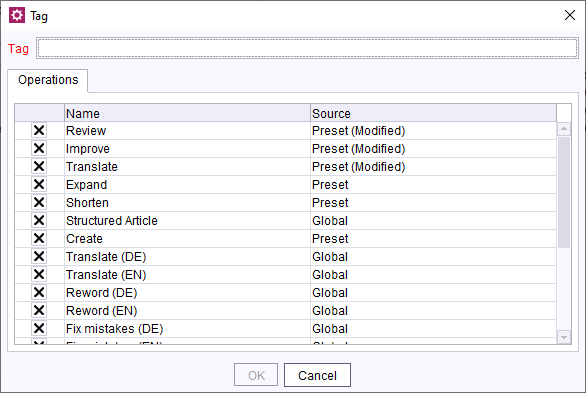
- In the Tag field, add a name, e.g. MyCustomAssistant.
- In the Operations tab, (un-)select operations for your custom tag.
- Click OK to save your changes.
→ Your custom tag appears in the list and is not marked as default.
Assigning a tag to multiple operations
- In the Tags tab, select an existing tag.
- Click Edit.
→ A new window opens. - (Un-)Select operations for the tag.
- Click OK to save your changes.
Shared prompts
Shared prompts are available in all projects on a given server. Unlike global prompts, you can also edit shared prompts in any individual project's configuration.
While global operations and options are also visible in the Shared Prompts tab, you can only modify the prompt itself in the Global Prompts tab. You can customize tags for global prompts also in the Shared Prompts tab.
Managing shared operations, options, and tags is identical to managing global prompts:
- Adding an operation
- Activating a function for an operation
- Testing a prompt
- Adding an option
- Duplicating an operation or option
- Assigning a tag to multiple operations
- Adding a tag
|
Any operation, option, or tag you add in the Shared Prompts tab will be marked as Shared in the Source column. |
FirstSpirit AI Configuration ProjectApp
To configure prompts in the FirstSpirit AI Configuration ProjectApp:
- Navigate to the project's Project components.
ServerManager > Project > Properties > [Project selection] > Project components - Select FirstSpirit AI Configuration ProjectApp.
- Click Configure.
→ A new window opens.
Project prompts
Project prompts are specific to individual projects and can only be added, edited, or deleted in the FirstSpirit AI Configuration ProjectApp.
Managing project operations, options, and tags is identical to managing global prompts:
- Adding an operation
- Activating a function for an operation
- Testing a prompt
- Adding an option
- Duplicating an operation or option
- Assigning a tag to multiple operations
- Adding a tag
|
Any operation, option, or tag you add in the configuration window will be marked as Project in the Source column. |
Shared prompts
Additionally to managing projects prompts, you can also configure shared prompts as project admin at the project-level.
- In the configuration window, click Edit Shared Prompts.
→ A new Shared Prompts window opens.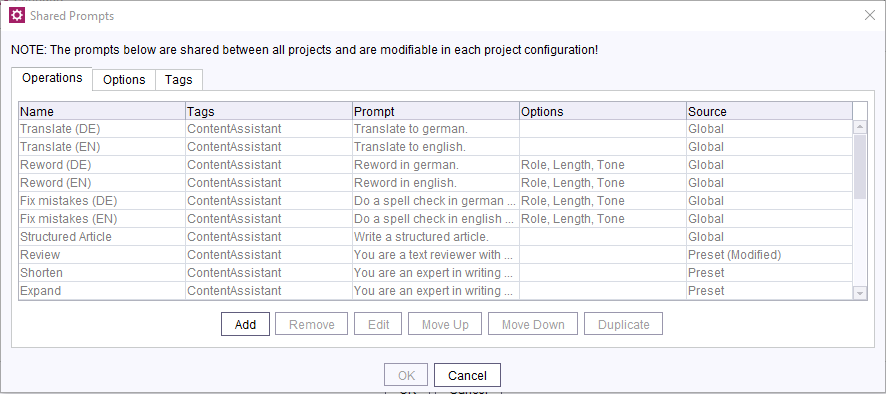
- Add, remove, edit, or duplicate a shared prompt.
- Click OK to save your changes.
→ Your changes are applied server-wide.