Start page / Templates (basics) / Composition of templates / Database schemata / Schema editor / Create foreign key
Creating a foreign key relationship
| Contents |
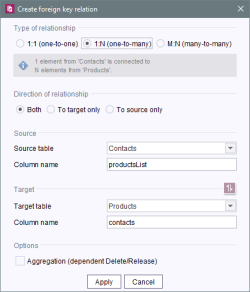
The process of creating a relationship will be explained using the example of the company database. We want to create a relationship between the tables called Products and Contacts: One contact person can be assigned to multiple products, i.e. they are in a 1:N relationship.
First of all, the Contacts and (while pressing the Shift key) Products tables have to be activated in Schema editor (activated tables change their frame color). Then, if the Create foreign key relation icon is selected, a window for defining the relationship appears:
Type of relationship
The radio buttons are used to define the nature of the relationship. The two tables should be in a 1:N relationship.
- 1:1 (one-to-one): A dataset of table A is connected to one dataset of table B.
- 1:N (one-to-many): A dataset of table A can be related to many datasets in table B, but a dataset of table B is never related to more than one dataset of table A.
- M:N (many-to-many): Each dataset of table A can be related to one or more datasets of table B.
Direction of relationship
These radio buttons specify the direction of the relationship.
- Both: A column is automatically inserted into both source and target tables such that datasets of each table may be accessed from the other table, respectively, in either direction.
- To target only: A column is automatically inserted into the source table such that datasets of the target table may be accessed from the source table. The field “Column name” associated with the target table (see below) is deactivated; access from the target table to the source table is not possible.
- To source only: A column is automatically inserted into the target table such that datasets of the source table may be accessed from the target table. The field “Column name” associated with the source table (see below) is deactivated; access from the source table to the target table is not possible.
Source / target
Source:
- Source table: This field specifies the table that serves as the starting point for the relationship (in our example: the Contacts table, which was the one we selected first). If necessary, another table from the schema can be selected via the combo box.
- Column name: This field contains a name for the column that is to be used to establish the relationship. The name is suggested by the system, but can be changed if necessary. This name will be subsequently used to track the datasets over the course of their relationships.
![]() The direction of a connection is assigned based on the order the tables are activated. The source and target table can be swapped in this dialog by using this icon.
The direction of a connection is assigned based on the order the tables are activated. The source and target table can be swapped in this dialog by using this icon.
Target:
- Target table: This field specifies the table to which the relationship leads (in our example: the Products table, which was the one we selected last). If necessary, another table from the schema can be selected via the combo box.
- Column name: This field contains a name for the column that is to be used to establish the relationship. The name is suggested by the system, but can be changed if necessary. This name will be subsequently used to track the datasets over the course of their relationships.
Options
Aggregation (dependent Delete/Release): If this option is checked, the deletion/release of a dataset also causes the linked dataset from the other table to be deleted/released at the same time.


