<VALIDATION/> Validating input components
A validation is a certain handling instruction that is executed as long as conditions defined within the <WITH/> section are not fulfilled (i.e., as long as the value determination "FALSE" is returned). A validation is defined within a <DO/> section.
In the process, the following applies for the definition of a validation:
- A validation can be optionally defined in a rule.
- A validation must always be assigned to a certain input component within a form. Within the validation, an internal <PROPERTY/> tag is thus always defined with the name of an input component and the attribute VALID.
- All the following handling instructions within the <VALIDATION/> section affect the input component defined there. If a <MESSAGE/> tag is therefore defined after the <PROPERTY/> tag, the corresponding message is displayed below this input component.
- Within a <DO/> section, several <VALIDATION/> sections can be defined for various input components. The “validity” of the input component referenced within the <VALIDATION/> section always results from the Boolean value defined through the value determination. If different properties of a form or input component are linked with each other, all properties affect the “validity” of this component (and not only the properties that belong to this component) (see the “Combined content check” example).
Negation
If the result of the value determination is a Boolean value, negation can be achieved for <VALIDATION/> via the <NOT/> tag.
Example:
<RULES>
   <RULE>
      <WITH>
        <PROPERTY name="EMPTY" source="st_headline"/>
      </WITH>
        <DO>
             <NOT>
              <VALIDATION scope="SAVE">
              <PROPERTY name="VALID" source="st_headline"/>
                <MESSAGE lang="*" text="The editor must not be empty!"/>
                <MESSAGE lang="DE" text="Der Editor darf nicht leer sein!"/>
              </VALIDATION>
                 </NOT>
        </DO>
   </RULE>
</RULES>
Example 1) Combined content check example
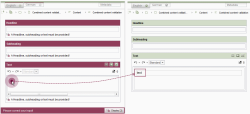
A form has three entry fields. The dynamic form should guarantee that at least one entry field has been filled by the editor during saving. For this purpose, each input component of the form is marked and given a note. As soon as the editor fills an input component, the markings and notes of all input components disappear and the form can be saved.
The value determination initially executes an empty check for each input component of the form (see the EMPTY property). These three conditions are linked with the logical <AND/> operator, which means that the condition of the rule is fulfilled only if all input components are empty (return "TRUE"). The negation is achieved by a surrounding <NOT/>.
The handling instructions within a validation are executed as long as the basic condition is not fulfilled; in this example, this is as long as all input components are empty. As soon as one input component of the form is filled, the value determination returns "TRUE" and the handling instruction within the validation is no longer executed.
<RULES>

    <RULE>
        <WITH>
            <NOT>
                <AND>
                    <PROPERTY source="st_headline" name="EMPTY"/>
                    <PROPERTY source="st_subheading" name="EMPTY"/>
                    <PROPERTY source="st_text" name="EMPTY"/>
                </AND>
            </NOT>
        </WITH>
        <DO>
            <VALIDATION scope="SAVE">
                <PROPERTY source="st_headline" name="VALID"/>
                <MESSAGE lang="*" text="A Headline, subheading or text must be provided!"/>
                <MESSAGE lang="DE" text="Eine Überschrift, eine Zwischenüberschrift oder ein Text muss erfasst werden!"/>
            </VALIDATION>
            <VALIDATION scope="SAVE">
                <PROPERTY source="st_subheading" name="VALID"/>
                <MESSAGE lang="*" text="A Headline, subheading or text must be provided!"/>
                <MESSAGE lang="DE" text="Eine Überschrift, eine Zwischenüberschrift oder ein Text muss erfasst werden!"/>
            </VALIDATION>
            <VALIDATION scope="SAVE">
                <PROPERTY source="st_text" name="VALID"/>
                <MESSAGE lang="*" text="A Headline, subheading or text must be provided!"/>
                <MESSAGE lang="DE" text="Eine Überschrift, eine Zwischenüberschrift oder ein Text muss erfasst werden!"/>
            </VALIDATION>
        </DO>
    </RULE>

</RULES>
Example 2): Checking an input component using multiple rules
For a text input component, it should be ensured that a maximum of 5 characters, whereby numbers are not permitted.
For the validation of this input component, two rules are defined here that generate four possible result variants depending on the content of the text field. The message texts themselves should only ever describe the actual problem in question:
- 0-5 characters, no numbers --> valid (without message text)
- More than 5 characters, no numbers --> invalid (“Maximum 5 characters permitted” message text)
- 1-5 characters, including at least one number --> invalid (“No number permitted” message text)
- More than 5 characters, including at least one number --> invalid (with both message texts)
In terms of validity, these each of these two rules defines its own value – different, where applicable – for the same input component, meaning they work separately from one another. Each rule can only ever affect the validity relating to the rule itself, and not the “final” validity status of the input component.
The actual validity (incl. the restriction level) is not determined by FirstSpirit until it can use the combination of the VALID properties determined for each rule. If, for example, the TRUE property is set to FALSE in only one of these rules, the input component will in any event be regarded as invalid; it is irrelevant whether or no the VALID property has been set to TRUE in the context of other rules.
<RULES>
  <RULE>
   <WITH>
    <LESS_THAN>
     <PROPERTY name="LENGTH" source="st_text"/>
     <NUMBER>6</NUMBER>
    </LESS_THAN>
   </WITH>
   <DO>
    <VALIDATION scope="SAVE">
     <PROPERTY name="VALID" source="st_text"/>
     <MESSAGE lang="*" text="Maximum 5 characters permitted"/>
    </VALIDATION>
   </DO>
  </RULE>
  <RULE>
   <WITH>
    <NOT>
     <MATCHES regex=".*[0-9].*">
      <PROPERTY name="VALUE" source="st_text"/>
     </MATCHES>
    </NOT>
   </WITH>
   <DO>
    <VALIDATION scope="SAVE">
     <PROPERTY name="VALID" source="st_text"/>
     <MESSAGE lang="*" text="No number permitted"/>
    </VALIDATION>
   </DO>
  </RULE>
</RULES>
The advantage of splitting the validation into individual aspects is for example that simpler rules and more precise message texts can be used.
Rules in combination with default and fall-back values (form preview)
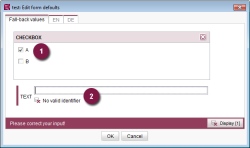
An input component is preassigned with a value (e.g., with a date or a particular selection) via the “Default values” dialog in the template store. To this end, the edit mode for the template is activated, the dialog for editing the default values is opened and the default or fall-back value for the required input component is entered. When the template is saved, the defined value is saved as a default or fall-back value for this component (see the information on working with default values).
It must always be possible to (partially) preassign default and fall-back values to a form. This means that rules which would usually prevent a form being saved will not be applied in this particular case. If a rule states, for example, that a mandatory field (2) in the form must be filled, this rule violation will be shown in the “Default values” dialog, but it will not prevent the form being saved (and, therefore, the default values given in (1)).


