LiveEdit
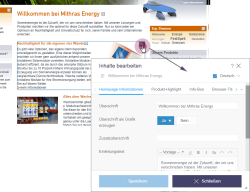
In LiveEdit mode, it is possible to edit content directly on a page that has already been deployed (e.g., an intranet page).
For this purpose, the  edit icon is displayed (similar to EasyEdit) so that the editor can change text very quickly and more directly, or even upload images. Clicking the relevant icon opens the corresponding form for modifying the content.
Use in a project
The LiveEdit icons are displayed in the same way as the EasyEdit icons and on the basis of the same editorIds. For more information, see also the Use in a project and editorId() pages.
In addition, the following code has to be inserted in the required template set tab of the relevant page template(s):
<script src="http://[SERVER]:[PORT]/fs5webedit/live/api.jsp?project=[XYZ]" language="JavaScript" type="text/javascript"></script>
Here, [SERVER] is the placeholder for the name of the FirstSpirit server and [PORT] is the placeholder for the relevant port.
The project number or $CMS_VALUE(#global.project.id)$ should be entered in place of [XYZ] (for more information on #global.project.id, see the preview-based #global calls page).
The editorIds required for LiveEdit are created in the preview by default. To enable the use of LiveEdit in a generated state, the feature for creating the editorIds via the #global.forceEditorIds system object can be specifically enabled, e.g., via the following call:
$CMS_SET(#global.forceEditorIds, true)$
(For more information on #global.forceEditorIds, see also the preview-based #global calls page.)
The following method can be used to deactivate the highlighting:
window.ContentCreator.setEnabled(boolean)
Thus, a corresponding call in the relevant channel might look something like this:
<script type="text/javascript">
            window.onContentCreatorLoad = function()
                {
                window.ContentCreator.setEnabled(false);
                };
</script>
Configuring a workflow
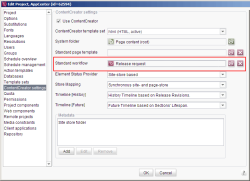
Before changes can actually be released and deployed, a corresponding workflow must be present in FirstSpirit ServerManager (“Project properties, ContentCreator, Standard workflow”, see figure).
Alternatively, the workflow parameter can be used to specify the ID of the workflow that is to be executed on saving, e.g.:
<script src="http://SERVER:PORT/fs5webedit/live/api.jsp?project=$CMS_VALUE(#global.project.id)$&workflow=ID" ...>
Here, ID is the ID of the project workflow required (select (Alt+P on the workflow node or the “Extras – Display properties”context menu).
Once the changes to the pages, sections, or datasets have been saved (with the “Save” button), another window for starting the workflow appears. As a result, the modified content can be released and deployed.


