Step 2) Importing project content (via External Synchronization)
From the file system into the FirstSpirit project
| Table of contents |
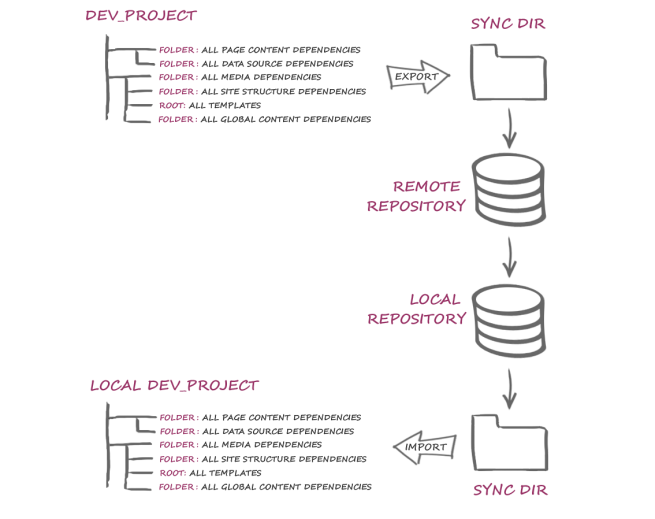
In this step, External Synchronization is used to:
- import the development state from the local External Sync directory (local repository) in the file system into the local FirstSpirit project instance.
The command line tool “FSDevTools” (fs-cli) is used for this process.
See figure Step 2) Import.
 |
We recommend performing all export and import actions using FSDevTools. This tool uses pre-defined commands to automatically import and export data between the FirstSpirit project and the file system. The interfaces therefore do not have to be implemented individually (see also The "FSDevTools" command line tool). |
Initial situation
What can be imported?
 |
In principle, only FirstSpirit content that stems from an export with External Synchronization can be imported. |
The following can be imported:
- Project content (objects): Content that is created and managed using SiteArchitect or ContentCreator. This includes templates, project structures, subtrees, and complete stores.
When exporting project content via External Synchronization, it is filed according to a defined structure in the file system (see Sync directory structure). The system attempts to duplicate the structures from the project using a file hierarchy in the file system. Further internal information is also exported to the FirstSpirit objects, e.g., via the storeelement.xml. This file contains information such as the FirstSpirit object’s ID, reference name, etc.
Using this information as a basis (folder hierarchy and internal meta-information), objects can be imported from the file system back into a FirstSpirit project.
Project content without this internal information cannot be imported!
Conventional image files (apart from a folder hierarchy and additional information) also cannot be imported out of the target directory and into a FirstSpirit project. - Project properties: Settings that are defined for a project using the ServerManager. These properties may be project-specific (“Project properties”) or global (“Server properties”) (e.g., languages).
For some projects (especially in the context of FirstSpirit CaaS), user-defined project properties (custom properties) can be defined. These properties can also be exported.
The following applies for all properties: If these properties (e.g., a certain language) are not available on a server, they are created on the server during the import process (as a server and project property). In this case, the technical user must possess the right permissions to create properties (see Importing project properties).
Preparation
The developer’s local repository has already been updated using the version control system (see 1) Update). During this process, the central development state was transferred out of the remote repository. The project content and, if applicable, project properties are in the Sync directory (file system) and ready for import.
Starting the command line tool (fs-cli)
The command line is opened in the “bin” directory (in the FSDevTools installation directory). All instructions issued via the command line start with the call fs-cli and a corresponding instruction.
D:\fs-cli\bin>fs-cli [command]
Establishing a connection to FirstSpirit (fs-cli)
To establish a connection to the (local) FirstSpirit server and the (local) project, the corresponding parameters (for host -h, Port-port, project name -p, user name -u, and password -pwd) are transferred, e.g.:
-h example.com.de -port 4242 -c HTTP -p "DevProject" -u userA -pwd mypwd
Optionally the parameter -sz can be transferred to specify a servlet zone.
To establish a connection to the file system, the path to the target folder -sd in the (local) file system also has to be specified, e.g.: -sd D:/Git/DevProject
You also have the option of testing the connection using the call test, whereby the placeholder [connection_parameters] has to be replaced with the project-specific connection settings:
D:\fs-cli\bin>fs-cli [connection_parameters] test
Log output if the test is successful:
#########
Test was successful
#########
User: userA
Host: example.com
Port: 4242
Servlet zone: null
Connection Mode: HTTP
Project: DevProject
Connection to FirstSpirit closed!
Execution time: 10.591s
Importing
Importing project content (fs-cli)
In the next step, the current state is imported out of the local file system and into the local FirstSpirit project instance (see figure “Importing”).
The import process is launched with the command import, whereby the placeholder [connection_parameters] has to be replaced with the project-specific values:
D:\fs-cli\bin>fs-cli [connection_parameters] import
The content of the entire Sync folder is imported during the import process!
Within the project
- new objects are created
- existing objects are modified
- existing objects are moved
- existing objects are removed
 |
An import does not always mean that FirstSpirit objects or project properties are modified or added. An import process may also delete content from the project. |
The following applies for imported project content: If an object is exported to an external directory and then re-imported (into a different FirstSpirit project), the version history only receives the corresponding add or import actions, but not the entire version history of the object from the source project.
 |
Notes on conflict handling: If multiple developers are editing elements at the same time, conflicts may occur when importing data into the project and these conflicts may not be detected at VCS level (e.g., namespace conflicts in FirstSpirit). Potential conflicts and solution strategies are described under Conflict handling. |
Help function (fs-cli)
Further project-specific settings for the import process can be viewed using the FSDevTools’ help function:
D:\fs-cli\bin>fs-cli help import
Recommendations for imports
Distributed development is based on a foundation of one central FirstSpirit instance (or a central repository), which collects the modified artifacts of all developers (see figure below “Dev_Project”, “Remote-Repository”). The export provided from this project must be complete and all dependencies between the individual exported objects must be taken into account (see Recommendations for exports).
The import process for FirstSpirit project contents using External Synchronization must also be complete and must follow clearly defined processes where possible.
Specific recommendations:
- All FirstSpirit project instances involved (local target projects, central source project) should use identical settings (number of languages, etc.) (see Recommendations for imports (settings)).
- All FirstSpirit project instances involved should have a standardized structure (see Project structure).
- The import should always be complete (do not import stores or objects individually).
This helps to prevent problems resulting from incomplete project contents (in local development environments), and, as a result, conflicts.
Importing database content (fs-cli)
When using FSDevTools to import a database schema into a project (which does not yet contain the schema to be imported), you will be required to enter a database layer. The parameter {-lm | --layerMapping} is used to configure the required layer during the import, e.g., via:
D:\fs-cli\bin>fs-cli import -lm *:CREATE_NEW
During this process (example above), the standard database (Derby) provided with FirstSpirit is activated for the project.
If the schema is already in the project (into which data is being imported), information on layer mapping is not required.
Further configuration options can be viewed using the help function for FSDevTools (see “Examples”).
Log output if mapping configuration is unavailable:
Importing...
Layer mapping is empty!
getLayer() with context -> schema: Products
Closing connection to FirstSpirit ...
(...)
Missing mapping for source layer 'null'!
Please specify a layer mapping.
For more information type 'fs-cli help import'.
Log output if mapping configuration is successful:
Importing...
Layer mapping: *:CREATE_NEW
Create a default derby layer 'derby_project48910_0' for project
Import operation successful
Import done.
The assignment information is kept for subsequent import actions.
Importing project properties (fs-cli)
In addition to the project content that is entered in SiteArchitect and/or ContentCreator, project properties can also be exported/imported using External Synchronization, even across servers. This method can be used, for example, to transfer the properties of a project (such as language settings and resolutions) to an empty project as well as to synchronize the project configuration of multiple projects.
Some project properties are dependent on server properties, e.g., users, groups, schedules, etc. These dependencies are automatically taken into account.
 |
The permissions of a project administrator are a minimum requirement for importing and exporting project properties; server administrator permissions are required to import server properties. |
Recommendations for imports (settings)
 |
All of the developers and systems involved in the project must used standardized settings. This means that the local projects must have a standardized structure and identical project settings! |
Why is this important? An example:
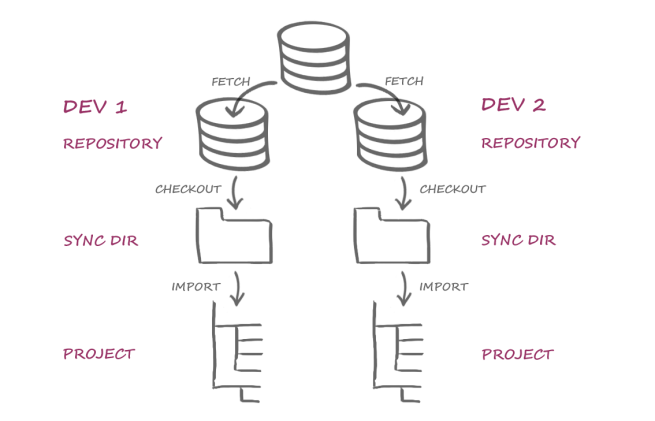
In a distributed development environment, multiple developers work on one FirstSpirit project. Using a version control system, the modified project contents and settings are distributed across multiple systems, e.g.
- in additional local development environments (“Development”)
- on a test system (“Test”)
- on a productive system (“Productive”)
If, for example, the individual systems have a different number of languages in this scenario, this will always lead to conflicts if the project property projectproperty:LANGUAGES is also transported via External Synchronization (in other words, as part of the export or import action).
In this case, a “Check-in / Export” from the development system (number of languages: 2) into the VCS and then a “Check-out / Import” into the test system (number of languages: 10) leads to content being removed for the 8 languages not included.
Next steps
Editing project content
After a successful import, the project content can be edited in the local development environment.
Continue with Step 3) Modification.


